I am an Australian based Mother of three and Scientist (PhD), inspiring creative kids and fun parents, families and educators. I post bright, colourful and fun learning and craft activities on my Instagram page @cintaandco. It’s called Cinta & Co. as my family and friends call me Cinta – short for Jacinta, and my kids are my Co. – you will often see their little hands hard at work in the photos that I post.
I love this pretty flower activity! It’s super easy and inexpensive to put together, but resulted in so much fun and learning for my girls!
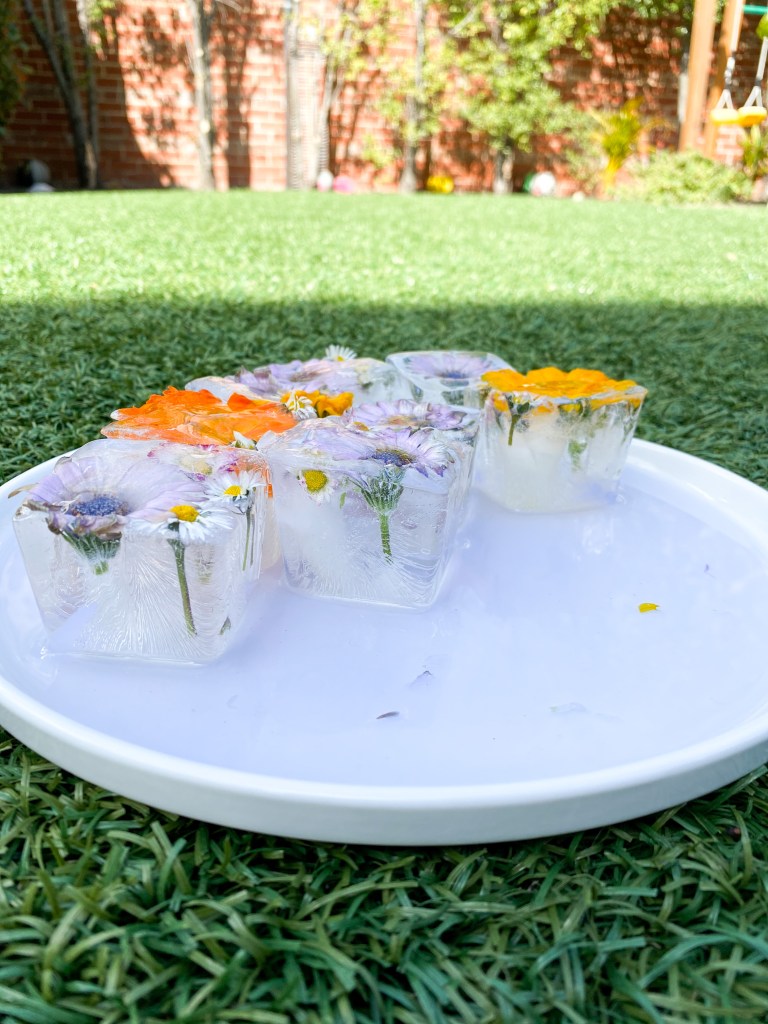
A couple of weeks ago we went for a walk together around our neighborhood, picking flowers that were growing on the nature strips – we didn’t pick any flowers from peoples gardens! It was actually nearing the end of winter, so we were really surprised to find so many beautiful, bright colored flowers growing.
Once we were home, we placed the flowers into an over sized ice cube tray, filled the tray with water and popped them into the freezer. To be totally honest, that’s where they sat for the next couple of weeks! But, we finally pulled them out yesterday and had the best time with them.
We used solutions of warm water (with a small amount of purple food dye added) and salt to melt the blocks. We talked about melting points and the patterns that we could make in the ice with the salt. We also noted how the flowers looked different on thawing than they did before we froze them! All great scientific observations.
Advertisements
Here is what you will need:
Flowers
Ice cube tray
Water
Plastic pipettes or squeeze bottles
Salt
Food coloring
Advertisements
Here is what you will need to do:
1. Pick some flowers. You might find these in your garden or in your neighborhood. Remember that if you are going to walk your neighborhood, make sure that an adult is present and that you watch for traffic when crossing roads.
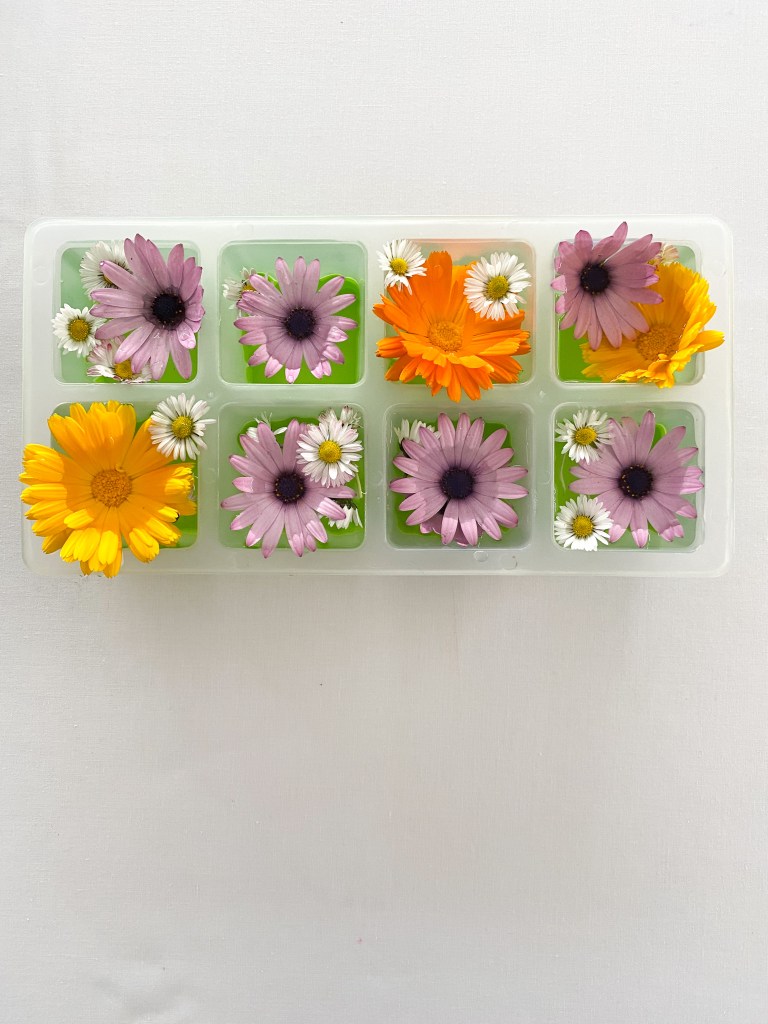
2. Place your flowers into the ice cube tray.
3. Fill the tray with water. You will notice that the flowers float to the top of the ice cube tray wells.
Advertisements
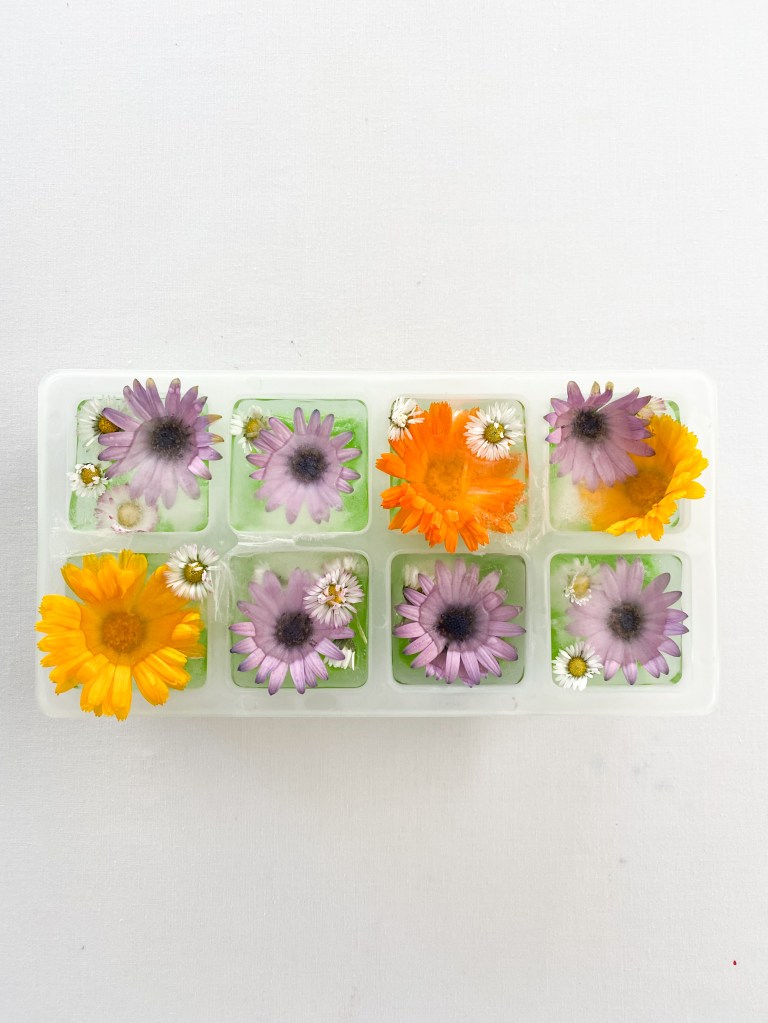
4. Pop the ice cube tray into the freezer. It will probably take overnight to freeze – especially if you are using similar trays to ours.
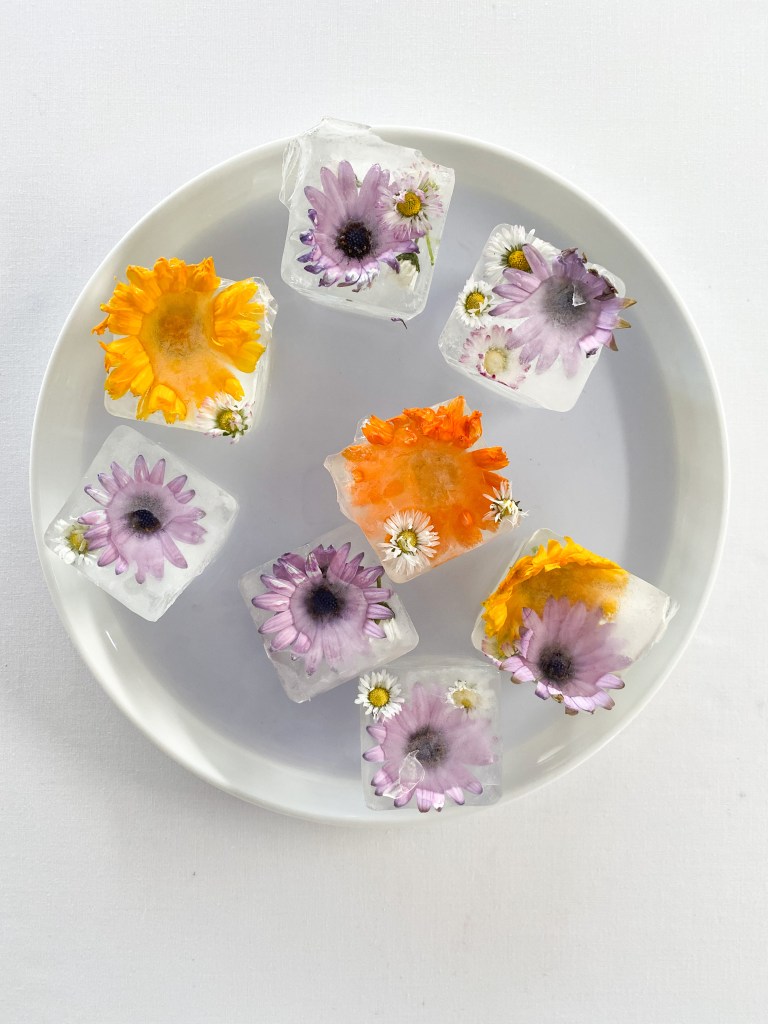
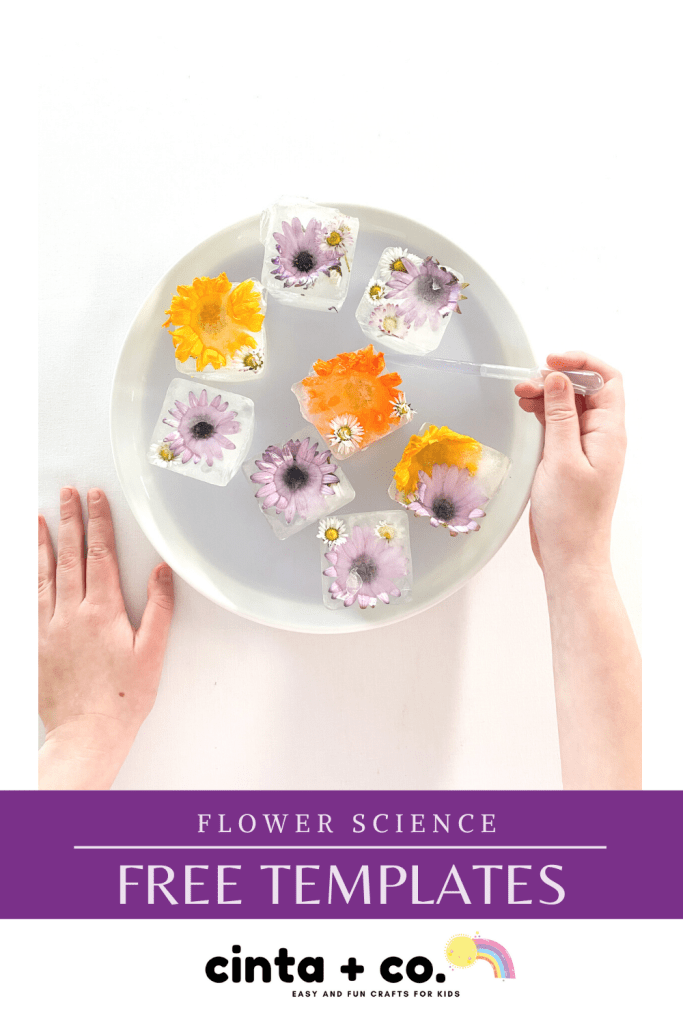
5. Place the frozen blocks onto a tray. Pour a small amount of warm water into the tray. We colored our water with a drop of purple food dye.
6. Take your pipette and drop the water over the ice blocks. Keep dropping until you see your ice blocks start to disappear. You can also sprinkle some salt over the ice blocks to speed up the thawing process.
7. If you don’t have a plastic pipette, you can also use squeeze or spray bottles to transfer the water. It’s totally up to you!
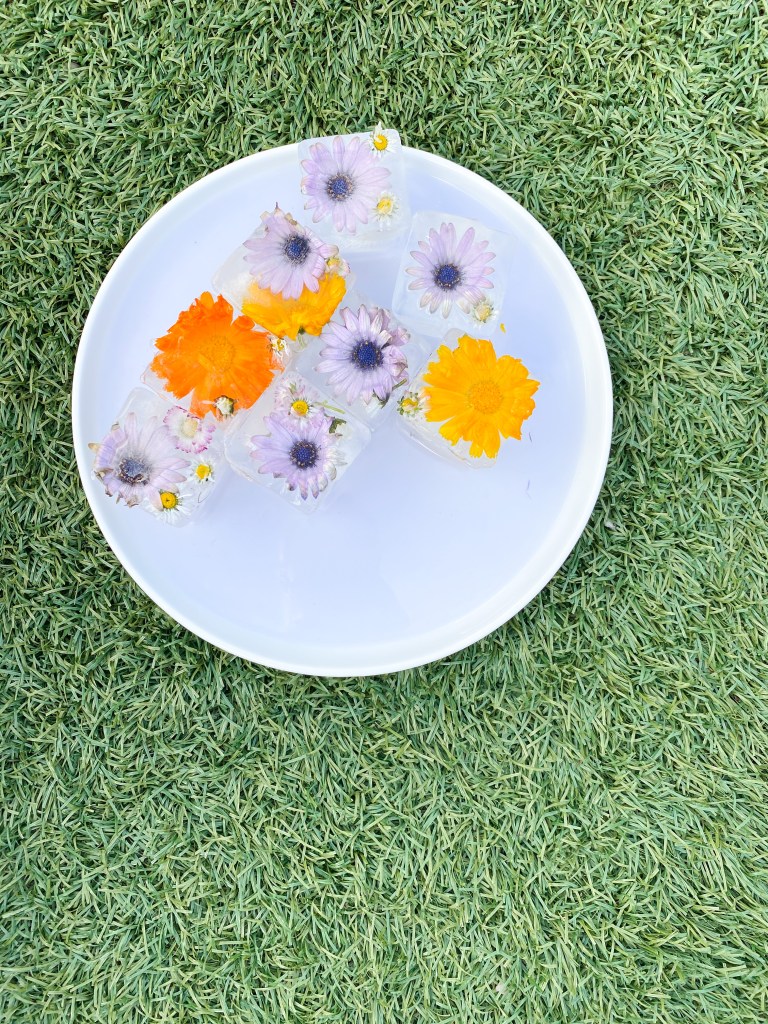
8. And this activity is a fun one to do outside! Take your tray out into a warm sunny spot and experiment further. This also makes clean up simple!
Advertisements
The Science:
Have you ever wondered why salt makes ice melt faster? The answer is actually really simple. Salt lowers the melting point of the water, meaning it will thaw at a lower temperature. The more salt that you add, the faster the ice will melt.
Thank you so much for reading! If you have any questions pop them in the comments section below. Jacinta Xx
Advertisements
Advertisements
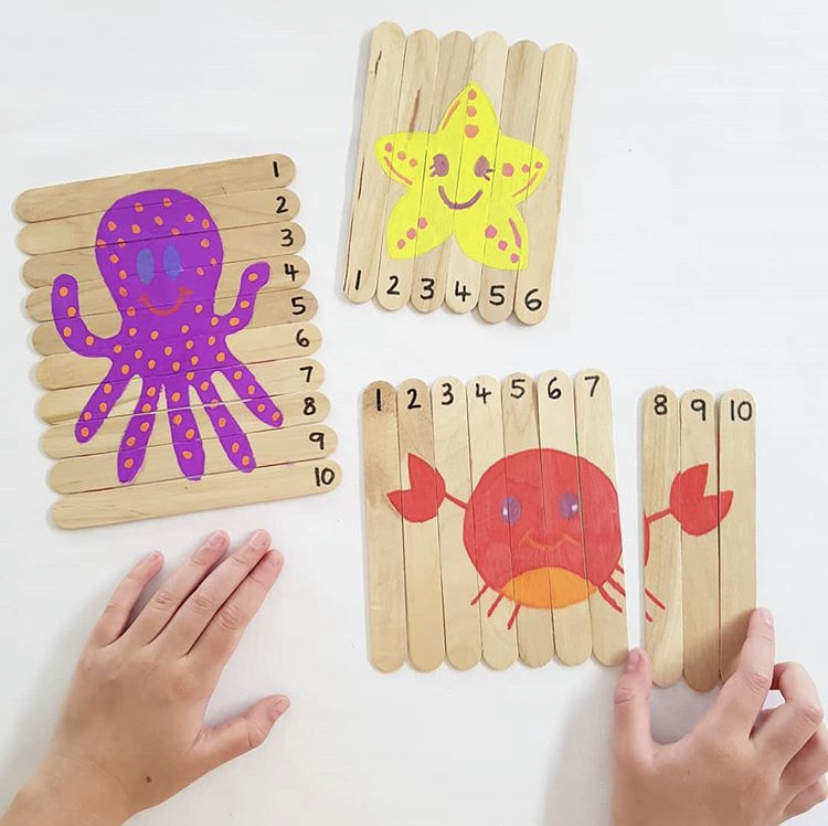
Here is a fun FREE printable for you! It is a fun number matching game.
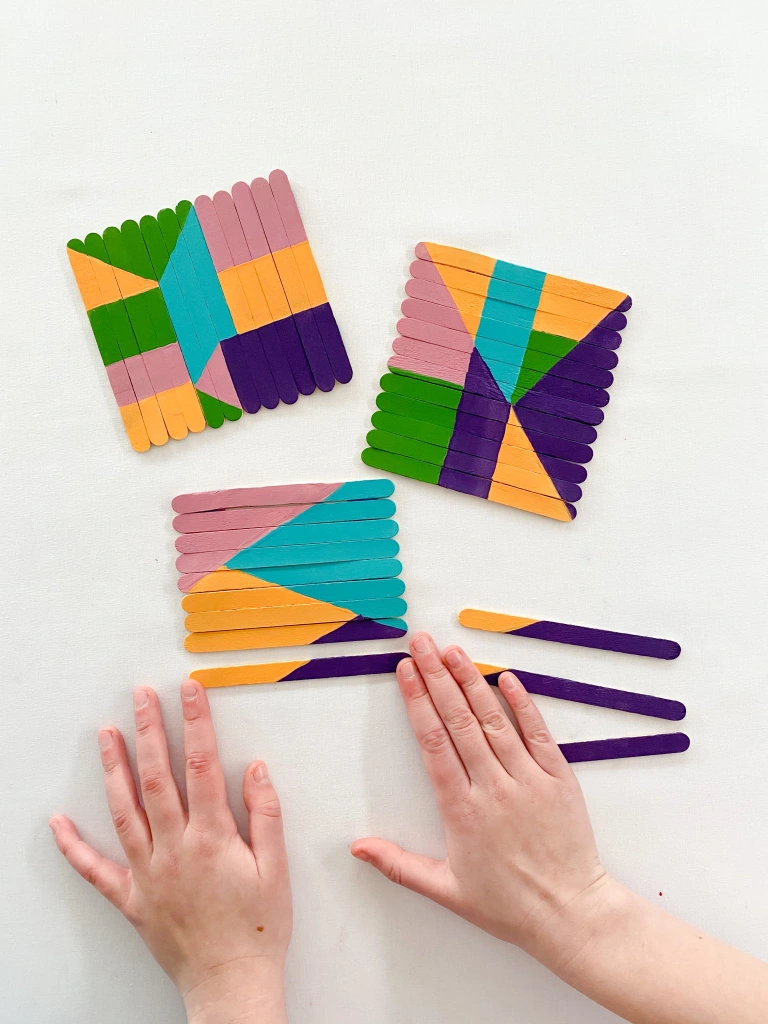
If you flick through my Instagram account you will notice that we love making our own puzzles, especially from craft sticks (do you call them craft sticks or popsicle sticks? Here in Australia we call them craft sticks!).
Craft stick puzzles are super easy and affordable to make. You can decorate them any way that you like too. You can paint them, color with marker pens or even use them as a base to collage on. Once the paint is dry, simply pop them in a snap lock bag, take them on holidays and road trips, and play with them over and over. You will never be bored again!
Another neat thing about craft stick puzzles is that they can be used as a fun way to practice number recognition and order. You can label each craft stick with a number (or even letters) and then put your puzzle pieces together in order. Lining up the puzzle pieces and manipulating them into place is also great fine motor skill practice!
Here are some of my most favorite craft stick puzzles that we have made.
Advertisements
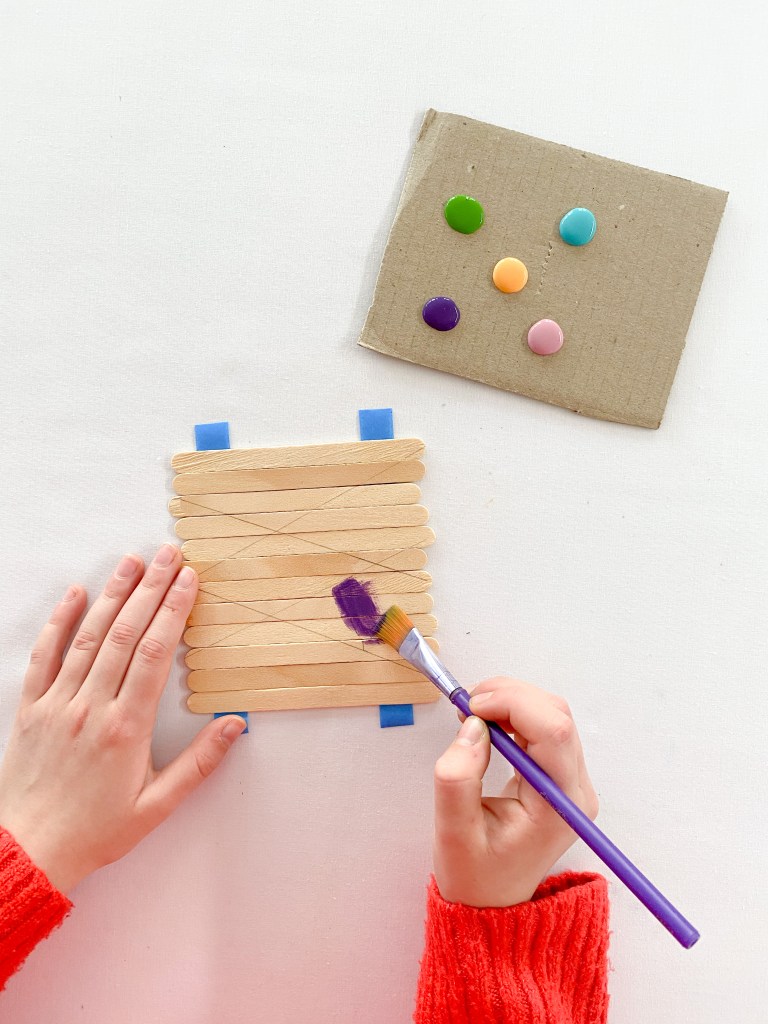
Keep reading to find out how to make our recently published geometric craft stick puzzles.
Here is what you will need:
Craft sticks
Washi tape
Pencil
Ruler
Black marker pen
Paint or marker pens
Advertisements
Here is what you will need to do:
Line 12 craft sticks up in a row. Secure the sticks in place with two strips of washi tape.
2. At this point, you may like to label each stick with a number. You can label either the front or the back of the sticks, depending on how hard you would like your puzzle to be.
3. Next, take a ruler and a pencil and rule geometric lines across your puzzle. If you do not want to make a geometric puzzle, that’s fine, at this point simply draw the picture that you would like.
Advertisements
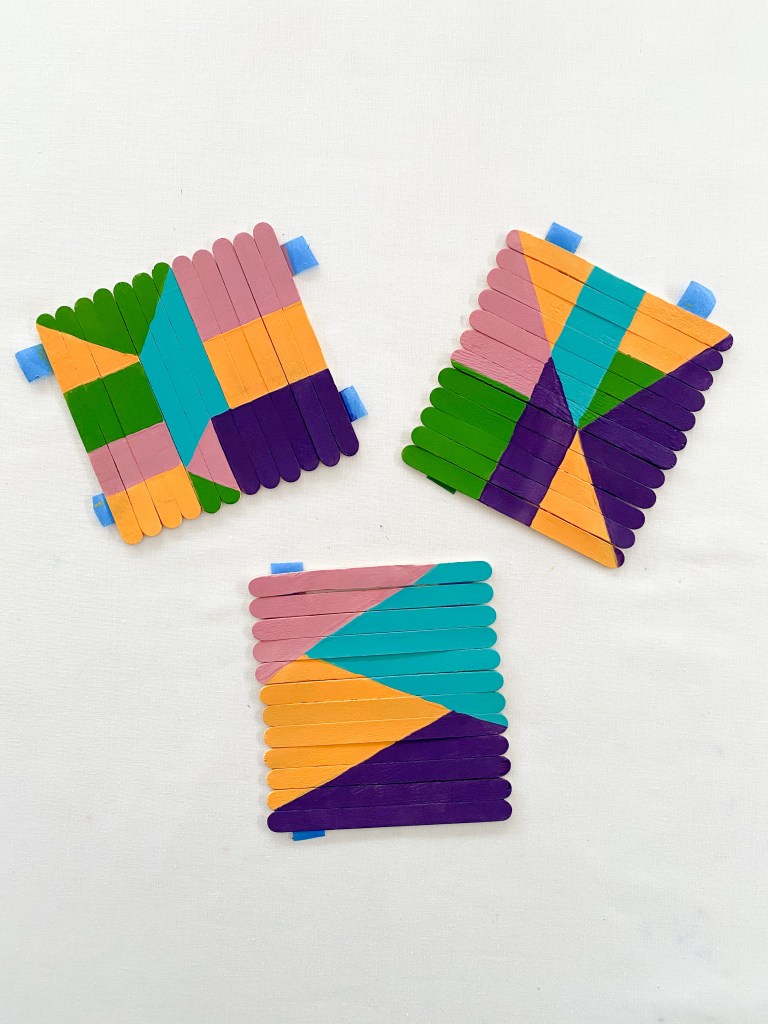
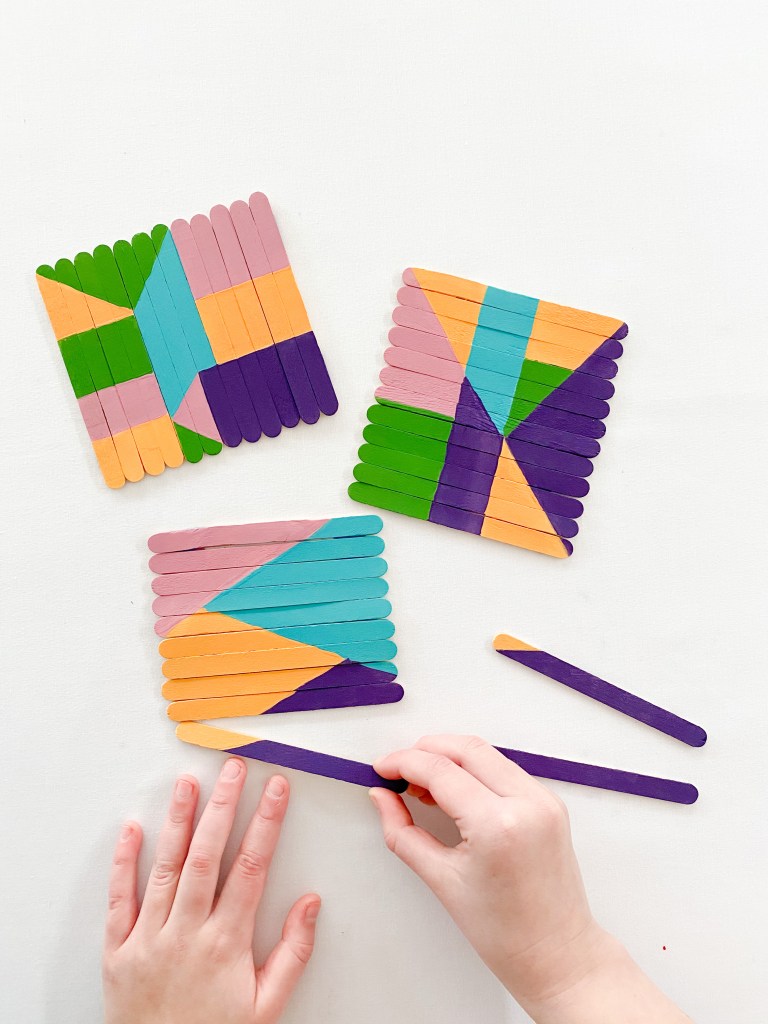
4. Paint (or color) your puzzle pieces. Allow the paint to dry completely.
5. Flip your puzzle over carefully and remove the washi tape.
6. Piece your puzzle back together.
And that’s it! It is so easy to make these puzzles, and the neat thing is, that once you have made them, you can use them over and over again. Just store your pieces in a snap lock bag or a small container whilst not in use! That way you won’t loose any pieces!
Thanks again for reading! Jacinta Xx
Advertisements
Here are some FREE printable paper puzzle files for you! Enjoy!
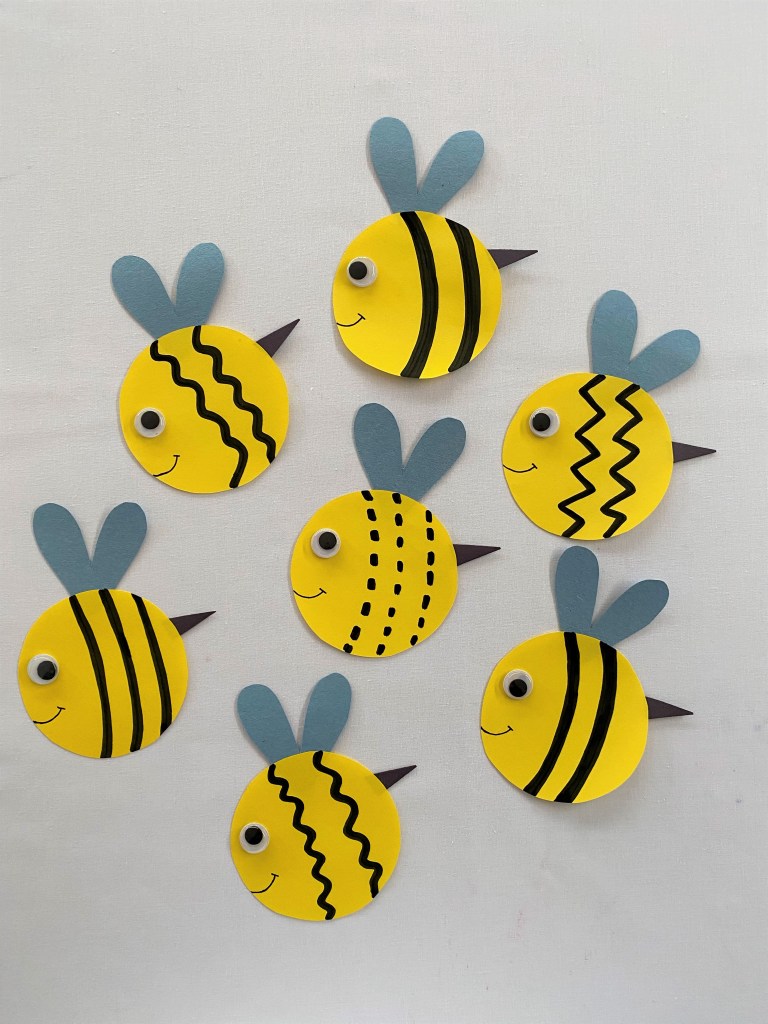
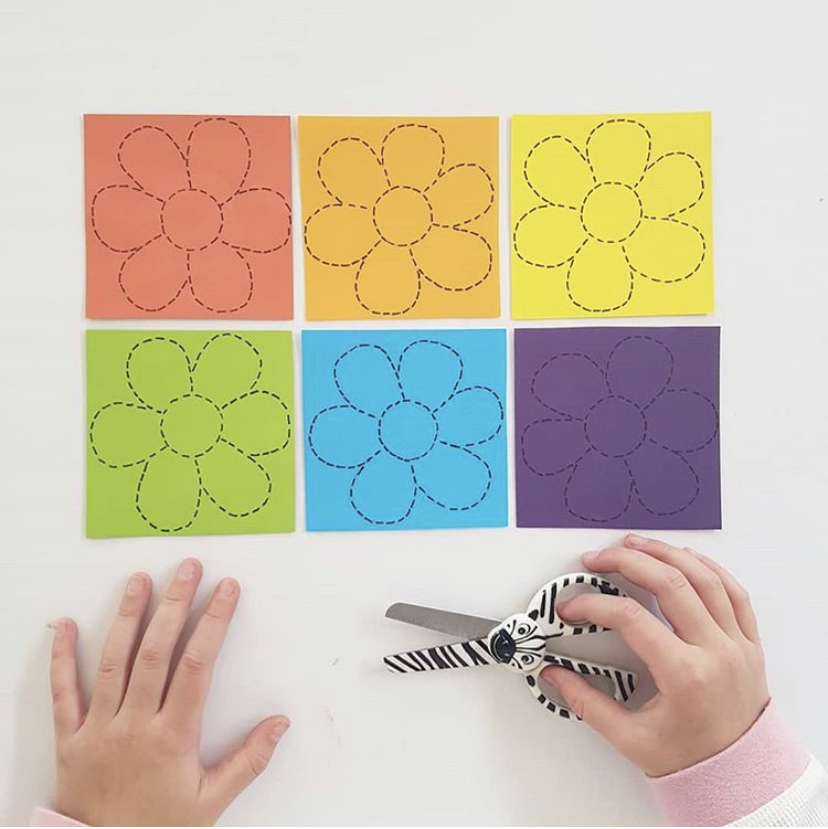
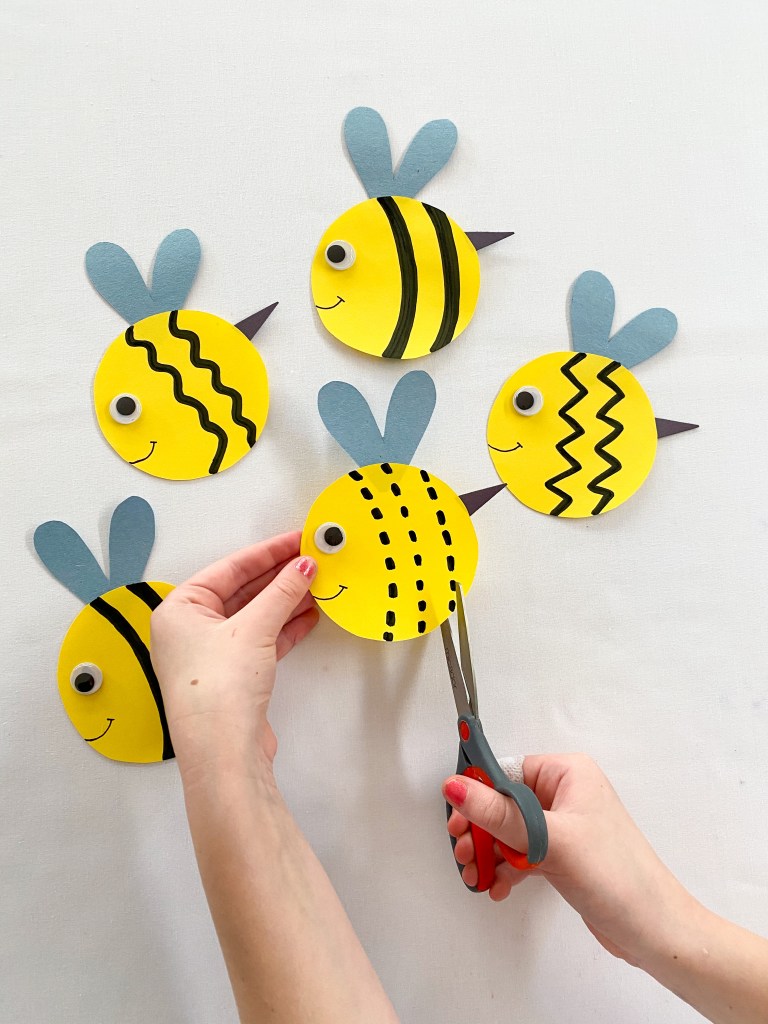
This scissor skill activity is one of my favorites. The bees are super easy to put together, and are a great tool for developing scissor skills in kids. And if you don’t like the idea of cutting through the adorable bees, I have included a FREE printable for you that doesn’t involve snipping through any of these cute little guys.
This is what you will need:
Colored construction paper
Pencil
Scissors
Glue stick or tape
Black marker pen
Googly eyes
!WARNING! Remember that scissors are sharp. Adults should always closely supervise children when they are using scissors.
This is what you will need to do:
1. Trace a circle shape onto the yellow paper with pencil. You might like to go on a shape hunt around your home to find the perfect size circle to trace. Think drinking glasses or cups, small containers and side plates.
2. Next, cut the circles out with scissors.
3. Cut some wings for your bees from light blue paper. I drew little heart shapes and then cut them out. While you have the scissors out, cut a small triangle shaped stinger from black paper.
4. Attach the wings and the stinger to the back of the bees with tape or glue.
5. Turn the bees over and draw line patterns on the bees with black marker pen. Try drawing dotted lines, zig-zag and curly lines. Finish your bees with a smiley face and glue down a googly eye.
6. Now you are ready to start cutting! Cut carefully along the lines with scissors.
If you don’t like the idea of cutting through the bees, here is another fun scissor skill activity for you.
And if you would like read to more about developing scissor skills in your children, have a look at the post I published a couple of days ago. There are so many ideas there for you. Thanks for reading! Jacinta Xx
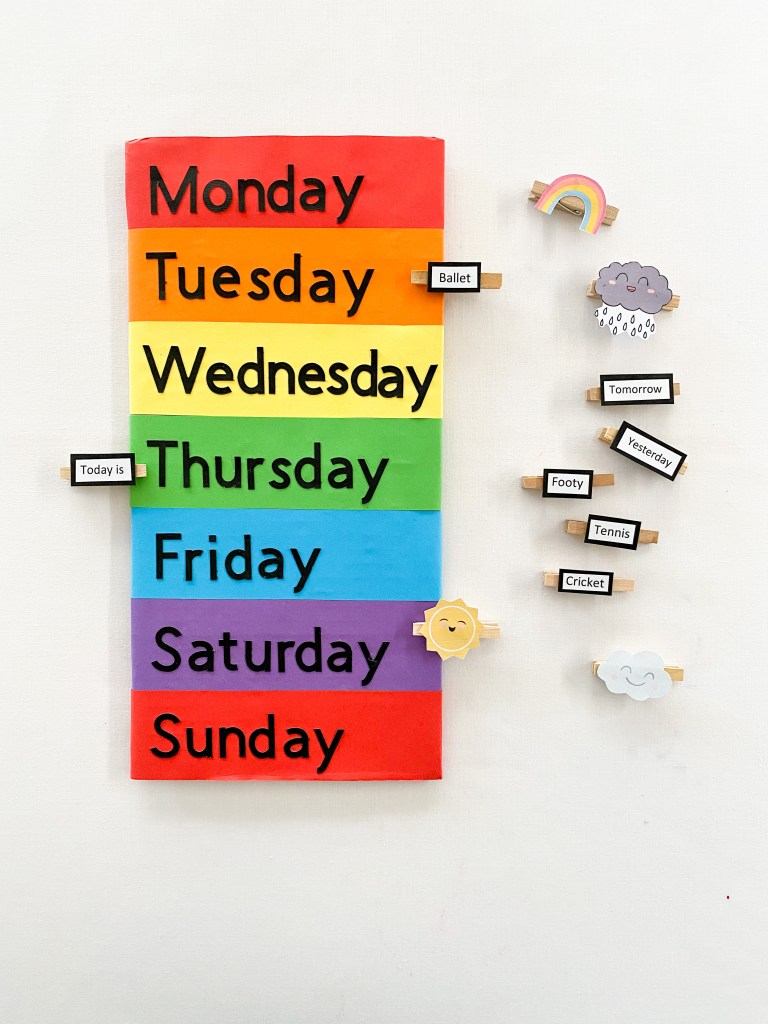
Remote learning this school term has meant that our days have started to blend into one another. As one of my friends said to me, “I put the bins out on Tuesday thinking it was Wednesday. Then had to go and find my phone later that day to see what day it actually was as the bins didn’t get emptied!” This made me laugh – and feel better that we had lost track of the days in lockdown too!
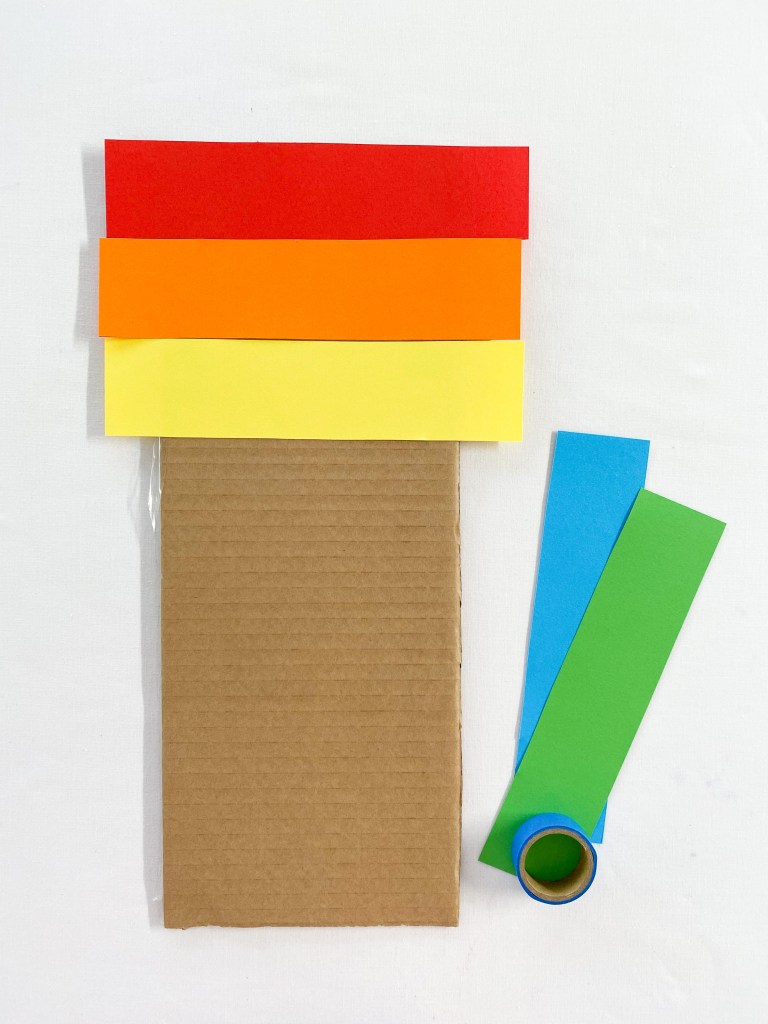
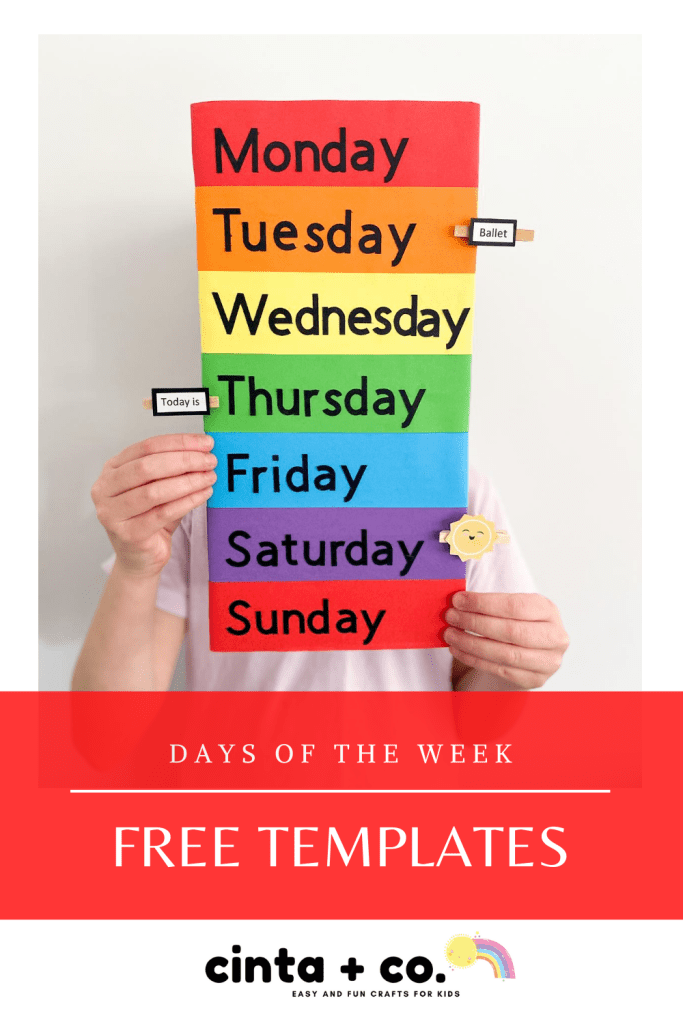
To help better keep track of our days, we turned a piece of recycled card into this colorful weekly calendar. These peg board calendars are super easy to put together, look amazing and because they are made from recycled card and paper, they are inexpensive to make. These calendars will help children learn the days of the week and their order, and you can also use them to keep track of after school activities and the weather.
Advertisements
This is what you will need:
Piece of recycled card
Strips of colored paper
Scissors
Glue stick
Tape
Black marker pen
Pegs
Printed labels and weather symbols
Small piece of black cardstock
Advertisements
This is what you will need to do:
1. Cut strips of colored paper. You will need seven equally sized strips of paper – one for each day of the week.
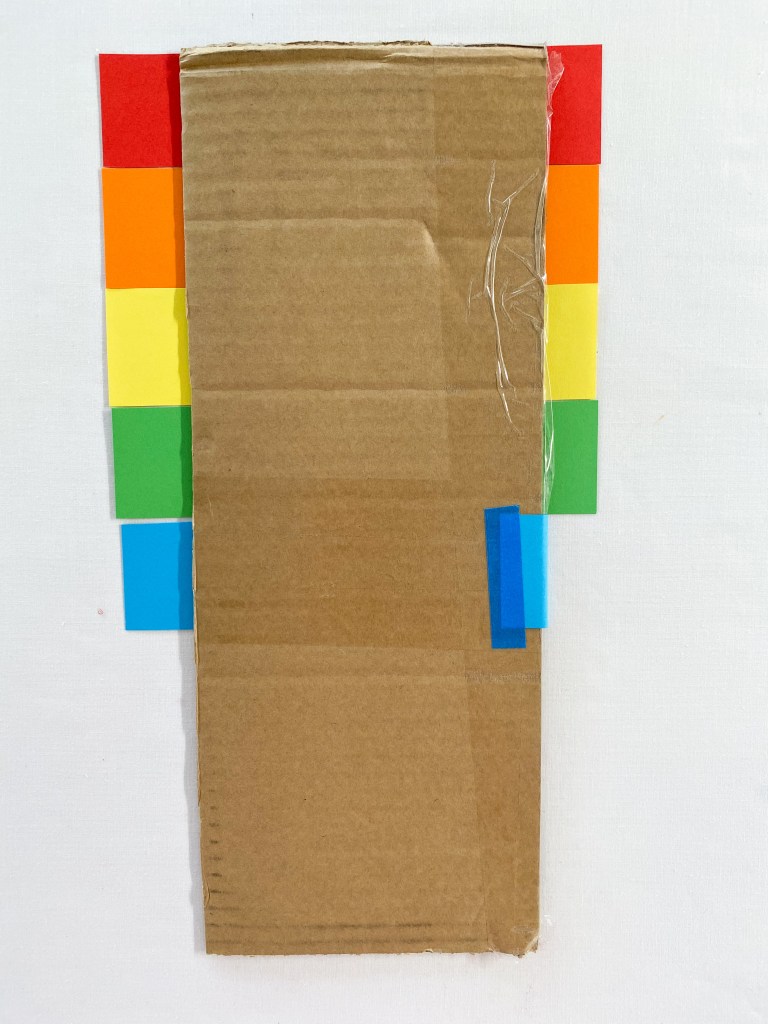
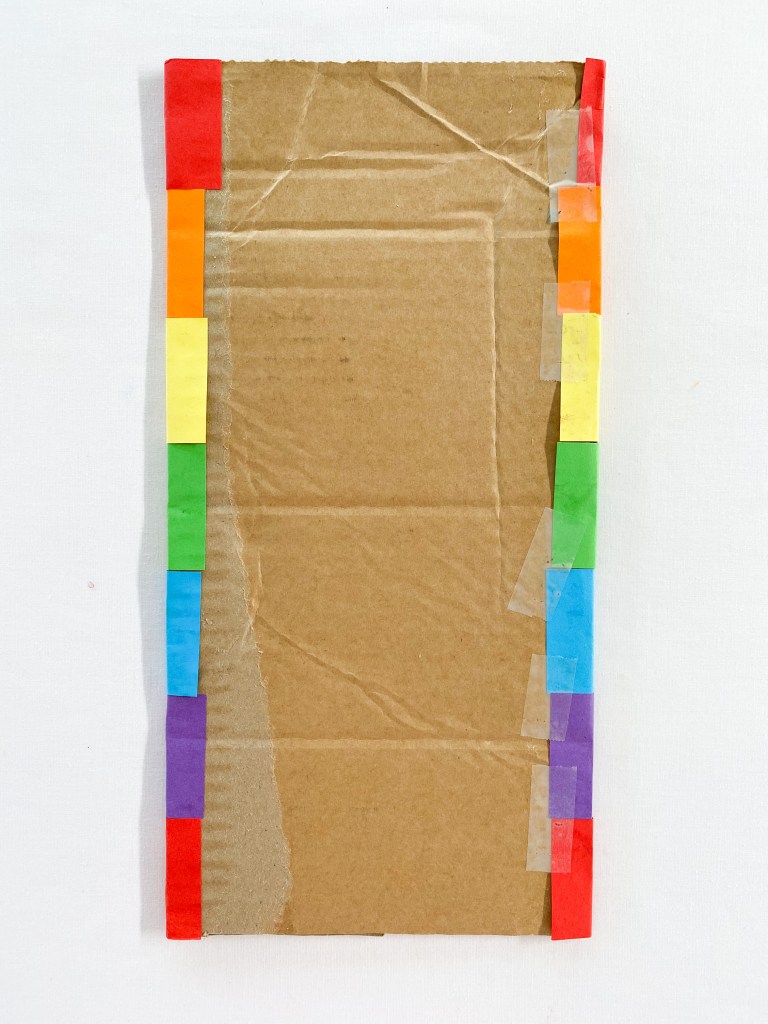
2. Use a glue stick (or glue of your choice) and paste the strips along the length of the card. Keep pasting until you have your seven strips attached. If there is any card left uncovered, simply trim away the excess.
3. Flip the card over and fold the excess paper to the back. Secure the ends to the card with glue or tape – just like the example with the blue paper below.
The finished card will look a little like this from the back. As you can see, the card does not need to be in perfect condition. The colored paper will cover any rips and tears in the card!
4. Next, label each day of the week. I used my Cricut to cut the letters and then glued them down. You could just as easily use a black marker pen to label the days. We started with Monday as our first day of the week, but feel free to start with Sunday if you would prefer.
5. The next thing to do is prepare the labels for your pegs. To do this, you can write the labels onto a piece of white paper, type and print them out – or use the free printable download below. It’s up to you! Once you have the labels prepared, paste them down onto a piece of black paper and trim. Attach them to your pegs.
Learning how to use scissors with ease and accuracy is a really important lesson for children. In this post, I have collated my ten most favorite ways to practice scissor skills. These activities are all super easy to put together and are lots of fun for kids to practice and master.
You will only require 3 materials for each of these activities! Yep 3, that’s all!
1 Scissors: We like to use specialized children’s scissors (with a metal blade) for cutting and snipping. These scissors are readily available at craft, department and stationary stores. The neat thing about children’s scissors is that they have a safety blade and a blunt tip, which protect little fingers from getting hurt. They’re also light in weight and the correct size for little hands. Big, heavy scissors are going to be difficult for children to manoeuver and control. I suggest avoiding plastic scissors, as they often don’t actually cut the paper. This frustrates children and discourages them from practicing and mastering their scissors skills. It is ultimately up to you though, which scissors you feel comfortable allowing your children to use.
2 Paper: You can use any paper that you like for your cutting and snipping activities. In most of the activities that I present in this article, I have used off cuts and scraps of colored paper. When possible, I also try to use a light cardstock. It’s a little bit heavier than paper, so it doesn’t flop around as much, making it easier for children to hold.
3 Marker pen: I use a black marker pen to mark the lines on the paper pieces. Start by marking long solid lines for your children to follow with scissors. Once your child has mastered following the solid lines, you can move to dotted or dashed lines to increase the difficulty.
!WARNING! Before presenting the activities, it is important to remember that scissors are sharp! It is always a great idea to remind children at the beginning of each lesson or activity that scissors can be dangerous when not used correctly. And of course, adults should always closely supervise children when using scissors.
Here are a couple of rules that I like to remind my kids before using scissors:
Scissors are for cutting paper only – not clothing, hair or fingers!
Encourage small snipping movements where your child moves the paper around the scissors, not big clunky movements.
And of course scissors should always point away from the body and only be used while stationary. Children shouldn’t walk around with scissors. If they must, remind children to secure the blades within the palms of their hands and to pass them via the handles.
You might have your own house rules for using scissors that you would like to add to your own scissor safety list.
Using scissors is tricky, so don’t worry if your child’s work appears messy at first. Your child will progress at their own pace. By preparing fun and colorful activities for them, they will be happy to practice and get better and better.
Here is the list of my 10 most favourite activities for increasing scissor skills.
1. Beginner scissor pattern with sticky marker dots: I love this super easy to set up scissor practice activity. These are off cuts of colored paper that I had at home. I drew different shaped lines on them with marker pen and then labelled with sticker dots to show where little fingers need to be positioned for safe cutting. If you do not have sticker dots, you can simply draw the dots with marker pen. That will work just as well! Just remember that some of the lines shown, such as the swirly line, can be quite difficult to cut for beginners. Practise straight lines first and then introduce harder lines to follow and cut.
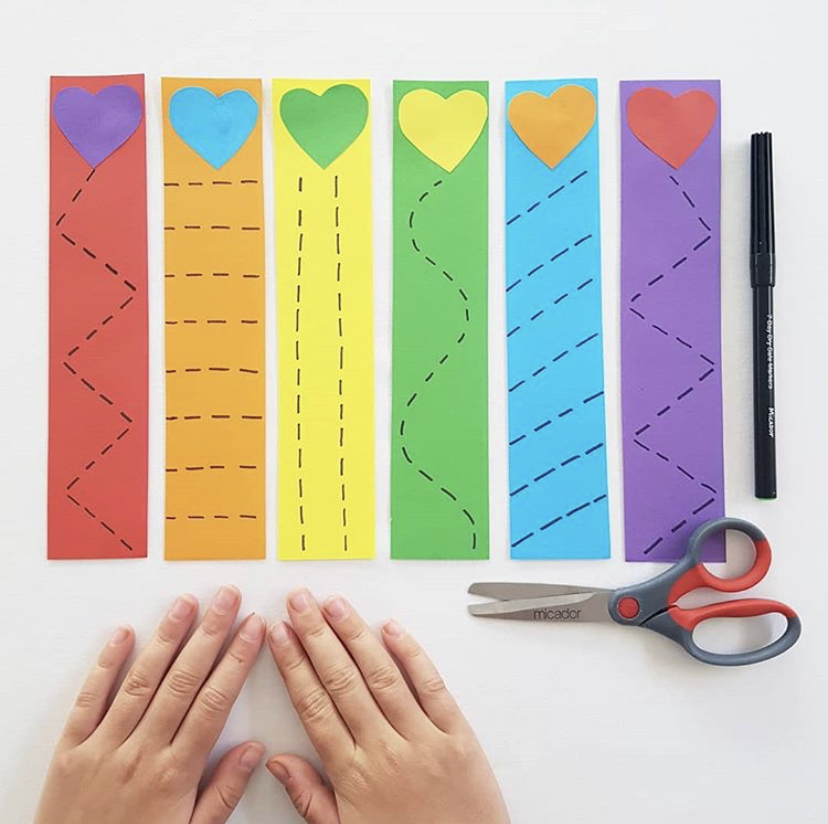
2. Trace and cut patterns: I love that you set this activity up once, but two skills are learned and practiced! To play simply draw out some dashed line patterns onto strips of paper. Then ask your child to trace the lines. You will see that I added the hearts to one side of the paper. This gives the activity direction. You can trace towards the hearts or away – whatever direction your child chooses. Tracing lines is a great pre-writing skill and helps strengthen the little muscles in your child’s fingers. Once the lines have been traced, ask your child to cut along the lines. It’s lots of fun!
3. Advanced cutting activities: Once your child has mastered snipping and cutting in a straight line, you can move to more difficult cutting patterns. These activities are just as simple to set up! For more advanced cutting activities you will just have to think of more challenging lines for your child to cut along. Think curved and zig-zag lines, and even intersecting lines. These activities will not only challenge scissor skills but will also challenge their strategic and creative thinking skills.
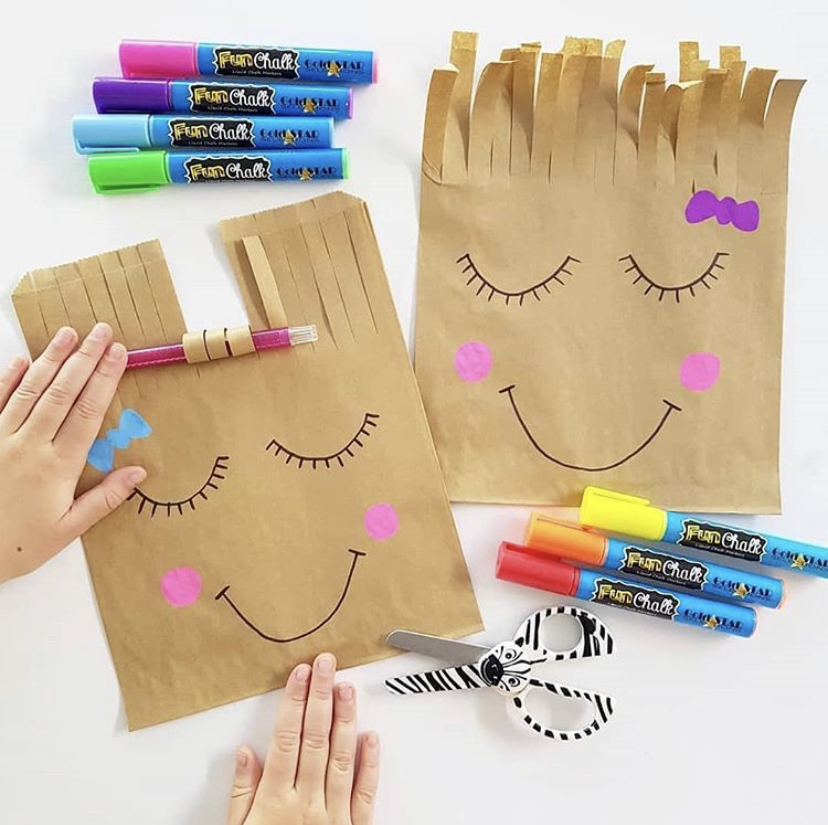
4. Paper bag haircuts: this activity also doubles as a fun art and craft activity and is a cute way to decorate a simple brown paper lunch bag. Start by decorating the front of the paper bag with a cute smiley face. Then take your scissors and snip some hair across the top of the bag. Your child can either cut through the two layers of the bag together or individually. Let them think about the best strategy to successfully make the cuts.
5. Cutting with direction: For this activity, simply draw some patterns on scraps of paper with marker pens and then give the lines direction by adding little arrow heads at the end of the lines. Then ask you children to cut the lines in the direction that the arrow is pointing. You can draw straight lines for beginners and curved lines and even circles for older children with more developed scissor skills.
6. Spring time trace and cut: you can always theme your cutting activities to your child’s interests! To make this flowery activity, draw some flowers onto squares or paper. You can then either cut along these lines directly, or ask your child to trace over the lines before cutting. Again, tracing along the lines is great pre-writing practice. As I mentioned above, cutting the curved lines can be tricky, so make sure that you work up to this activity. You do not want your child getting frustrated or disappointed if the activity is way too difficult for them.
7. Meet in the middle: this scissor skill lesson is a great collaborative activity that we like to call “meet in the middle.” It’s perfect for siblings and small groups in the classroom. To play, we taped strips of colored paper together, ruled cutting lines and marked the midline with a star shaped sticker – again, if you don’t have stickers, mark the middle with marker pen. Then use your scissors to cut along the ruled lines and “meet in the middle.” Remember that this activity is not a race! It’s about cutting accurately along the straight lines and stopping once you reach the midline.
8. Curly rainbows: this is one of my most favorite Instagram posts ever! As well as providing a lovely scissor practice opportunity, it also results in a beautiful, happy art piece. To put this activity together, simply draw some clouds on a piece of white paper and ask your child to cut around the outline with scissors. Then ask them to cut strips of colored paper. Tape the strips to the back and draw smiley faces onto the clouds. You can either stop there, or if you want some extra fine motor skill practice, curl the paper around a pencil!
9. Cutting shapes: this activity has direction and requires a little more concentration than snipping short straight lines. It also provides a great opportunity to introduce shape and some early geometry principals. To put this activity together, simply cut the shapes from some colored paper. Then draw the lines with marker pen and add some little direction arrows. Finally, ask your children or students to cut along the line. This one is actually quite fun!
10. Cutting puzzles: I love it when you set up an activity that can be used over and over again. This was actually an activity that I put together for my girls in the lead up to Easter, but you could just as easily turn it into a dinosaur egg game and it use it year round. To play, I simply cut out the egg shapes, drew lines on them with marker pen and asked my girls to cut along the lines. We then kept the pieces and used them as puzzles! You can store the pieces in an envelope or bag and then play with them as often as you like.
We have made a couple of Lion crafts over the last few years. The first was when we painted a paper plate and then attached strips of yellow and orange paper hair (picture in the middle in the above panel). Cutting the strips of paper to attach as the hair was a great way to practice scissor skills! We also rolled the paper around a pencil to curl it – another fun way to strengthen little fingers and develop fine motor skills.
Next, we gave the adorable lions that we had made a hair cut to practice our scissor skills some more (right picture above). We started by cutting off the curls with scissors and then snipping a fringe pattern around the plate. It’s a little hard to see – you may need to zoom in.
And then just yesterday we made these Lacing Lions (pictured on the left)! This activity is a great way to practice fine motor skills and pincer grip, and to introduce some easy sewing techniques.
These lacing lions are so easy to put together. They are made from a piece of recycled card, and the really neat thing is that once you have made the lion, you can lace the yarn over and over again.
Keep reading to see how we made these Lacing Lions!
This is what you will need:
A piece of recycled card
Yellow paint (I used acrylic paint)
Paintbrush
Pencil
Black marker pen
Bamboo skewer
Orange or yellow yarn
Plastic sewing needle
This is what you will need to do:
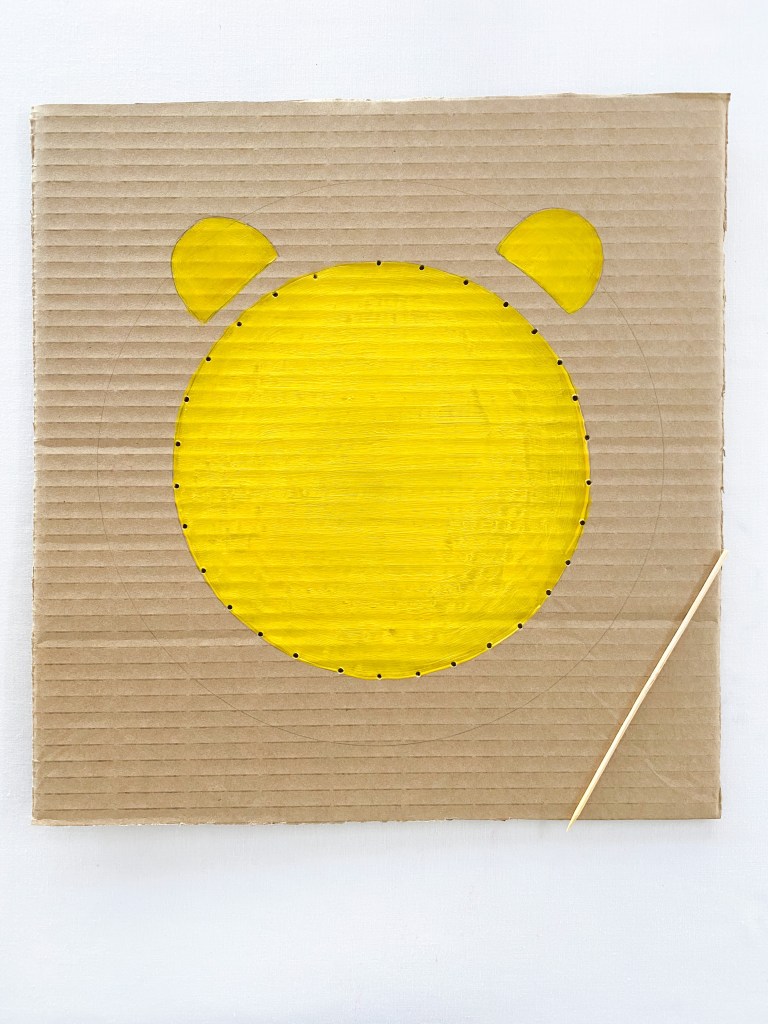
1. Trace a circle in the middle of your card with pencil. You might like to trace a small plate or bowl to get a nice even circle shape. Once you are happy with your circle shape, paint it yellow and add some ears. Allow the paint to dry completely.
2. Next, take your bamboo skewer and press holes around the edge of the circle. Remember that the bamboo skewers are sharp. An adult will need to do this step.
3. Trace a second larger circle around your painted circle with pencil.
4. Take your bamboo skewer again and very carefully press holes through the card along the second pencil line. The trick with this step is to make sure that you match the holes up with those on the smaller circles so that they are in pairs. (remember that the bamboo skewers are sharp. Please use them carefully!).
5. Decorate the face of your lion. We drew eyes, a nose and mouth with black marker pen and then used a little bit of water colour paint to give red, rosy cheeks.
6. Start lacing! To do this, thread some orange yarn onto a plastic needle and start pushing the needle through the holes in the card.
7. At this point, I felt as though our lion looked a little bit more like a sun than a lion! ha ha!
8. So I used the bamboo skewer to add more holes around the edge of the lion and we added more layers of yarn.
This is how the finished lion looked!
Here is a quick video of how we made these Lions.
Thank you so much for reading all the way down to the end of this article. Let me know what you think in the comments below. Jacinta Xx
And here is a free lion template for you to practice your fine motor and scissor skills!
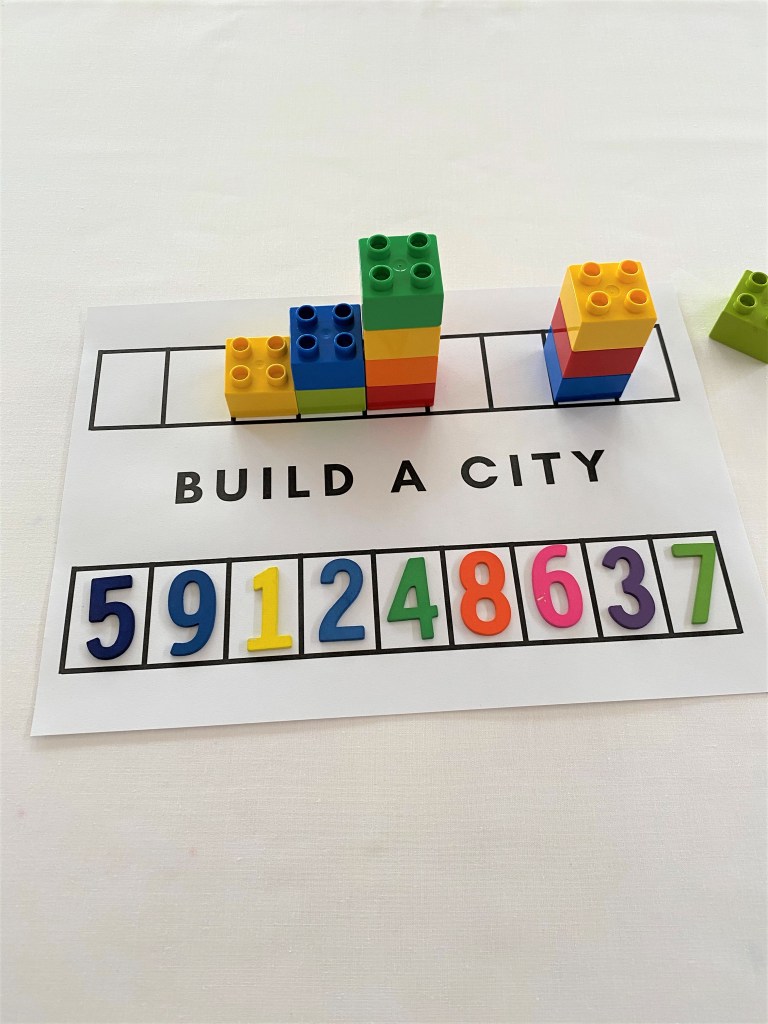
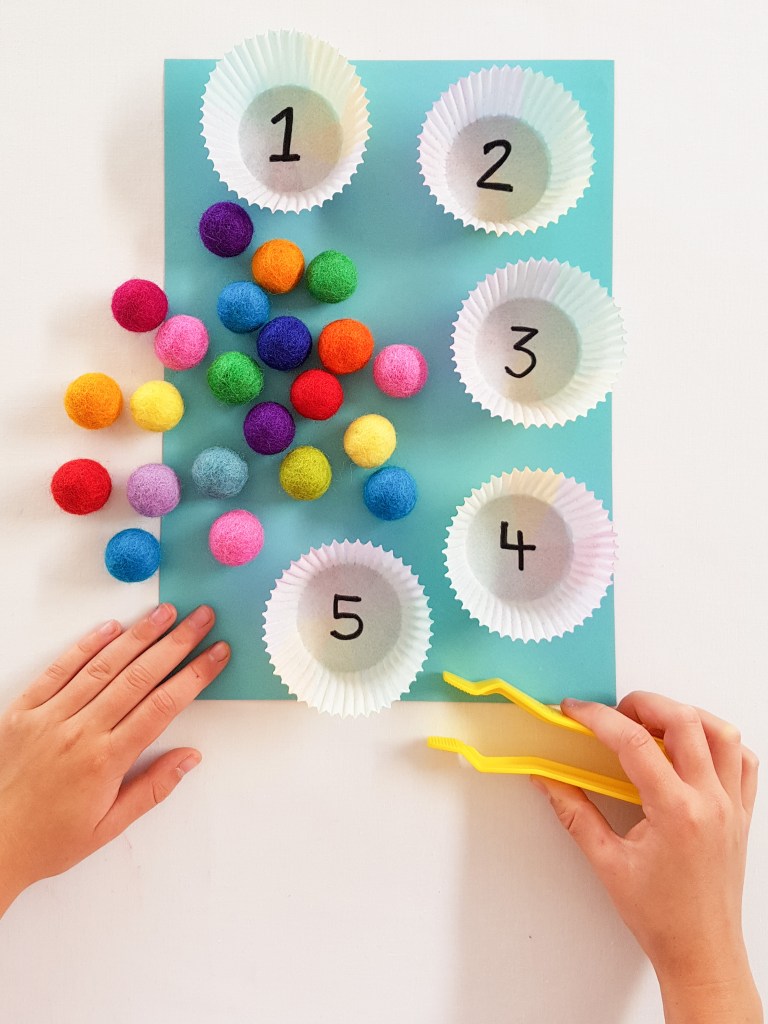
Activities that develop early math skills are our favourites! We love working on our number recognition, counting skills, subitising and 1:1 correspondence. This “Build a City” activity is perfect for developing all of these early numeracy skills. And best of all, you probably have everything you need to play at home already!
Advertisements
What you will need:
Build A City template
Blocks – we used our duplo blocks, but you can use any building blocks that you like.
Small wooden numbers or marker pens.
Advertisements
What you will need to do:
Print out the “Build a City” template (or draw up your own on a piece of paper). Here is the link to the file:
Please note that your printed page will look a bit different to the ones in our photos above! It will look like this one:
2. Fill in the bottom grid with numbers. We used wooden numbers so that we could switch the order each time we played. If you don’t have wooden numbers you can fill the numbers in with marker pens.
3. Identify the numbers and stack the corresponding number of blocks into a tower. Keep building until you have constructed your skyline.
Your finished skyline might look something like this:
Here’s a quick video of how to play!
And you can Pin this to save the link to the template too!
Thank you so much for reading! Feel free to leave any questions or comments below. I would love to hear from you. Jacinta Xx
Hello and welcome to my blog! I actually purchased this blog domain over three years ago with grand plans of blogging all the step-by-step details of the arts and crafts I create over on my Instagram. As I generally only publish the finished results on Instagram, I thought a blog would be an amazing opportunity to outline all the tips and tricks I have up my sleeve for making and creating easy, fun and colourful craft activities for kids. I also had plans of adding links to printables to help you create fun learning opportunities in your own home and even the classroom. In my mind, this blog was such a fun and colourful little corner of the web!
But…and there’s always a but!…ha ha, I always got stuck writing my first post. I would sit down and start typing, but never had anything very interesting to say. I tried introducing myself, I tried talking about my background as a Scientist and our lives here in Melbourne. It all sounded so blah! So, I have finally decided to just skip it all and get started. After all, if you decide to follow along, you will learn all about me along the way!
So here goes! Welcome to my blog! It is a work in progress and totally built by me. Enjoy!