This penguin shape sort activity is one of my post popular posts! We made these cute little penguins from construction paper and then matched foam shape stickers to each penguin. This activity is perfect for developing shape recognition and fine motor skills. But most importantly, it’s simply fun!! And you can scroll down for FREE printable versions of the activity too.
Advertisements
This is what you will need:
Construction paper
Scissors
Glue stick
Googly eyes
Foam shape stickers
Advertisements
This is what you will need to do:
1. Cut your penguin shapes and glue down some googly eyes.
Advertisements
2. Sort your stickers to each penguin.
Advertisements
If you would like a FREE printable version of this activity click this link:
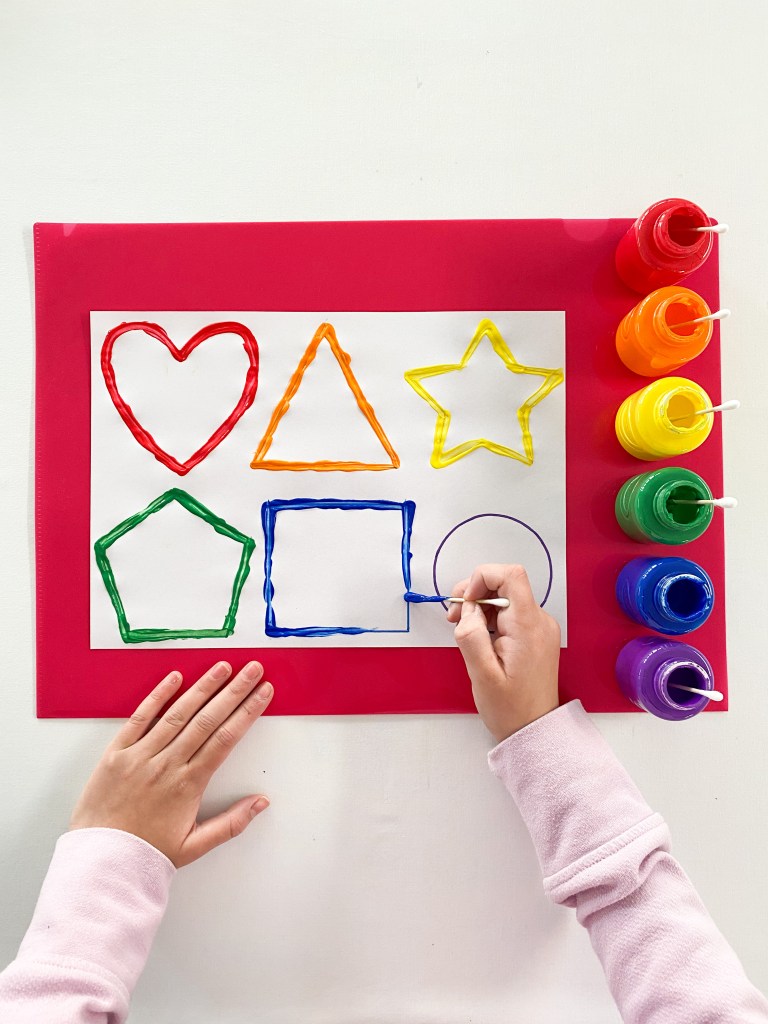
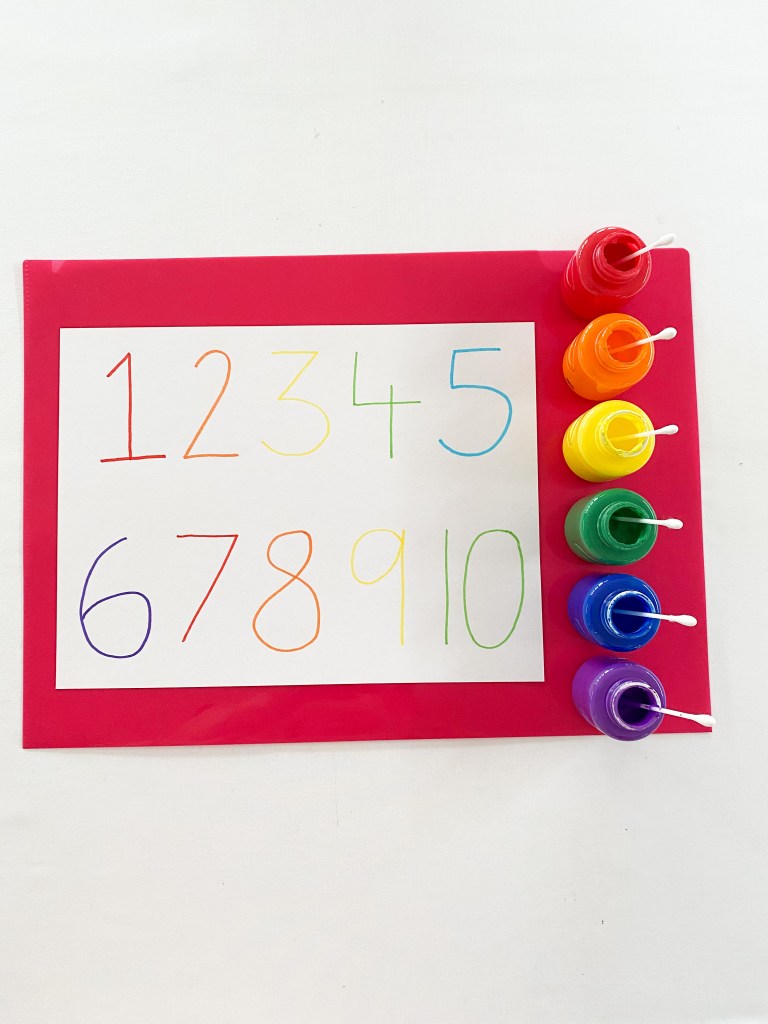
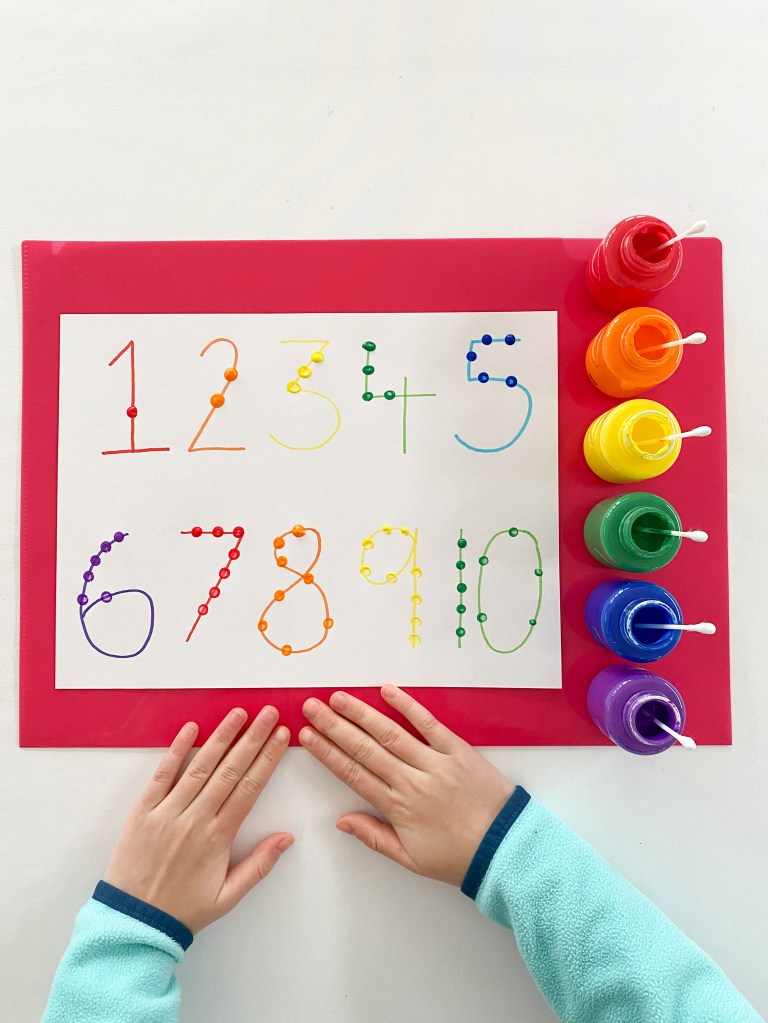
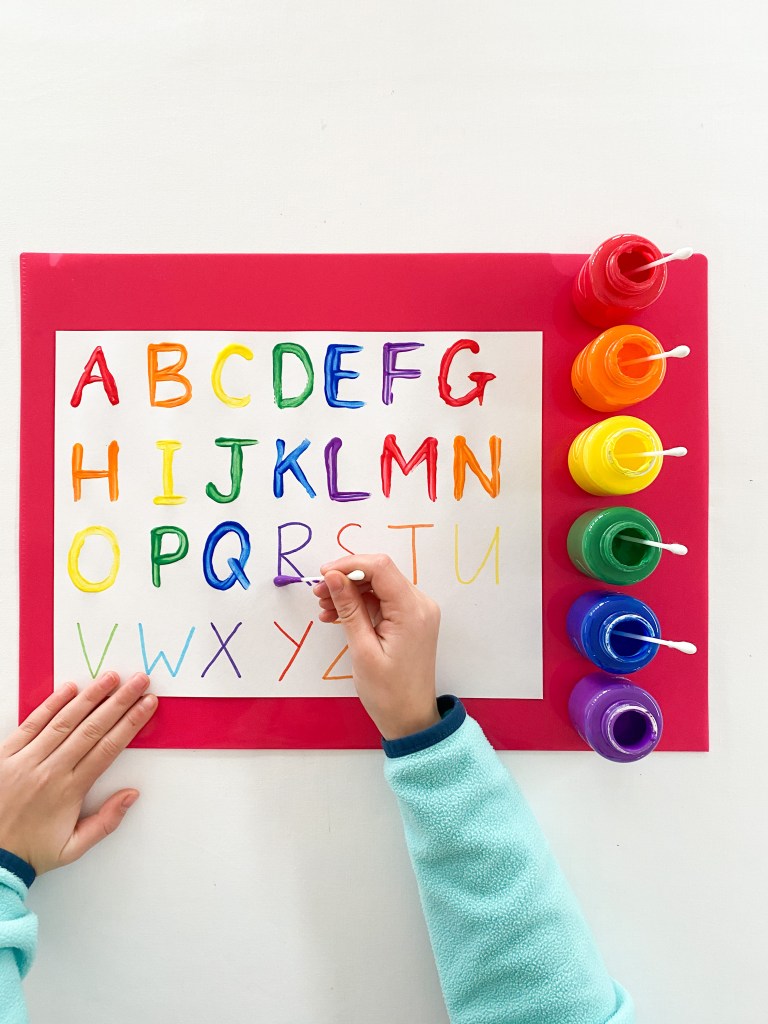
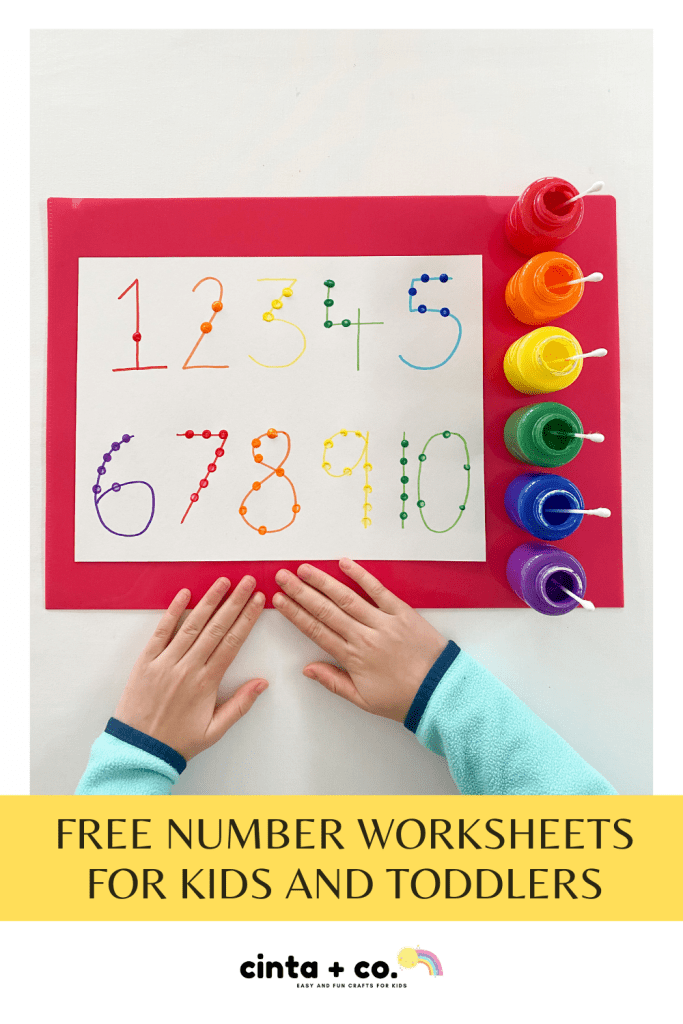
Q-tip painting is a favorite activity of ours! It is relatively mess-free and is perfect for developing fine motor skills. This activity is the best way for kids, preschoolers and toddlers to practice shape, number and letter recognition. Best of all, it’s lots of fun!
Scroll down for your FREE printable shape, letter and number printable worksheets.
Advertisements
This is what you will need:
Paint (I recommend washable kid paint!)
Q-tips
Free printable templates – scroll down and you will easily find these
Advertisements
Shape Recognition and Tracing for Kids
1. Prepare your shape template. You can print my FREE printable worksheet here, or draw up your own.
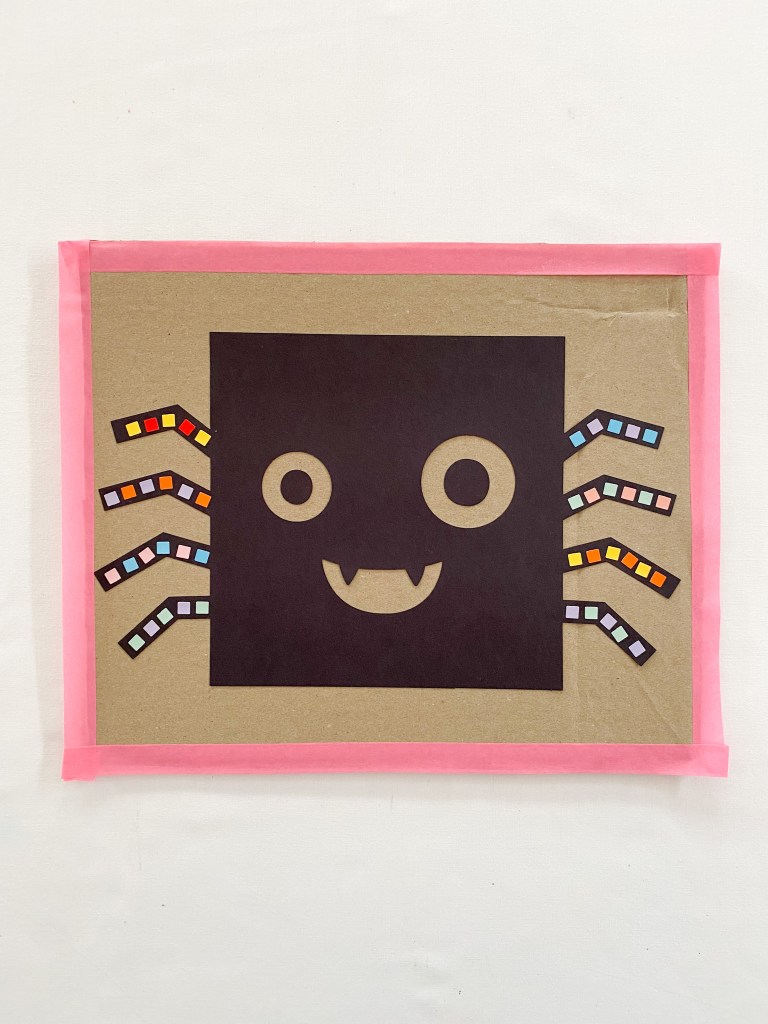
This cute spider activity is perfect for helping kids learn about shapes and patterns this Halloween! Simply print out the templates below, snip the shapes carefully with scissors and then paste them onto the spider legs to continue the patterns. This activity is great for developing early numeracy skills, scissor skills and fine motor skills. And it’s heaps of fun too!
Advertisements
This is what you will need
Construction paper
Scissors
Recycled cardboard
Glue stick
Stickers
Washi tape (optional)
Advertisements
This is what you will need to do
1. Cut a spider shape from black construction paper and glue it down onto a piece of recycled cardboard. Add some stickers to start a pattern. Your pattern could be simple alternating patterns or more complicated ones that involve 3 or more colors or shapes. You might also like to add a border of washi tape to finish your game.
Advertisements
2. Next ask your child to finish the patterns with their stickers. We used small square stickers, simply because that’s what we had on hand. You could use sticker dots or even paints and Q-tips to finish the patterns.
My kids loved this super easy math lesson. Adding the sun rays to each smiling sun was such fun, and a perfect way to learn so many early numeracy skills including number recognition, addition and subtraction, subtilizing and 1:1 correspondence. I made this easy template from some colored construction paper and a piece of recycled cardboard, but if you are short on time, I have a FREE printable version that you might like to use. Once printed, you could even laminate it so that it can be used over and over again!
Advertisements
This is what you will need:
A piece of recycled cardboard
Colored construction paper
White printer paper
Scissors
A small square of sticky contact
Dry erase marker
Googly eyes
Glue stick
Washi tape (optional for border)
Advertisements
This is what you will need to do:
1. Cut a sun shape from some orange construction paper and glue it to the piece of recycled cardboard. You might like to give your sun a smiley face too! Next, paste a square of white paper to the top right hand corner of your cardboard. Cover the white square with a piece of clear sticky contact – this will make your board wipeable and allow it to be used over and over again. You will also need some small rectangle “sun rays. Cut these from yellow construction paper.
Advertisements
2. Print the free Sun Numbers worksheet and use this to practice your numbers. Select one of the suns, count the rays, write the number in the box and the place the corresponding number of sun rays onto the sun.
Advertisements
3. Use a wipeable or dry erase marker to write the number of rays on the white square. Then add the corresponding number of sun rays to your sun. You don’t need to paste the paper rays down. Just let them sit there so that you can play over and over again.
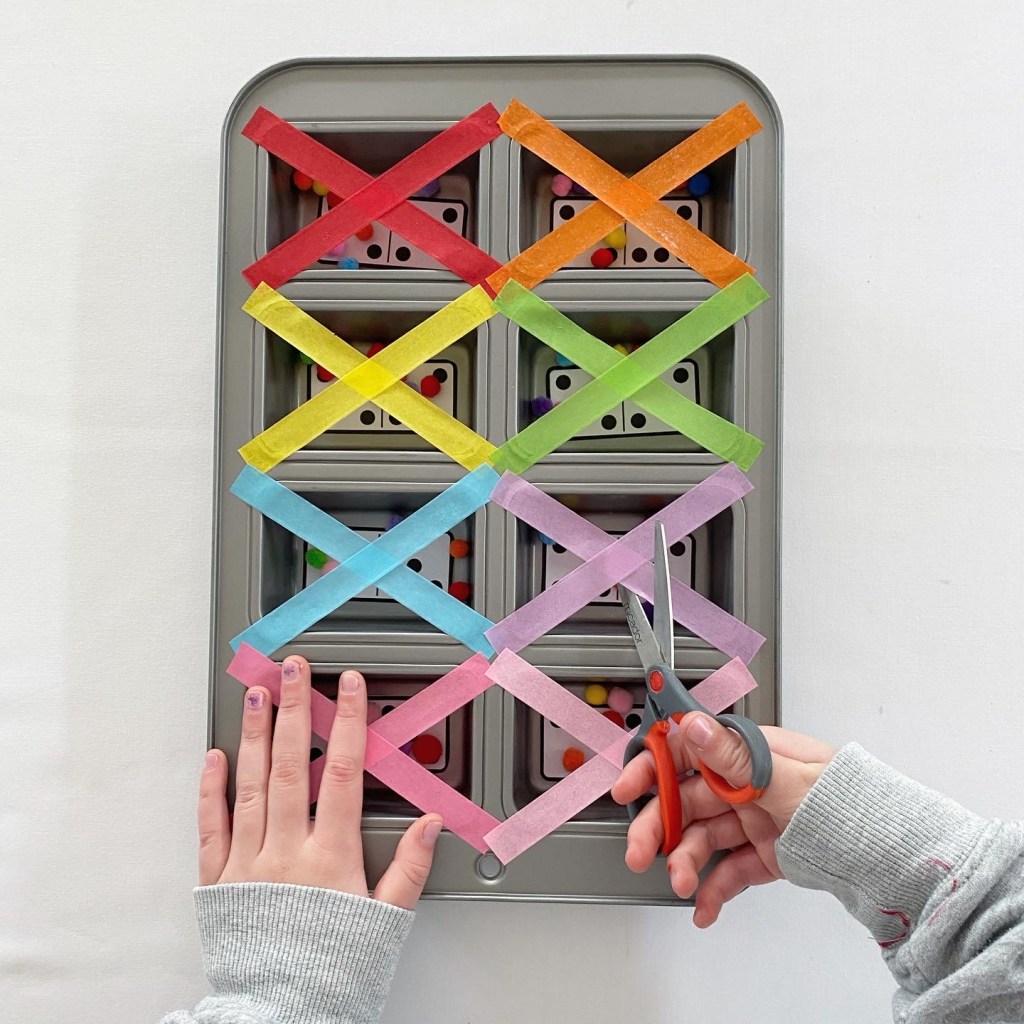
Dominoes are such a great learning tool for kids. As well as helping preschoolers develop number recognition, they also help teach patterns, subitizing, 1:1 correspondence and even fine motor skills. There is such a lot of learning in such a simple toy! In the following activities, I actually use paper dominoes that I have made into a printable worksheet. You can scroll down for your own FREE copy if you would like.
Advertisements
This is what you will need:
Dominoes
Pom poms
Tweezers (optional)
Advertisements
This is what you will need to do:
1. Print out your FREE copy of the paper dominoes and carefully cut around each individual piece with scissors. Match pom poms to the dots on the dominoes. Count the dots and pom poms as you go.
Advertisements
2. You may like to extend the activity by making it into a rescue game. To do this, place a dominoes piece into each well of a muffin tray. Add some pom poms to each well and then tape down some layers of sticky tape.
Advertisements
3. Then carefully snip away the washi tape to reveal your dominoes and pom poms. Once the playing pieces are revealed, match the pom poms to the dominoes.
!WARNING! Remember that scissors are sharp! Always supervise children when they are using scissors!
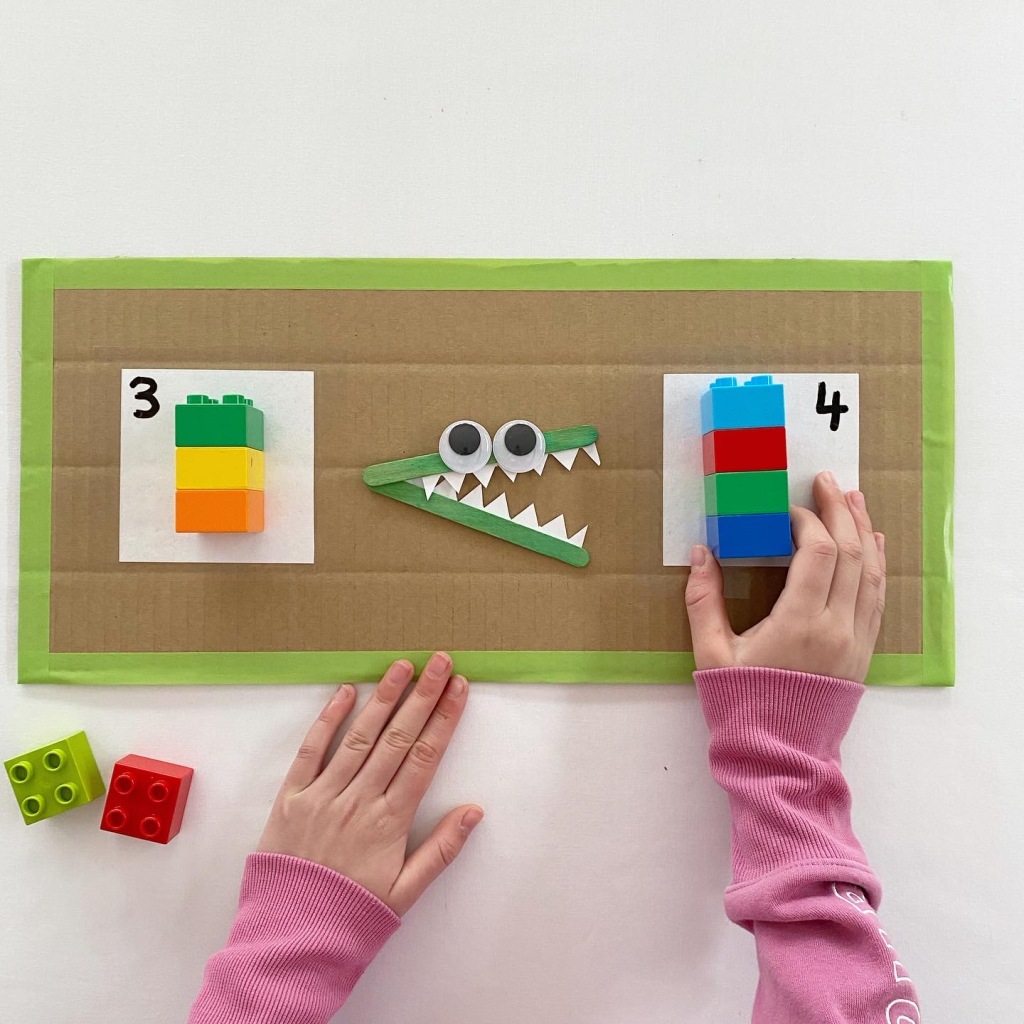
I loved learning about greater than and less than numbers when I was at school. My teacher had this really neat way of teaching us the underlying principals. She used this cute crocodile analogy to show us that the crocodiles open mouth pointed to the bigger number! It’s something I still remember to this day, and has proven a great way to help my children learn these math basics.
You can easily make one of these crocodiles with some craft sticks, or scroll down below to find a FREE printable version of the activity.
Advertisements
This is what you will need:
A piece of recycled cardboard
White computer paper
Clear sticky contact or packing tape
Green craft sticks
Googly eyes
Scissors
Blue tack or a glue stick
Dry erase or white board marker
Washi tape (optional)
Advertisements
This is what you will need to do:
1. Start by making your game board. To do this, paste down two squares of white paper onto the recycled cardboard. Cover these squares with clear contact or packing tape to make a wipeable board. You can then write the number of blocks you will need to build in each square with white board marker.
Next, make the crocodile. To do this, take two craft sticks and use blue-tack or a glue stick to attach two googly eyes. Cut a strip of sharp white teeth from the your left over white computer paper.
Advertisements
2. Collect some blocks – we used Duplo blocks, and then you are ready to play. Build your towers and move your crocodile mouth to point to the largest tower.
Advertisements
Here is your FREE printable version of this activity:
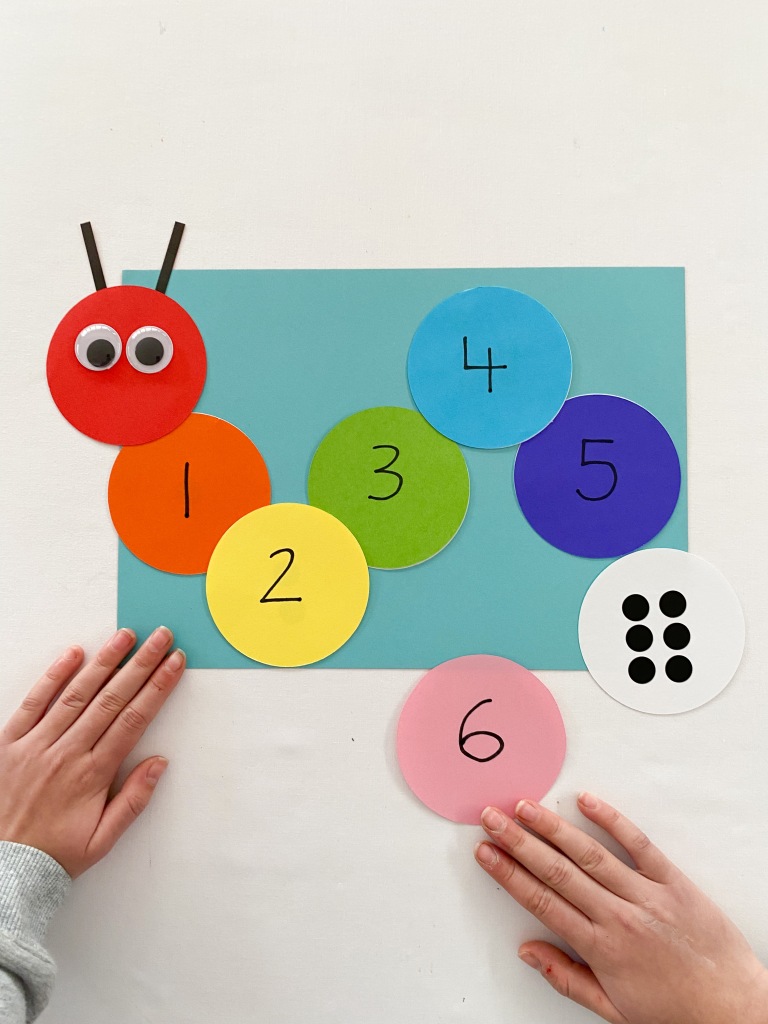
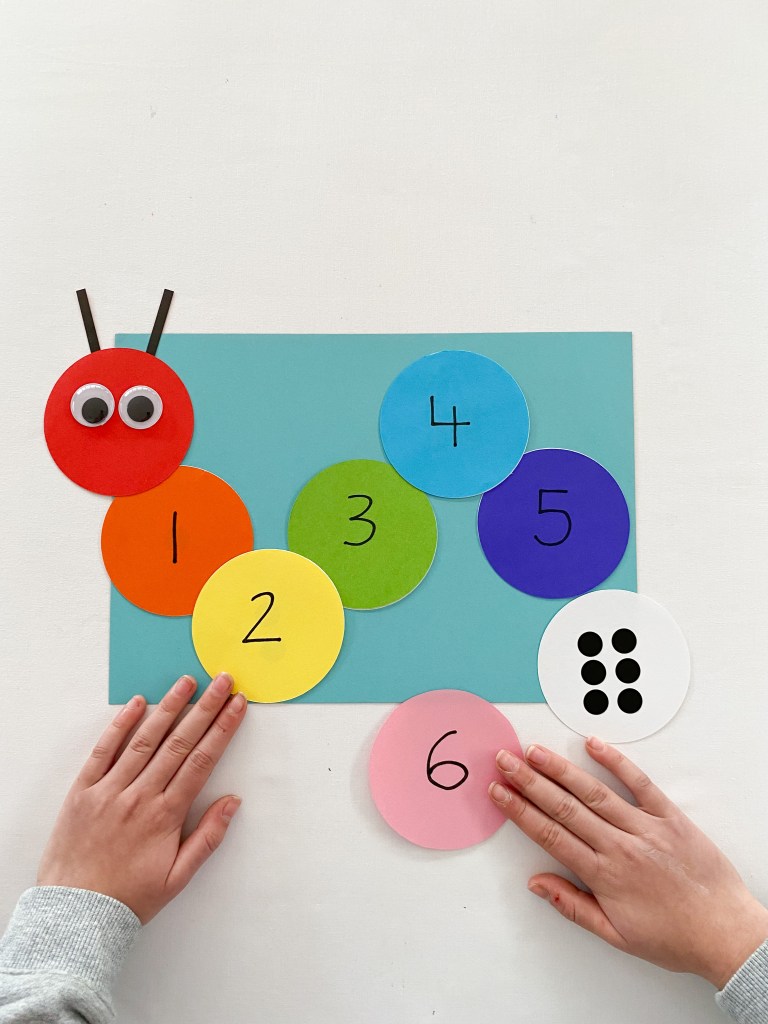
This fun and easy math activity is perfect for developing early numeracy skills for kids. It’s great for practicing number recognition, subitising, 1:1 correspondence and even fine motor skills. Best of all, you will only need a few easy to find materials to put one of these cute caterpillars together.
If you don’t have time to make your own number caterpillar you can scroll down for your own FREE printable worksheet. It will save you heaps of time and will be just as fun to make.
Advertisements
This is what you will need
White computer paper
Colored construction paper
Scissors
Black marker pen or sticker dots
Advertisements
This is what you will need to do:
1. Trace white circles and use your marker pen to add number groups to each circle. Then arrange on a piece of paper to resemble a caterpillar.
Advertisements
2. Cut a second group of circles from colored construction paper and label with numbers using your black marker pen.
Advertisements
3. Match your colored circles to the white circles to make a colored caterpillar.
Advertisements
Here is your free printable version of this activity. It’s very cute!
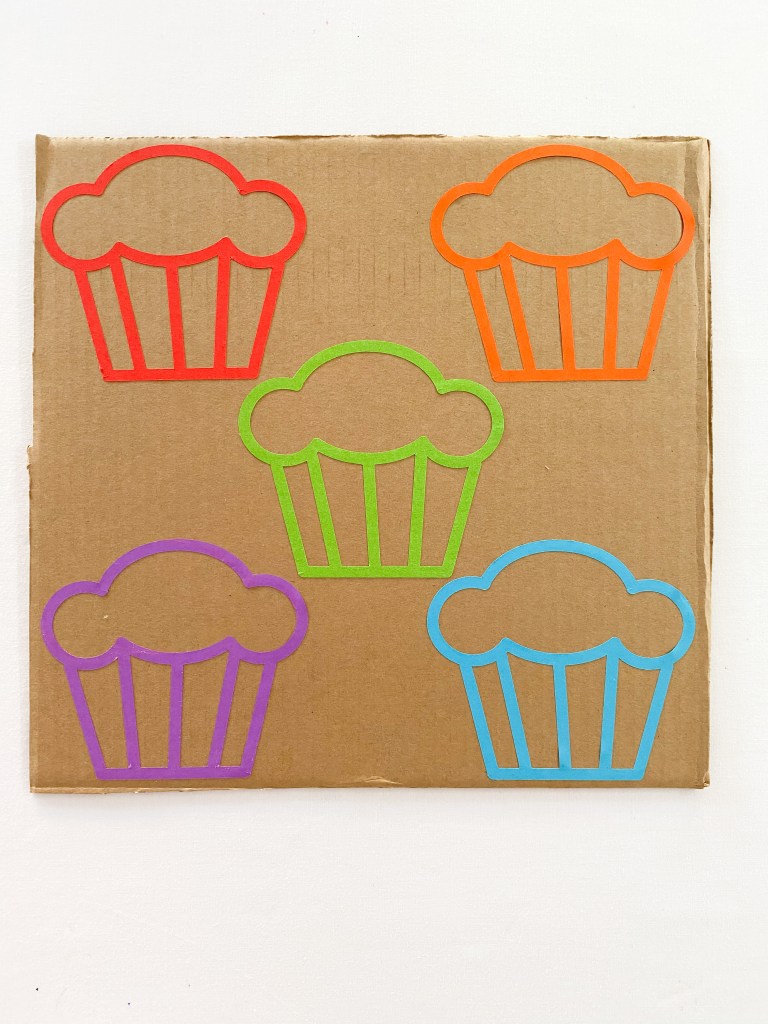
We loved this fun counting and early numeracy game for kids! It was super easy to put together and was a fun way to recycle a piece of cardboard. It is also a mess-free activity and once made, the game board can be played with over and over again.
If you don’t have time to make your own game board or you would prefer the FREE printable version, simply scroll down for your copy.
Advertisements
This is what you will need:
A piece of recycled cardboard
Colored construction paper
Scissors
Marker pen
Pom poms
Advertisements
This is what you will need to do:
1. Cut some cupcake shapes from colored construction paper and paste them onto your piece of recycled cardboard. You could also draw them with marker pens. To be honest, this will probably be a lot quicker and easier than cutting the paper ones out 😉
Advertisements
2. Label each cupcake with a number. The number will correspond to the number of pom poms you will add to each cupcake.
Advertisements
3. Grab some pom poms and place the corresponding number onto each labelled cupcake.
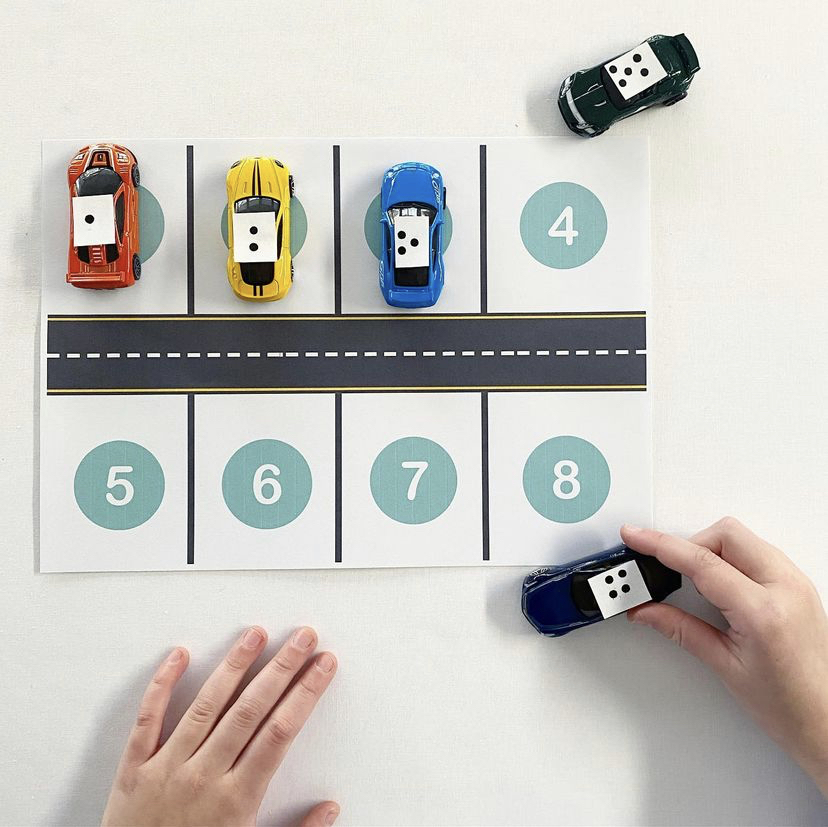
Number car parking lots are so fun to play with and are a great way to encourage kids to learn early numeracy skills like number recognition, subitising and 1:1 correspondence. They are also so easy to make. And if you don’t have time to make your own from scratch, scroll down for your FREE copy of my cute parking lot template.
Advertisements
This is what you will need:
Printed copy of the FREE template
Toy cars
Sticker sheet
Marker pen
Advertisements
This is what you will need:
Print out a copy of the parking lot worksheet. You will find it here:
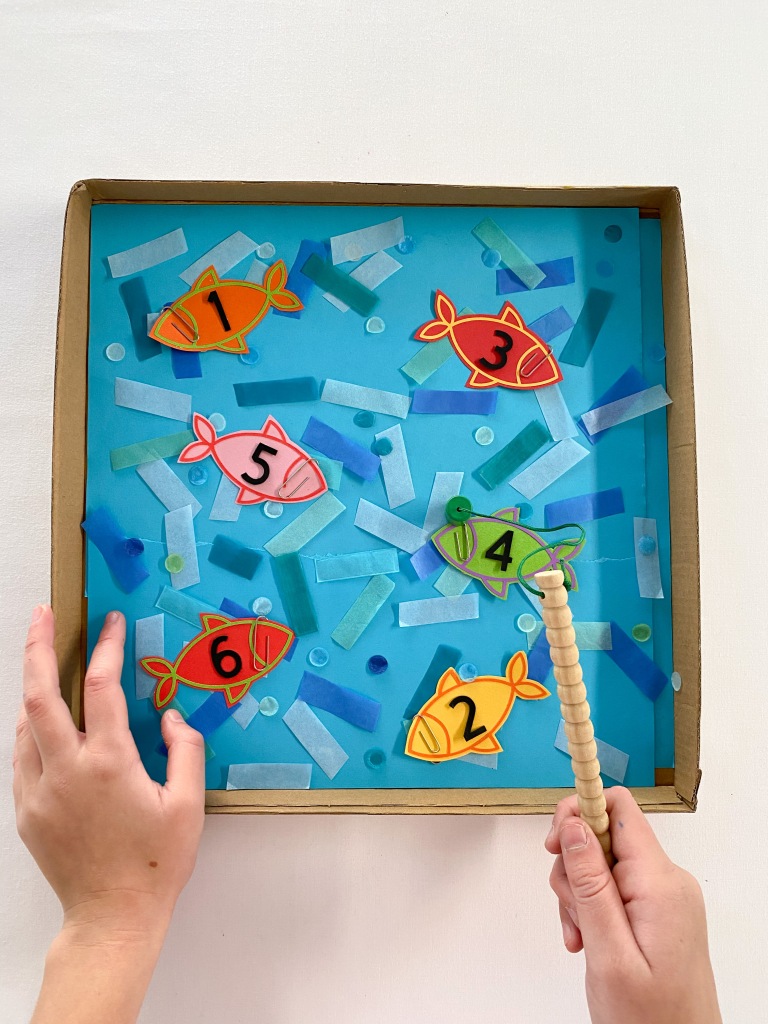
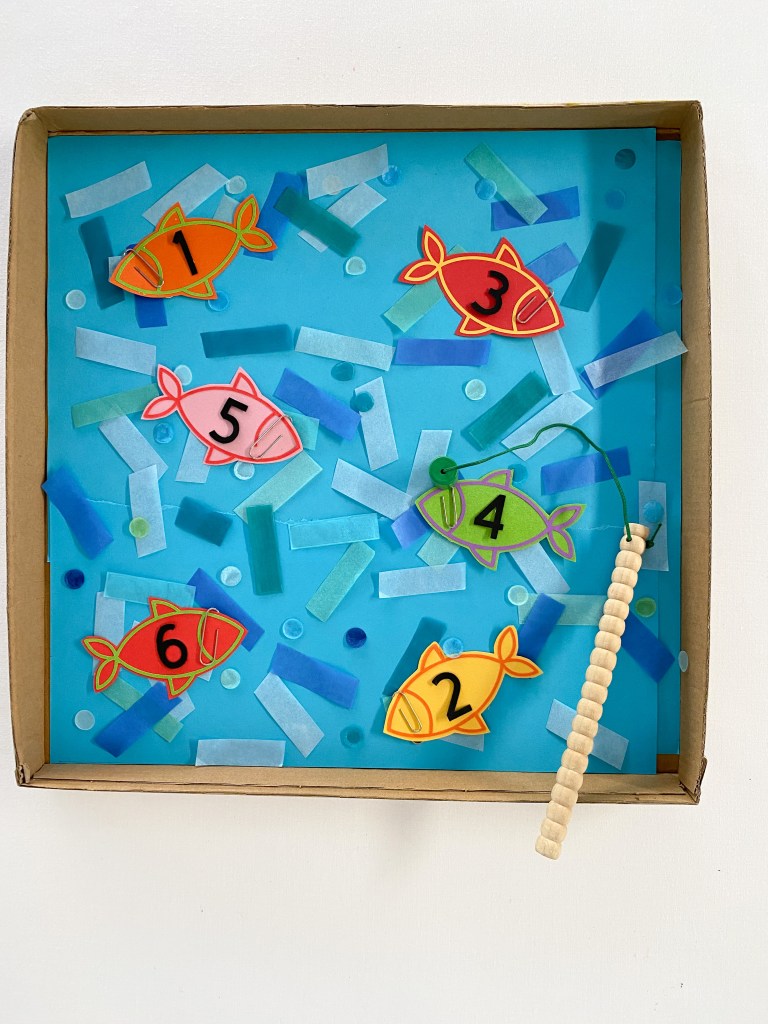
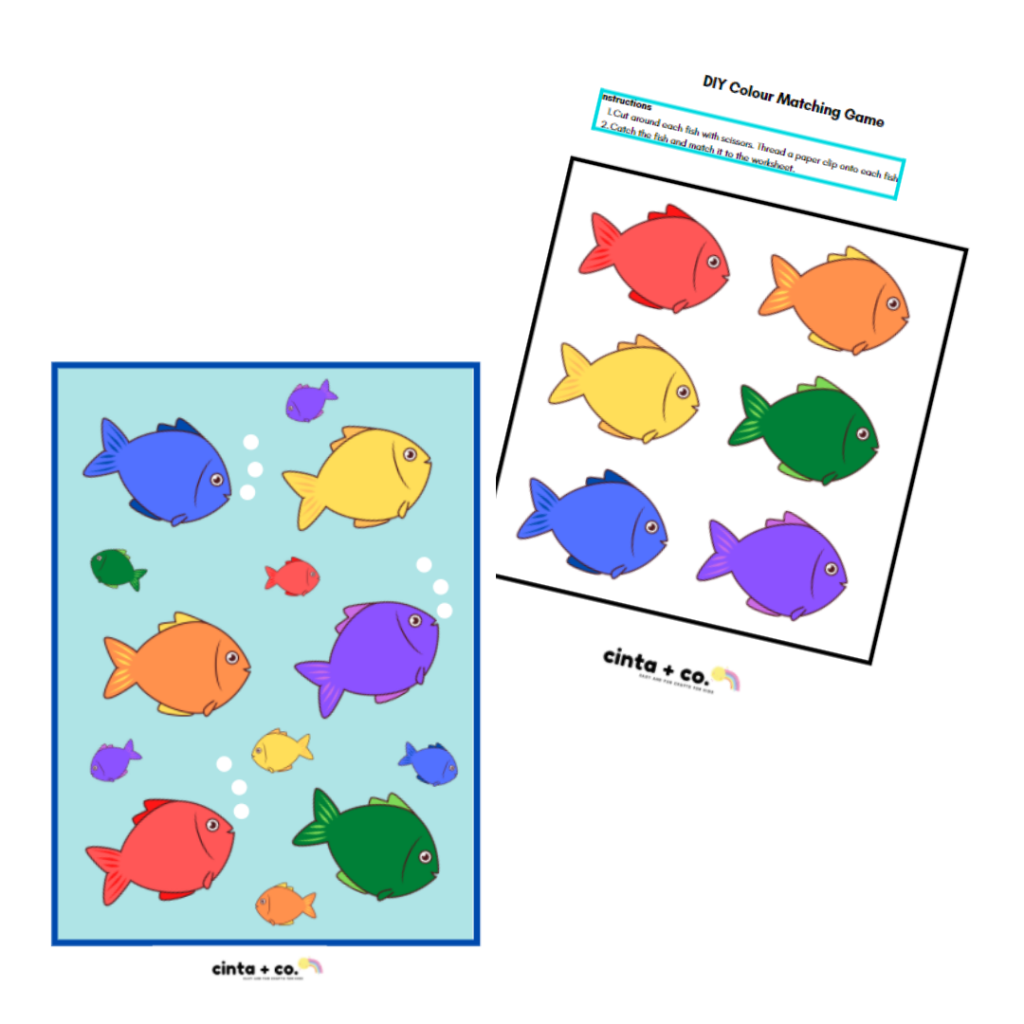
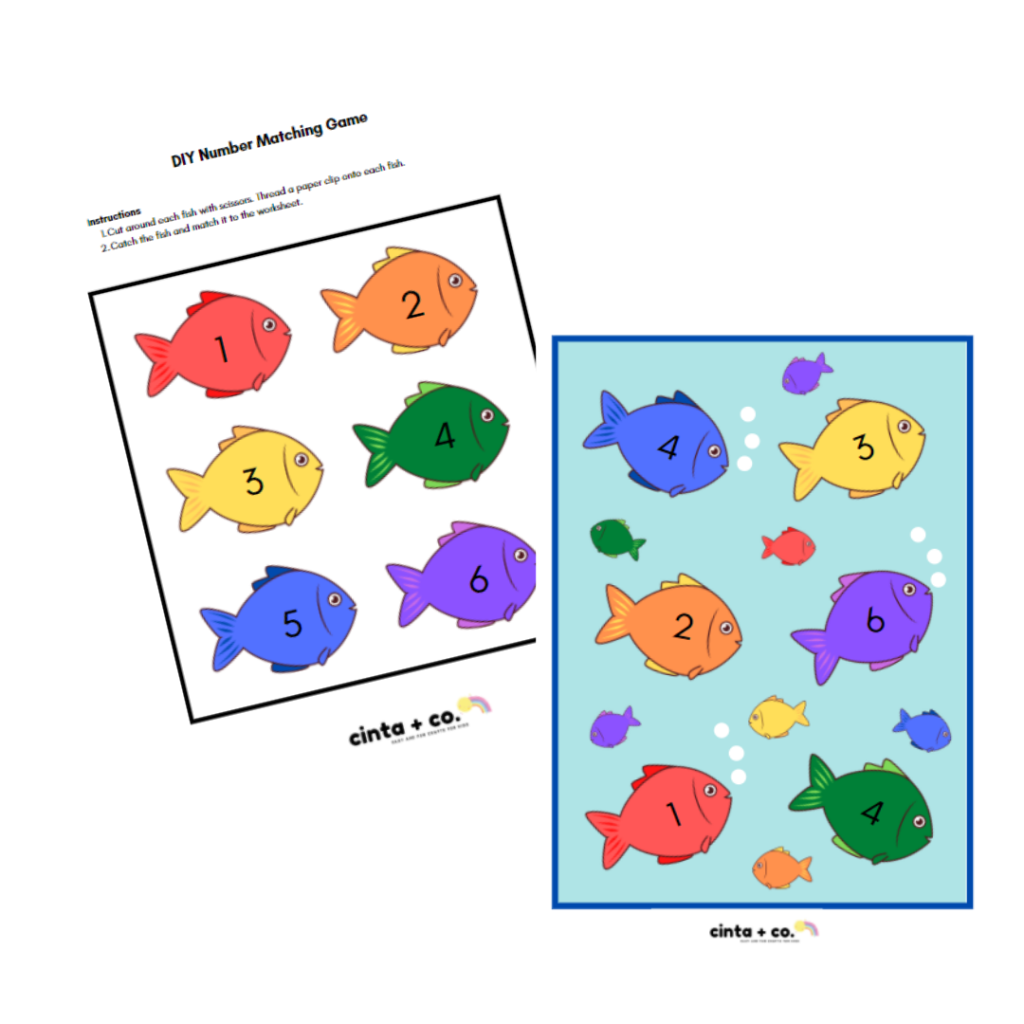
DIY fishing games are a wonderful way for children to build and explore many developmental skills including fine motor skills, motor strength, hand eye coordination, problem solving and even some early math and literacy skills.
This DIY fishing game is the easiest to put together and lots of fun to play. And if you don’t have time to make your own game from scratch, scroll down to the end of this article for a FREE printable version.
Advertisements
What you will need:
Empty cardboard box (a cereal box would be perfect)
Colored paper
Tissue paper confetti (optional)
Scissors
Marker pen
Paper clips
Magnetic wand or toy fishing rod.
!WARNING! I do not recommend using small magnets in this activity. Small magnets are not to be ingested and parents should always carefully observe their children when playing with small parts – especially magnets.
Advertisements
What you will need to do:
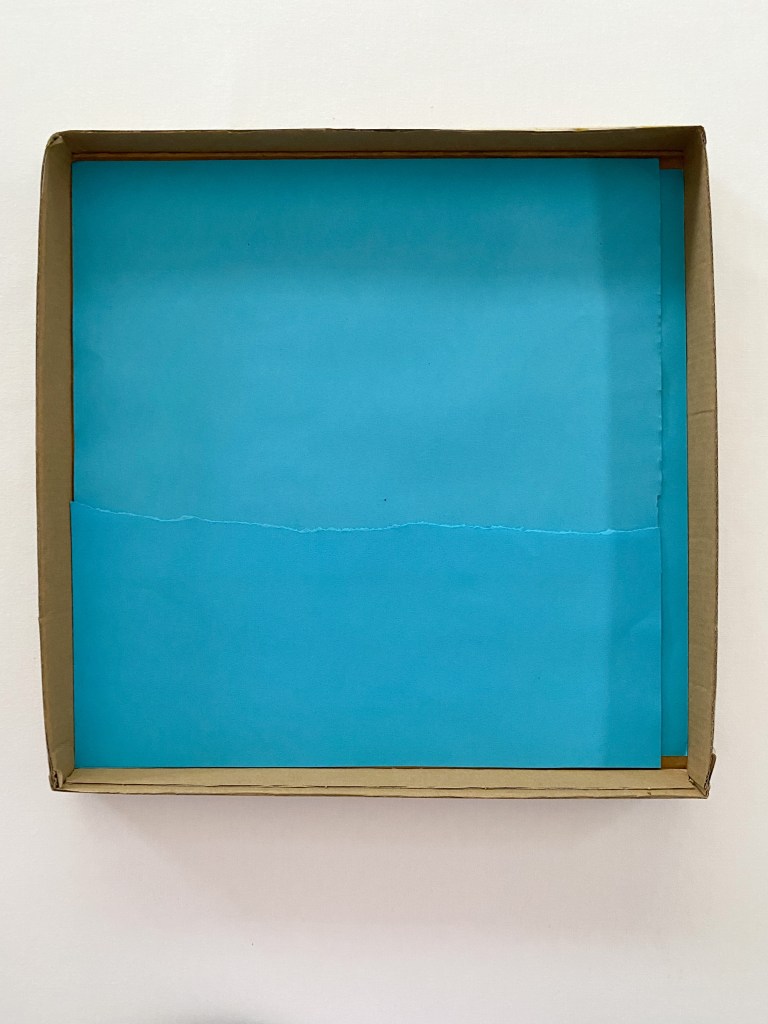
1. Very carefully cut the front away from the cereal box with scissors. This can be a little tricky, so you may need to ask an adult to help you with this. You might also need to secure the corners of the box with sticky tape to prevent it from falling apart. Once your box is ready, line the surface of the box with blue paper so that it looks like water.
Advertisements
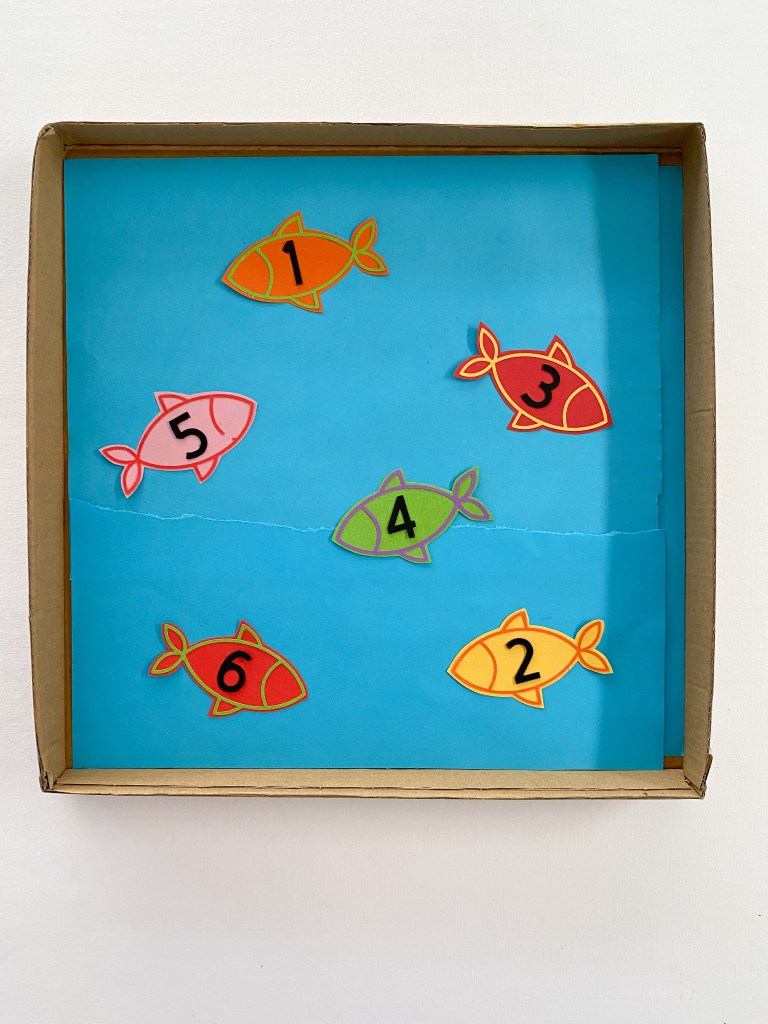
2. Using your scissors, very carefully cut out some fish shapes. You can do this by eye or if you have a paper cutter, like a Cricut, you may like to use that! Place the fish into your box.
Advertisements
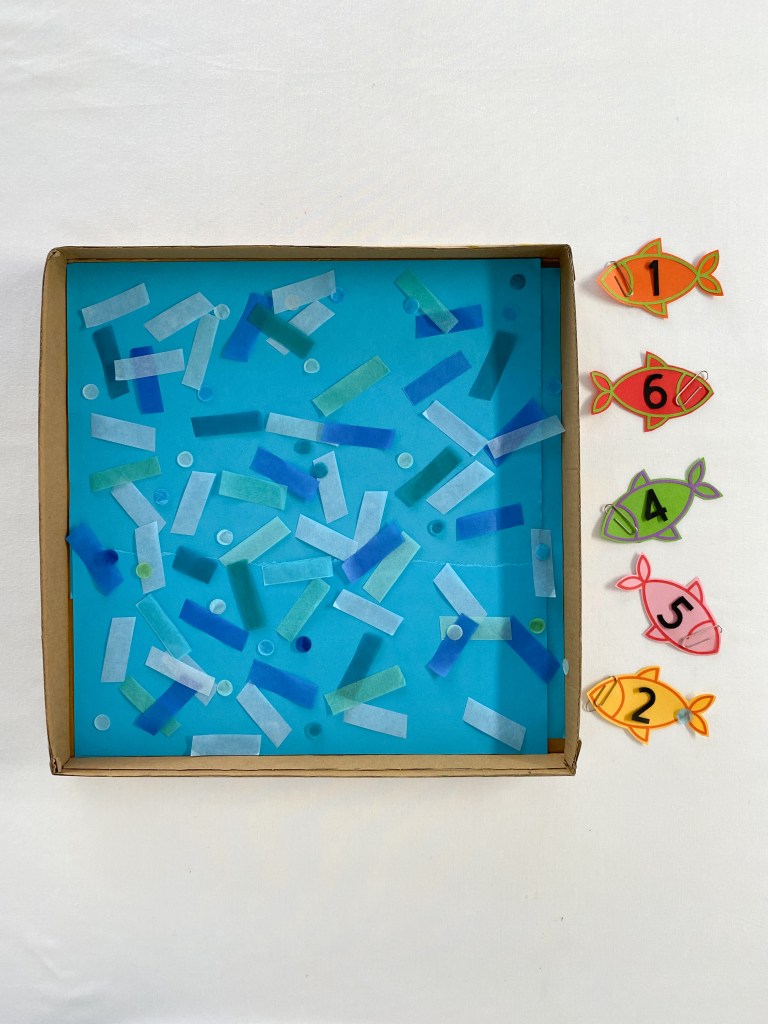
3. If you would like to practice some early numeracy skills, you might like to add a number to each fish. You can collage the number with paper or simply write it out with pencil. You might also like to add some tissue paper to the box for some extra detail.
Advertisements
4. Next, carefully thread a paper clip onto each of the fish. Remember that paper clips are small and an adult should always watch small children closely when using.
Advertisements
5. Grab a magnetic wand or toy fishing rod that you may have at home and catch the fish!
Advertisements
Here is the FREE color match printable worksheet for you: