Easy Shape Activities for Kids

Learning how to recognize shapes and their properties is an essential early numeracy skill. My kids love learning all about shapes, and I love putting activities together that teach about shapes. As you can see in this post, shape activities can be so easy to set up, require few materials and can be played with over and over again.

Advertisements

This is what you will needyou will only need three things!

A piece of recycled cardboard

Shape stickers – if you do not have stickers, simply use some marker pens to draw them!

Small pegs

Advertisements

This is what you will need to do:

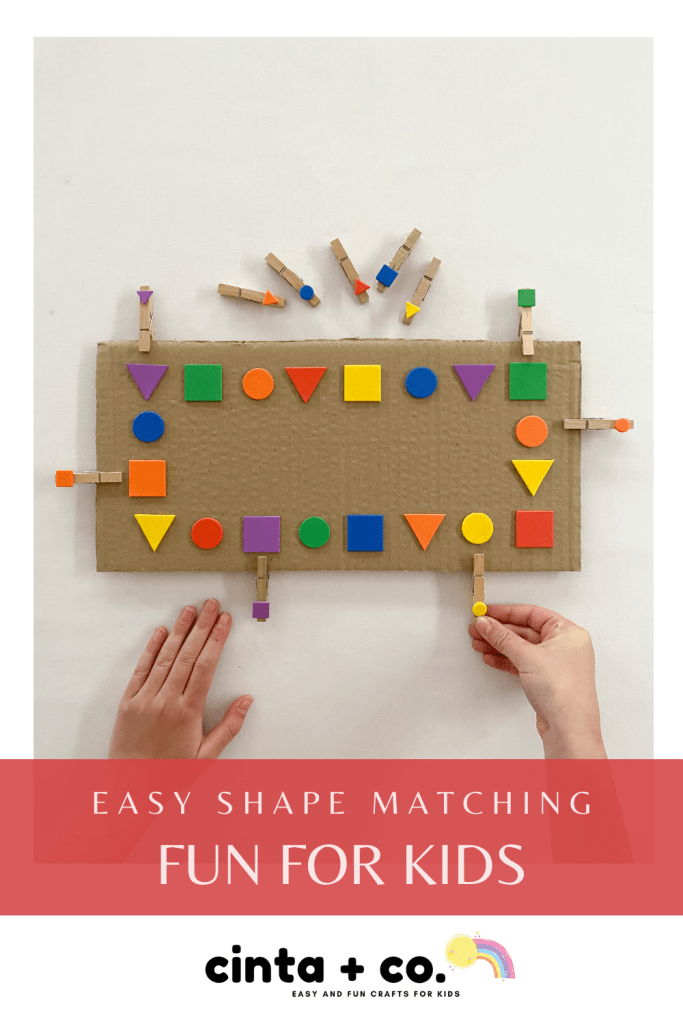
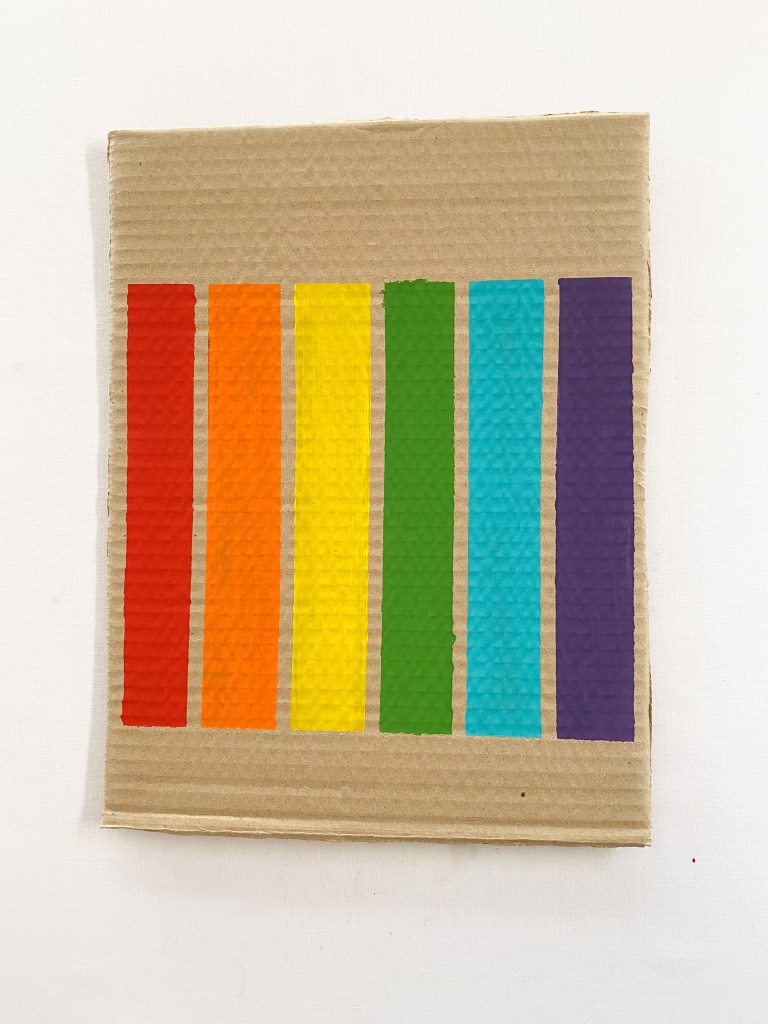
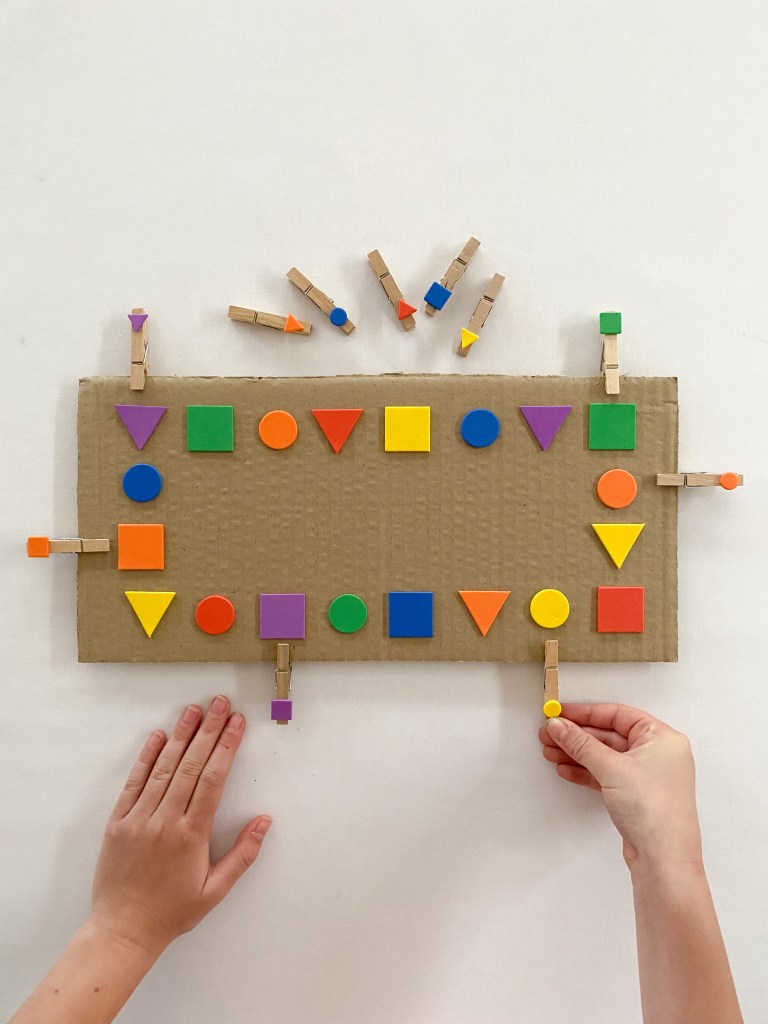
1. Trim your piece of cardboard to size. For reference, our piece of cardboard is about 30 cm long and 20 cm high. This is just a rough guide though, you can use any size piece of card that you like. Once you are happy with your cardboard, simply paste stickers around the edge of the card. Make sure you leave enough space to place a peg between the sticker and the actual edge of the card.

If you do not have shape stickers, simply draw some shapes with marker pens or colored pencils directly onto the card. You can draw any shape and use any colors that you like!

Advertisements

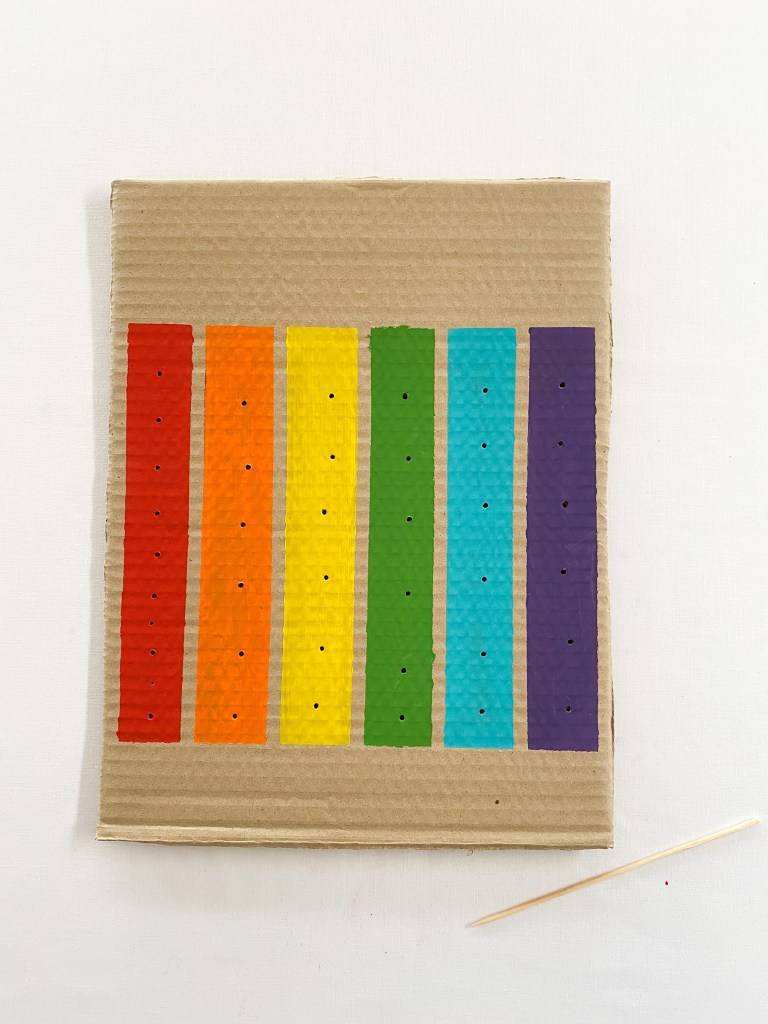
2. Next, prepare your matching pegs. I used small shape stickers to label our pegs. As our game is a shape and color matching game, I made sure that the pegs were labelled with the same colored shape as the shapes on the cardboard.

Advertisements

3. Now play! Simply match the pegs to the board. Attaching the pegs is great for fine motor skill development and for encouraging pincer grip – the finger grip required to hold a pencil.

Advertisements

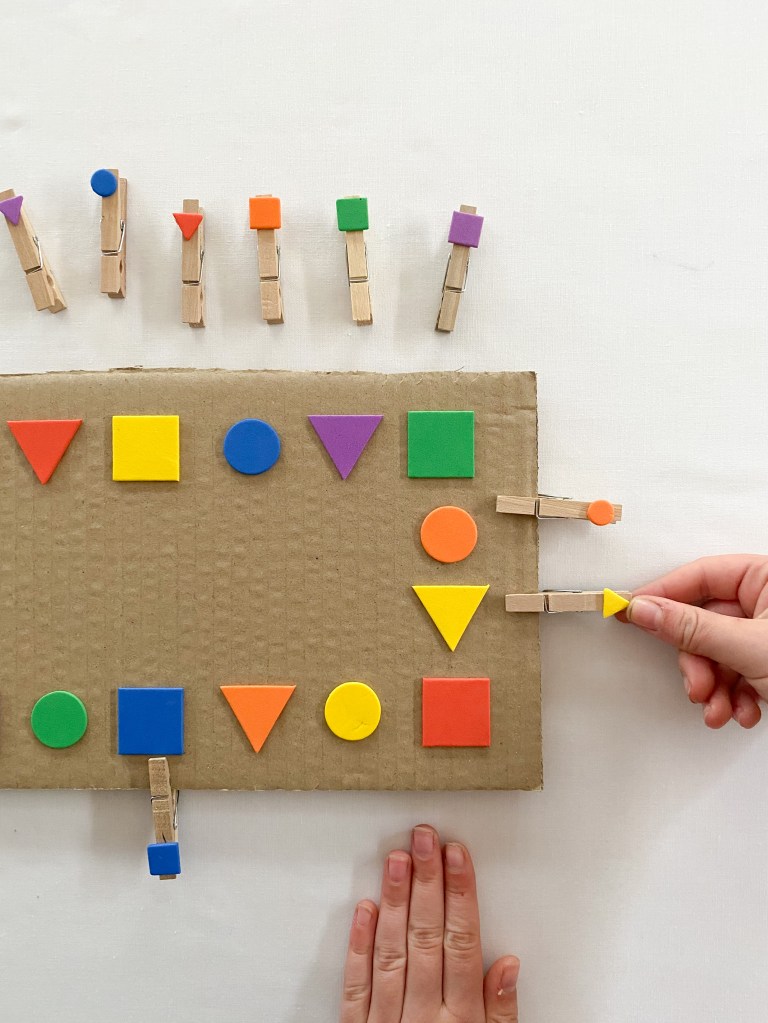
And the neat thing about this game is that there are so many ways to play. You could use a timer and see how quickly you can match the pegs or you could call out a shape or color and find the corresponding peg to match! And if you have colored pegs, you could even match colors to shapes. See the pictures below for that to make more sense 😉

Advertisements

Thank you so much for reading! Jacinta Xx. I hope that you enjoy these fun shape printables!

Advertisements
Advertisements

The Best Fall and Autumn Crafts for Kids

It feels a little strange writing this blog post about fall activities as it’s actually spring here in Melbourne. In fact, it’s a lovely sunny day! I do love Fall crafts though, especially ones I see coming out of the northern hemisphere where the falling leaves are beautiful reds and orange in color. Where we live, the leaves obviously fall, but we don’t really get the vibrant color changes. Mostly just green to brown!

We have tried a few fall crafts over the years, but this one was really fun! I do want to point out that it does require single use plastic bags – which from an environmental view – we hate using. To make the activity worthwhile, we added quite a bit of paint to each bag, so that it didn’t dry out and we could play longer, and we ensured that once we had finished with the bags, we disposed of them carefully. And you could always wash the bags out and reuse them again too if you like!

And please read through right to the end of post to find some fun FREE fall printables!

Advertisements

This is what you will need:

Leaves

Zip-lock bags

Black marker pen

Paint

Advertisements

This is what you will need to do:

1. Head outside to collect some leaves. Remember to always watch for car and bicycle traffic when you are walking your neighborhood, and make sure that adults accompany children at all times.

2. Trace the leaves onto the zip-lock bags with marker pen. You will have to make sure that you collect leaves that are slightly smaller than your bags. And if you can’t find any leaves that you LOVE, you could print some paper ones like we did!

Advertisements

3. Then add some paint to your bags. I wanted to make our activity a color mixing activity as well as a fine motor activity, so we added two colors to each bag.

4. Once the paint is in the bag, you might like to tape the bag closed to secure. The last thing you want is little people opening the bags and spilling paint everywhere. My girls are older now and know not to open the bags, so I haven’t taped these ones!

I definitely recommend taping the bags though and supervising carefully throughout the activity to avoid any paint spills and damage to clothing and furniture.

Advertisements

5. Once the paint is safely in the bag, squish it with your fingers. The idea is to both mix the colors together and keep the paint within the outlines of the leaves. This can be a little tricky for small children, especially when you are trying to mix the color evenly at the same time! See how you go!

Advertisements

My girls really love this type of activity, and I love it because it’s relatively mess free! They get to use paint, which they really enjoy, and the paint stays in the bag for a quick and easy clean up!

Advertisements

Have you seen this craft on my Instagram? These are leaves that we collected from our neighbors oak tree and colored with oil pastels. It looks much better over on Insta, but this is fun too if you are looking for a quick prep activity!

Advertisements
Advertisements

And I nearly forgot to include these FREE printables! Enjoy! Jacinta Xx.

Advertisements
Advertisements

The Best Nature Crafts for Kids

Getting out and exploring our neighborhood and enjoying nature has been so important to us this year. It has allowed for fresh air, calm and a change of scenery! While we have been out and about exploring, we have collected all sorts of beautiful natural specimens that we have turned into these wonderful crafts!

!WARNING! remember to watch for car and bike traffic while out walking, and always walk safely with an adult.

Advertisements

Nature Vases

These vases are made from a piece of recycled cardboard, this particular one was cut from the side of a delivery box, and are a great way to go on a nature hunt around your local neighborhood.

This is what you will need:

Recycled cardboard

Marker pens

Bamboo skewer

!WARNING! please be careful when using the bamboo skewers to make holes in the card. Bamboo skewers are sharp. It is strongly recommended that an adult makes the holes in the card using the bamboo skewer.

Advertisements

This is what you will need to do:

1. Draw a vase onto the piece of cardboard with black marker pen. Add some pattern and detail to your vase. Feel free to be as creative as you like! Then, color your vase with marker pens.

2. Take your bamboo skewer and make holes in the cardboard above the vase. Remember that bamboo skewers are sharp! So it is best to ask an adult to do this step.

3. Take your cardboard outdoors and search your neighborhood for colorful flowers and leaves. Push the stems of the leaves and flowers through the holes in the card.

Advertisements

Flower Crowns

This gorgeous flower crown craft is super easy to put together! You will only need a couple of easy to source materials to make this beautiful piece of art.

This is what you will need:

Recycled cardboard

Pencil

Scissors

Acrylic paint

Paintbrush

Black marker pen

Bamboo skewer

!WARNING! please be careful when using the bamboo skewers to make holes in the card. Bamboo skewers are sharp. It is strongly recommended that an adult makes the holes in the card using the bamboo skewer.

Advertisements

This is what you will need to do:

1. Using your pencil, draw the face shape onto your piece of cardboard. Cut around your drawing with pencil. Then paint the hair and use the marker pen to draw the face.

2. Carefully take the bamboo skewer and make holes across the hairline. Remember that bamboo skewers are sharp! It is best to ask an adult to do this step!

3. Now head outside on a nature hunt and search for all sorts of flowers that will make a beautiful flower crown!

Advertisements

Nature Color Hunt

This nature hunt is fun to make and is a great way to learn colors! Again, all you will need is a piece of recycled cardboard and some paint to make your very own.

This is what you will need:

Recycled cardboard

Paint

Paintbrush

Bamboo skewer

!WARNING! please be careful when using the bamboo skewers to make holes in the card. Bamboo skewers are sharp. It is strongly recommended that an adult makes the holes in the card using the bamboo skewer.

Advertisements

This is what you will need to do:

1. Paint strips of color onto the piece of recycled cardboard.

2. Carefully use the bamboo skewer to make holes along each strip of color. Remember that the bamboo skewers are sharp. It is best to ask an adult to do this step.

You may even like to add some little labels to bring some literacy and early reading skills into the activity.

3. Head outside and collect all sorts of flower and leaf specimens and push them into their correct colored holes.

Advertisements

There are so many fun ways to use nature specimens in kids crafts! What is your favorite activity? Thank you for reading! Jacinta Xx

Advertisements

Here are some fun free printables for you!

Advertisements
Advertisements
Advertisements

Halloween Scissor Crafts for Kids

Halloween is the perfect holiday for practicing scissor skills! I have heaps of fun ideas that will have your kids perfecting their scissor skills in no time. Best of all, you will only require a couple of inexpensive and simple materials – and these activities are FUN!

Keep reading, you will find a FREE printable at the end of this article that will make practicing scissor skills with your kids and students a breeze!

Advertisements

Below is my favorite and most simple scissor skill activity. To play this one, you will only need some strips of paper, a marker pen and of course, some scissors. For this activity, we used specialized children’s scissors.

Children’s scissors are great for learning how to snip and cut. They are the correct size for little hands (so they are not too heavy or too big, which helps with accuracy of cutting), they have a real safety blade that actually cuts (plastic scissors often fold paper rather than cut through it, making them frustrating for little kids to use) and have that little spring lever connecting the two handle pieces together. This spring is fabulous! The reason being, that kids only have to get their hands working in the one direction to close the scissors, then the scissors spring back open on their own. This makes using scissors so much easier for preschoolers.

!CAUTION! Remember to always carefully and closely supervise your children when using scissors!

To put this activity together, all you need to do is cut some strips of paper, label them with a variety of lines using a marker pen, and then if you like, add a little ghost to each end of the strips. I used my Cricut Maker to cut the ghosts out and then pasted them down. You could simply draw them out or use a Halloween themed sticker if you have one. Then ask your children to cut along the lines in the direction towards the ghosts. You can make your lines as easy or tricky as you like – depending on your child’s skill level.

Advertisements

I posted the below activity on my Instagram earlier this week. I have to be honest and say that I don’t really love the pictures (I have almost deleted them at least 10 times! ha ha!), but I do really LOVE the idea of the activity. It’s a fun variation on the above idea, and is a great and easy way to practice scissor use!

For this next activity, I simply cut out the ghost shapes on white printer paper, drew some lines on the ghost tails with black marker pen, and then we cut along the lines with scissors. Again, this activity allows practice of cutting in a specific direction. You may notice that these scissors are different to the ones pictured above. They are still children’s scissors, but they have a sharper point (compared to the safer, blunt tip scissors above) and are a little heavier. These scissors are good for children who have some experience using scissors.

This final ghost cutting activity is one of my favorites! Again, draw and cut a ghost shape onto white printer paper and make snips along the tail. Then for some extra fine motor practice, take a pen or a pencil and roll the snips of paper towards the body of the ghost. Then once you reach the body, remove the pencil and you will see that the paper has curled. These curly tail ghosts are just the cutest!

If you have younger children, you might want to use cardstock to use in these cutting activities. Cardstock is a little less flimsy than printer paper, making it easier for kids to handle and cut.

Advertisements

Thanks so much for reading! I hope that you find these activities helpful these Halloween holidays! Jacinta Xx

Here are some fun printables for you to practice those scissors skills:

Advertisements
Advertisements

Halloween Number Match for Kids

I first posted this super easy activity a couple of months back as a fun way for kids to practice their early number skills. The idea is to simply match the corresponding number of sticker or googly eyes to each number. This activity is perfect for practicing number recognition, number order, 1:1 correspondence and subitising skills.

Once you match the stickers to the numbers, it kind of makes the numbers look like monsters! So come October, this activity will be a super fun Halloween game too.

I have used stickers in the above pictures to label each number, but you can also use googly eyes! You can even use the googly eyes like counters, rather than gluing them down, so that you can play over and over again.

Advertisements

This is what you will need:

Copy of the FREE printable file

Stickers or googly eyes

White school glue (optional)

Advertisements

This is what you will need to do:

1. Print the free downloadable file.

2. You can now play any way that you like! You can use googly eyes to decorate your numbers, either gluing them down, or if you would like to use your print out over and over, simply use the googly eyes like counters. That way you can move them into place, and then clear them away.

!WARNING: Remember that googly eyes are a choking hazard. Always closely supervise your children and never give googly eyes to mouthing babies to play with!

3. I used some fun sticker eyes that we had at home to label the pictures that I posted over on Instagram. If you don’t have these stickers, you could try drawing some eyes with chalk or a white gel pen.

And that’s it! A really fun and super easy activity to play with your children or students this Halloween.

Before I forget, here is the FREE printable:

Thank you for reading. Jacinta Xx

Advertisements
Advertisements