Easy Halloween Crafts for Kids

Halloween is fast approaching and my kids are getting super excited! Even though the holiday will look a bit different this year and trick or treating probably wont be happening where we live – I am still determined to make it as fun as possible.

These three activities are super easy to set up and lots of fun to play. They each use clear sticky contact – the type that you would cover school books with. Clear contact is such a fun craft material! I always have some on hand at home.

Please note that the materials list in this post contain referral links!

Advertisements

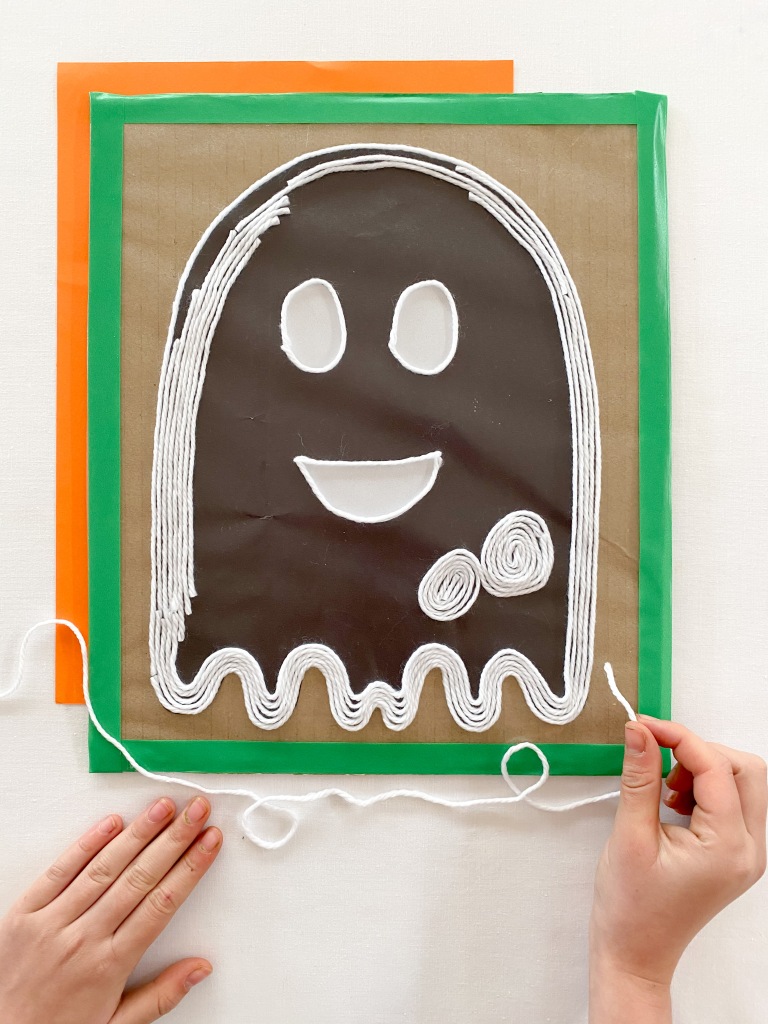
The first sticky contact activity that I want to share with you is this ghostly yarn art activity.

Here is what you will need:

A piece of recycled cardboard

Black and white construction paper

Crayola Construction Paper (120 Sheets)

Glue stick

Glue Stick Glu Stik 8g, 2 Pack, (30840251)

Clear Sticky Contact

Contact Self-Adhesive Clear Book Covering Roll (10M x 450MM)

Scissors

Blunt Tip Crayola Blunt Tip Scissors for Ages 4 Years and Up, (16187)

Washi Tape

Colored Masking Tape,Colored Painters Tape for Arts & Crafts, Labeling or Coding – Art Supplies for Kids – 6 Different Color Rolls – Masking Tape 1 Inch x 13 Yards (2.4cm X 12m)

White Yarn

RED HEART Super Saver Yarn, White
Advertisements

Here is what you will need to do:

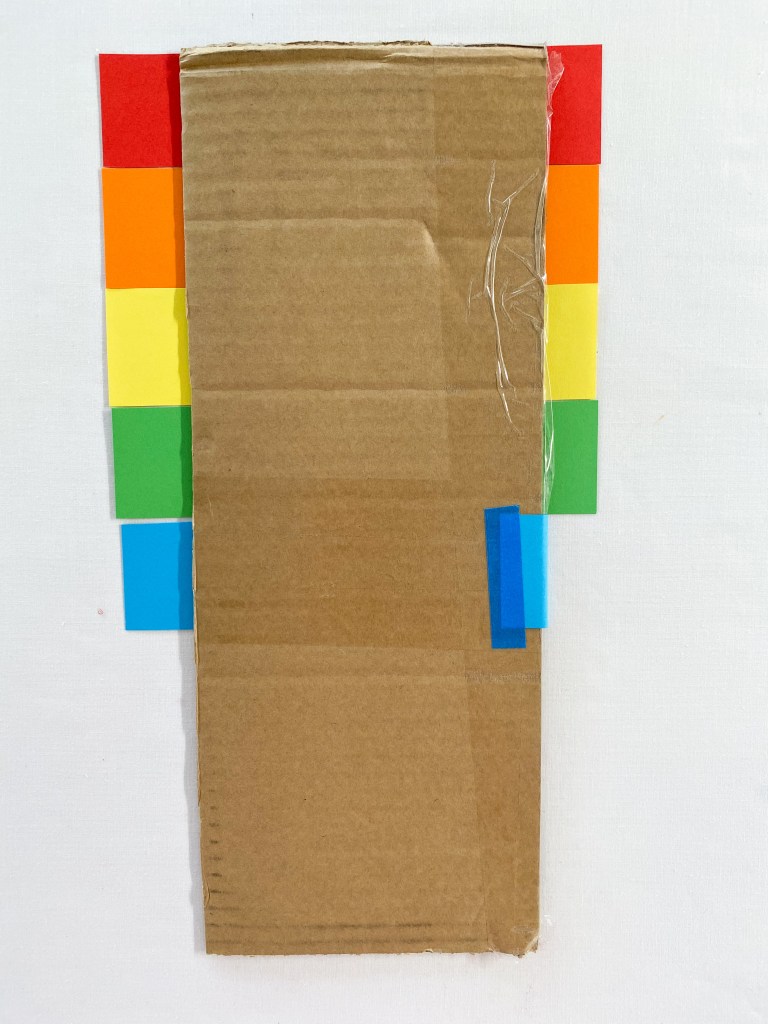
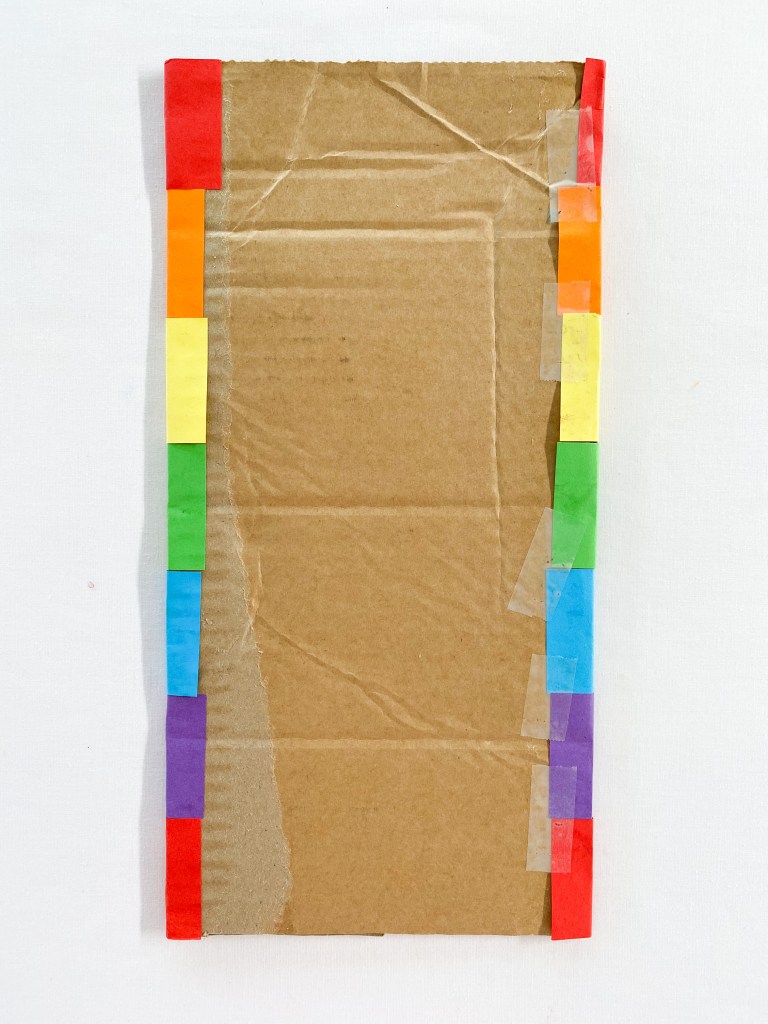
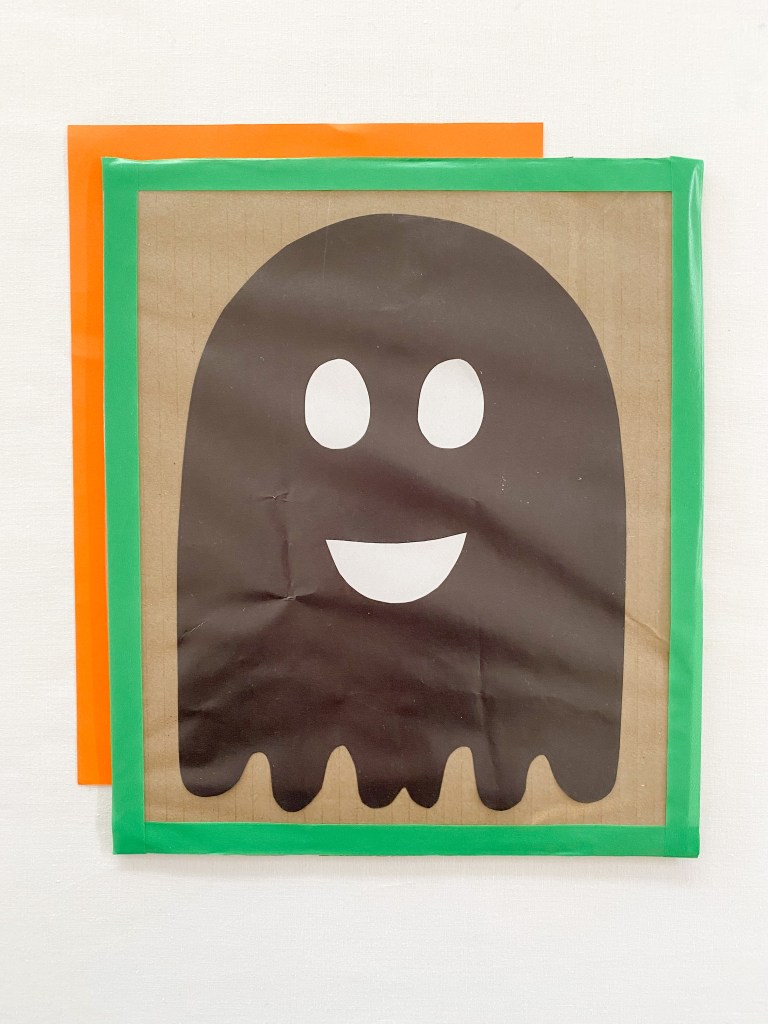
1. Place your cardboard on a flat surface. Draw a ghost on some black construction paper and glue it to the cardboard. Cut some eyes and a mouth from the white construction paper and paste down these pieces too! Cover the cardboard with clear contact – sticky side up. You may like to decorate your cardboard with a strip of colored washi tape to finish.

2. Cut a piece of white yarn and stick it down to the contact. You can start covering your ghost anywhere that you like. We started tracing around the edge of our ghost picture.

3. Keep sticking down the yarn until you have covered your entire ghost. The neat thing about this activity is that you can be as creative as you like with how you stick down the yarn. You might like to add long, straight lengths of yarn or you may like to swirl your yarn pieces.

4. And if you have younger children, you might like to use cotton balls to stick to your ghost. They work really well too and look great!

Advertisements

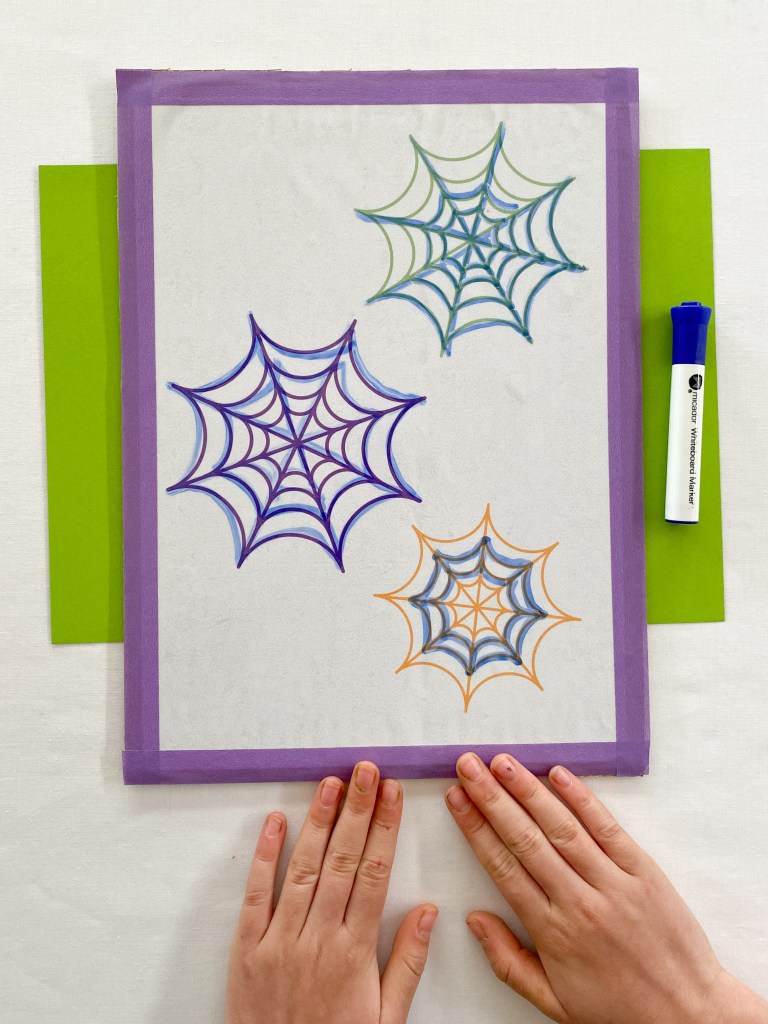
The next activity I want to share with you is this fun erasable tracing board. This activity is great for developing fine motor skills and once you’ve made it, can be used over and over again! It’s a great way to save paper!

Here is what you will need:

Recycled Cardboard

Spider Web Printable (See step 1)

Clear Contact

Erasable Marker pens

Paper Towel

Here is what you will need to do:

1. Start by printing the PDF attached below and paste it to a piece of cardboard. Once the glue is dry, cover the printed sheet with clear contact. For this activity, you will stick the contact down as you would normally cover a book. You may like to finish the board with a washi tape boarder.

Here is the link for the spider web PDF:

2. Now trace away! Grab a dry erase or white board marker and start tracing!

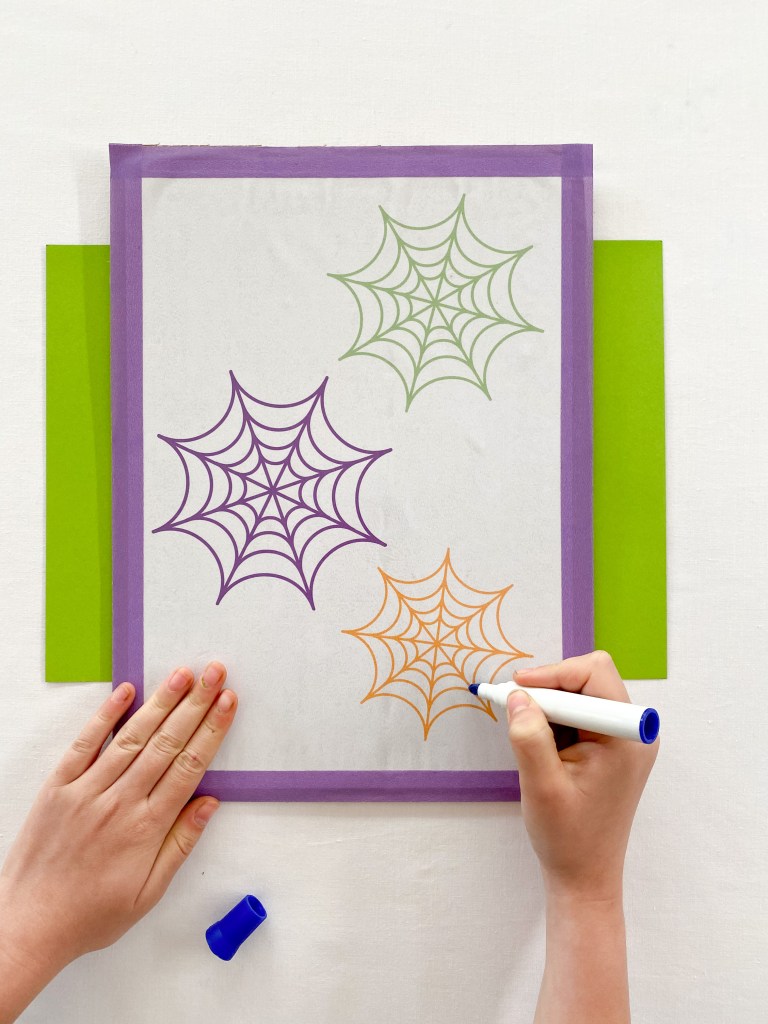
3. Once you have finished tracing, simply grab some paper towel and wipe the marker away. Then you can start tracing again!

Advertisements

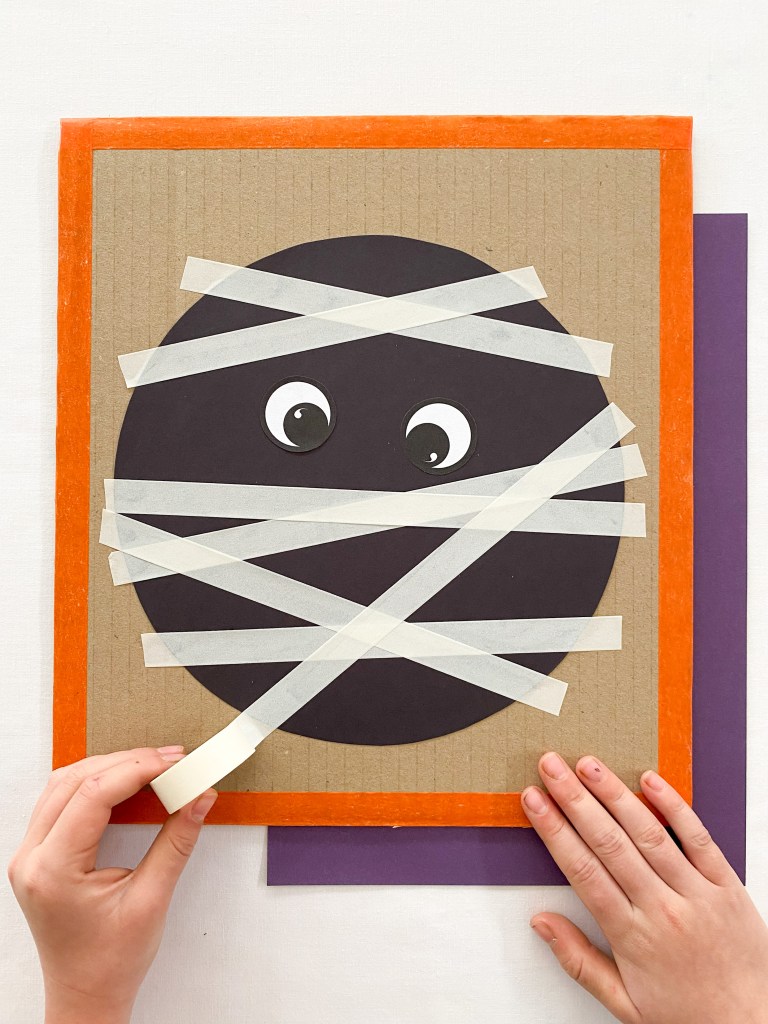
The final activity that I want to share with you is this fun sticky mummy activity! This is such fun, and best of all, you only need a few simple materials to make one.

This is what you will need:

A piece of recycled cardboard

Black construction paper

Glue stick

Clear Contact

Scissors

White washi tape

This is what you will need to do:

1. Trace a circle shape onto black construction paper and paste the circle onto the piece of cardboard. Add some big eyes to the center of your circle. Cover the entire board with clear contact, smoothing any bubbles out with your fingers as you go. You may like to decorate the boarder of your cardboard with a strip of washi tape.

If you like, you can use this Mummy picture instead of drawing your own:

2. Next, grab your roll of washi tape and start adding strips to your mummy. Each of these strips that you add will represent the mummies bandages. You can either tear lengths of tape straight from the roll and attach to the board, or use your scissors to neatly snip. It’s up to you. Both ways will look great!

3. Once you have finished your Mummy, you can remove the tape from the clear contact. You probably won’t be able to use the tape again, but you will be able to reuse the board.

Advertisements

I hope that you have enjoyed reading this article and find it useful this Halloween holiday! Jacinta Xx

Advertisements
Advertisements

Early Math Activities for Kids

I really love activities that develop math skills! Especially activities that encourage number recognition, counting skills, subitising and 1:1 correspondence. The activities that I describe here are perfect for developing all of these early numeracy skills. And best of all, you probably have everything you need to play at home already!

These activities are actually an extension of a recent blog article I posted entitled “Build A City.” You may have read it already? As well as working on the early math skills I listed above, these activities also introduce some simple addition and subtraction principles.

Advertisements

This is what you will need:

Printed copy of the downloadable files

Lego, duplo bricks or building blocks

Advertisements

Build a Tower

For this first activity, simply print out the “Build a Tower” file – you will find a link at the end of this paragraph. Then build a tower, stacking the number of bricks or blocks in each square. You will notice that the squares on the page are at different angles. This encourages your child to manipulate the angle of their tower on the page. This manipulation of angle is great for developing fine motor skills.

Here are the files that you will need. There is a black and white one, where you can match any color bricks to the squares, and a colored file. For this one, you can match colored bricks to each square.

Advertisements

Add a Tower

You will get to practice some easy addition in this activity. Begin by printing out the downloadable file – again, you will find this file at the end of the paragraph. Then simply add the blocks together to build the towers.

Here is the file that you will need:

Advertisements

Subtract a Tower

You guessed it! This next activity is subtract a tower. Start by printing the downloadable file and then substract the blocks. Place the resulting stack onto the corresponding square.

Here is the file that you will need:

Advertisements

I really hope that you enjoy building these towers! Enjoy! Jacinta Xx

Advertisements

Halloween Number Match for Kids

I first posted this super easy activity a couple of months back as a fun way for kids to practice their early number skills. The idea is to simply match the corresponding number of sticker or googly eyes to each number. This activity is perfect for practicing number recognition, number order, 1:1 correspondence and subitising skills.

Once you match the stickers to the numbers, it kind of makes the numbers look like monsters! So come October, this activity will be a super fun Halloween game too.

I have used stickers in the above pictures to label each number, but you can also use googly eyes! You can even use the googly eyes like counters, rather than gluing them down, so that you can play over and over again.

Advertisements

This is what you will need:

Copy of the FREE printable file

Stickers or googly eyes

White school glue (optional)

Advertisements

This is what you will need to do:

1. Print the free downloadable file.

2. You can now play any way that you like! You can use googly eyes to decorate your numbers, either gluing them down, or if you would like to use your print out over and over, simply use the googly eyes like counters. That way you can move them into place, and then clear them away.

!WARNING: Remember that googly eyes are a choking hazard. Always closely supervise your children and never give googly eyes to mouthing babies to play with!

3. I used some fun sticker eyes that we had at home to label the pictures that I posted over on Instagram. If you don’t have these stickers, you could try drawing some eyes with chalk or a white gel pen.

And that’s it! A really fun and super easy activity to play with your children or students this Halloween.

Before I forget, here is the FREE printable:

Thank you for reading. Jacinta Xx

Advertisements
Advertisements

DIY Rocket Launch for Kids

Here is a super easy science craft for kids. These rocket launches are actually amazing! And, all you will need to make one is two paper cups, two elastic bands and a pair of scissors. Then if you like, you can add some extra construction paper decorations to turn one of the cups into a rocket, but this is not essential. The launch will work with plain, undecorated cups too.

This craft is perfect for kids of all ages. Preschoolers will be amazed playing around with these, while older children can use them to help explain important physics principles such as force, mass and acceleration.

This is what you will need:

2 paper cups

2 elastic bands

Scissors

If you would like to make a rocket, you will also need:

Colored construction paper

Tissue paper

Tape

(You can see that I also put some aluminum foil in the picture. We didn’t use this in the end – it was really hard to wrap around the cup securely. By all means use it if you would like though!)

This is what you will need to do:

  1. Make 4 snips in the cup. Then, snip each elastic band once to form a long piece of elastic.

2. Attach the two elastic bands to the cup. The trick here is to not pull the elastics too tight. You want to retain the original shape of the cup, or as close to it as possible.

Advertisements

3. Tie each end of the elastic band to secure. Trim any excess elastic.

4. You can now launch your paper cup! To do this, place your unaltered cup upside down on a flat surface. Then gently press the elastic bands on your second cup down on top. Let go and watch the cup fly.

5. If you would like to turn you cup into a rocket, tape some strips of colored tissue paper to the inside of the cup.

6. Then cut some pieces of colored construction paper to decorate the body of the rocket. I added two windows and some fins. But you can decorate your rocket any way that you like. You might like to add your name or even a nose cone! Just be careful not to make it too heavy. Heavy cups won’t launch very high!

7. Once you have decorated your rocket. Press it onto the launch cup, let it go and watch it fly!

I hope you have making your own rocket launcher. Jacinta Xx

Chromatography Science for Kids

I love this super easy chromatography experiment for kids! It kind of reminds me of the actual chromatography techniques I used in the lab as a student. Most importantly though, this experiment is fun! It is so magical watching the colors appear.

Paper chromatography is a scientific technique that is used to separate and identify individual components within mixtures. It can be used to identify proteins and even genes in a mixture of liquids. In this activity, we simply use chromatography to make the colors magically appear on our robots.

Advertisements

This is what you will need:

Paper towel

Washable marker pens (the pens must be washable for this experiment to work).

Black permanent marker

Shallow plate or dish

Water

Advertisements

This is what you will need to do:

1. Tear the paper towel into individual sheets and fold each piece in half. Open the paper towel and draw on the right hand side of the fold with the washable markers. You can draw anything that you like. We drew robots for this experiment. And if you prefer, you can lightly draw your pictures with pencil first and then color with markers.

2. Fold the paper towel back over and trace around your drawings with black permanent marker. Add as much detail as you like.

Here is a picture of the four robots that we drew.

3. Pour a small amount of water into the bottom of a dish or container.

4. Gently drop your paper towel directly into the water. The colors that you have drawn will magically appear.

The most important part of this experiment is that you use washable markers. The experiment doesn’t work as well, if at all, if you use permanent, non washable markers for your coloring.

Here is a super fun robot memory match game for you! Thanks so much for reading! Jacinta Xx Enjoy

Advertisements
Advertisements
Advertisements

Bubblegum Art

I posted this activity over on my Instagram a couple of weeks back and wow was it popular! The girls and I had been home and were bored, so we searched through Pinterest for a fun art activity to try together. We stumbled across a similar activity and instantly knew that it would be fun!

Here is how we put our own little spin on this fun art activity.

Advertisements

This is what you will need:

White A4 paper

Cardstock

Black marker pen

Coloured markers, pencils or crayons

Scissors

Balloon

Advertisements

This is what you will need to do:

1. Draw a face with black marker pen onto a piece of white paper.

2. Color the picture.

3. Add a pattern to the background and lots more color. We pasted some confetti onto the cheeks!

4. At this point, paste your picture down onto some card. You don’t have to do this, but the paper on its own might be a little flimsy to hold when you are blowing your balloon.

5. Use your scissors to make a small hole where the mouth would be. Remember that scissors are sharp. Always be careful when using scissors and closely supervise children using scissors.

5. Gently press the balloon through the hole.

6. Blow the balloon up!

Thanks so much for reading! If you have any comment or questions, pop them below and I will get back to you. Jacinta Xx

Advertisements

If you would like to make a girl balloon art, here’s a template:

If you would like to make a boy balloon art, here’s a template:

Advertisements
Advertisements

Bee Scissor Skills

This scissor skill activity is one of my favorites. The bees are super easy to put together, and are a great tool for developing scissor skills in kids. And if you don’t like the idea of cutting through the adorable bees, I have included a FREE printable for you that doesn’t involve snipping through any of these cute little guys.

This is what you will need:

Colored construction paper

Pencil

Scissors

Glue stick or tape

Black marker pen

Googly eyes

!WARNING! Remember that scissors are sharp. Adults should always closely supervise children when they are using scissors.

This is what you will need to do:

1. Trace a circle shape onto the yellow paper with pencil. You might like to go on a shape hunt around your home to find the perfect size circle to trace. Think drinking glasses or cups, small containers and side plates.

2. Next, cut the circles out with scissors.

3. Cut some wings for your bees from light blue paper. I drew little heart shapes and then cut them out. While you have the scissors out, cut a small triangle shaped stinger from black paper.

4. Attach the wings and the stinger to the back of the bees with tape or glue.

5. Turn the bees over and draw line patterns on the bees with black marker pen. Try drawing dotted lines, zig-zag and curly lines. Finish your bees with a smiley face and glue down a googly eye.

6. Now you are ready to start cutting! Cut carefully along the lines with scissors.

If you don’t like the idea of cutting through the bees, here is another fun scissor skill activity for you.

If you don’t have the time to make these bees, here is a fun printable that is similar.

And if you would like read to more about developing scissor skills in your children, have a look at the post I published a couple of days ago. There are so many ideas there for you. Thanks for reading! Jacinta Xx

Days of The Week Peg Board

Remote learning this school term has meant that our days have started to blend into one another. As one of my friends said to me, “I put the bins out on Tuesday thinking it was Wednesday. Then had to go and find my phone later that day to see what day it actually was as the bins didn’t get emptied!” This made me laugh – and feel better that we had lost track of the days in lockdown too!

To help better keep track of our days, we turned a piece of recycled card into this colorful weekly calendar. These peg board calendars are super easy to put together, look amazing and because they are made from recycled card and paper, they are inexpensive to make. These calendars will help children learn the days of the week and their order, and you can also use them to keep track of after school activities and the weather.

Advertisements

This is what you will need:

Piece of recycled card

Strips of colored paper

Scissors

Glue stick

Tape

Black marker pen

Pegs

Printed labels and weather symbols

Small piece of black cardstock

Advertisements

This is what you will need to do:

1. Cut strips of colored paper. You will need seven equally sized strips of paper – one for each day of the week.

2. Use a glue stick (or glue of your choice) and paste the strips along the length of the card. Keep pasting until you have your seven strips attached. If there is any card left uncovered, simply trim away the excess.

3. Flip the card over and fold the excess paper to the back. Secure the ends to the card with glue or tape – just like the example with the blue paper below.

The finished card will look a little like this from the back. As you can see, the card does not need to be in perfect condition. The colored paper will cover any rips and tears in the card!

4. Next, label each day of the week. I used my Cricut to cut the letters and then glued them down. You could just as easily use a black marker pen to label the days. We started with Monday as our first day of the week, but feel free to start with Sunday if you would prefer.

5. The next thing to do is prepare the labels for your pegs. To do this, you can write the labels onto a piece of white paper, type and print them out – or use the free printable download below. It’s up to you! Once you have the labels prepared, paste them down onto a piece of black paper and trim. Attach them to your pegs.

Here is the Icon printable download

Advertisements

6. Now start pegging and labeling your days.

Thanks so much for reading this article! I hope you get a chance to make your own colorful days of the week peg calendar. Jacinta Xx

Here is a free printable days of the week board. It is a PDF set to the size of an A4 sheet of paper. It might be helpful in getting you started!

Advertisements

If you want your board to start on Monday, here is the printable for you!

If you would like your board to start on Sunday, here is the printable for you!

Advertisements
Advertisements

Scissor Skills – How to teach kids to safely use scissors.

Learning how to use scissors with ease and accuracy is a really important lesson for children. In this post, I have collated my ten most favorite ways to practice scissor skills. These activities are all super easy to put together and are lots of fun for kids to practice and master.

You will only require 3 materials for each of these activities! Yep 3, that’s all!

1 Scissors: We like to use specialized children’s scissors (with a metal blade) for cutting and snipping. These scissors are readily available at craft, department and stationary stores. The neat thing about children’s scissors is that they have a safety blade and a blunt tip, which protect little fingers from getting hurt. They’re also light in weight and the correct size for little hands. Big, heavy scissors are going to be difficult for children to manoeuver and control. I suggest avoiding plastic scissors, as they often don’t actually cut the paper. This frustrates children and discourages them from practicing and mastering their scissors skills. It is ultimately up to you though, which scissors you feel comfortable allowing your children to use.

2 Paper: You can use any paper that you like for your cutting and snipping activities. In most of the activities that I present in this article, I have used off cuts and scraps of colored paper. When possible, I also try to use a light cardstock. It’s a little bit heavier than paper, so it doesn’t flop around as much, making it easier for children to hold.

3 Marker pen: I use a black marker pen to mark the lines on the paper pieces. Start by marking long solid lines for your children to follow with scissors. Once your child has mastered following the solid lines, you can move to dotted or dashed lines to increase the difficulty.

!WARNING! Before presenting the activities, it is important to remember that scissors are sharp! It is always a great idea to remind children at the beginning of each lesson or activity that scissors can be dangerous when not used correctly. And of course, adults should always closely supervise children when using scissors.

Here are a couple of rules that I like to remind my kids before using scissors:

  1. Scissors are for cutting paper only – not clothing, hair or fingers!
  2. Encourage small snipping movements where your child moves the paper around the scissors, not big clunky movements.
  3. And of course scissors should always point away from the body and only be used while stationary. Children shouldn’t walk around with scissors. If they must, remind children to secure the blades within the palms of their hands and to pass them via the handles.

You might have your own house rules for using scissors that you would like to add to your own scissor safety list.

Using scissors is tricky, so don’t worry if your child’s work appears messy at first. Your child will progress at their own pace. By preparing fun and colorful activities for them, they will be happy to practice and get better and better.

Here is the list of my 10 most favourite activities for increasing scissor skills.

1. Beginner scissor pattern with sticky marker dots: I love this super easy to set up scissor practice activity. These are off cuts of colored paper that I had at home. I drew different shaped lines on them with marker pen and then labelled with sticker dots to show where little fingers need to be positioned for safe cutting. If you do not have sticker dots, you can simply draw the dots with marker pen. That will work just as well! Just remember that some of the lines shown, such as the swirly line, can be quite difficult to cut for beginners. Practise straight lines first and then introduce harder lines to follow and cut.

2. Trace and cut patterns: I love that you set this activity up once, but two skills are learned and practiced! To play simply draw out some dashed line patterns onto strips of paper. Then ask your child to trace the lines. You will see that I added the hearts to one side of the paper. This gives the activity direction. You can trace towards the hearts or away – whatever direction your child chooses. Tracing lines is a great pre-writing skill and helps strengthen the little muscles in your child’s fingers. Once the lines have been traced, ask your child to cut along the lines. It’s lots of fun!

3. Advanced cutting activities: Once your child has mastered snipping and cutting in a straight line, you can move to more difficult cutting patterns. These activities are just as simple to set up! For more advanced cutting activities you will just have to think of more challenging lines for your child to cut along. Think curved and zig-zag lines, and even intersecting lines. These activities will not only challenge scissor skills but will also challenge their strategic and creative thinking skills.

4. Paper bag haircuts: this activity also doubles as a fun art and craft activity and is a cute way to decorate a simple brown paper lunch bag. Start by decorating the front of the paper bag with a cute smiley face. Then take your scissors and snip some hair across the top of the bag. Your child can either cut through the two layers of the bag together or individually. Let them think about the best strategy to successfully make the cuts.

5. Cutting with direction: For this activity, simply draw some patterns on scraps of paper with marker pens and then give the lines direction by adding little arrow heads at the end of the lines. Then ask you children to cut the lines in the direction that the arrow is pointing. You can draw straight lines for beginners and curved lines and even circles for older children with more developed scissor skills.

6. Spring time trace and cut: you can always theme your cutting activities to your child’s interests! To make this flowery activity, draw some flowers onto squares or paper. You can then either cut along these lines directly, or ask your child to trace over the lines before cutting. Again, tracing along the lines is great pre-writing practice. As I mentioned above, cutting the curved lines can be tricky, so make sure that you work up to this activity. You do not want your child getting frustrated or disappointed if the activity is way too difficult for them.

7. Meet in the middle: this scissor skill lesson is a great collaborative activity that we like to call “meet in the middle.” It’s perfect for siblings and small groups in the classroom. To play, we taped strips of colored paper together, ruled cutting lines and marked the midline with a star shaped sticker – again, if you don’t have stickers, mark the middle with marker pen. Then use your scissors to cut along the ruled lines and “meet in the middle.” Remember that this activity is not a race! It’s about cutting accurately along the straight lines and stopping once you reach the midline.

8. Curly rainbows: this is one of my most favorite Instagram posts ever! As well as providing a lovely scissor practice opportunity, it also results in a beautiful, happy art piece. To put this activity together, simply draw some clouds on a piece of white paper and ask your child to cut around the outline with scissors. Then ask them to cut strips of colored paper. Tape the strips to the back and draw smiley faces onto the clouds. You can either stop there, or if you want some extra fine motor skill practice, curl the paper around a pencil!

9. Cutting shapes: this activity has direction and requires a little more concentration than snipping short straight lines. It also provides a great opportunity to introduce shape and some early geometry principals. To put this activity together, simply cut the shapes from some colored paper. Then draw the lines with marker pen and add some little direction arrows. Finally, ask your children or students to cut along the line. This one is actually quite fun!

10. Cutting puzzles: I love it when you set up an activity that can be used over and over again. This was actually an activity that I put together for my girls in the lead up to Easter, but you could just as easily turn it into a dinosaur egg game and it use it year round. To play, I simply cut out the egg shapes, drew lines on them with marker pen and asked my girls to cut along the lines. We then kept the pieces and used them as puzzles! You can store the pieces in an envelope or bag and then play with them as often as you like.

Here is a FREE printable summary of this article!

What are your favorite ways to practice scissor skills? Have you tried any of these activities?

Thank you so much for reading! If you have any questions pop them in the comments below and I will get back to you. Jacinta Xx

Hello!

Hello and welcome to my blog! I actually purchased this blog domain over three years ago with grand plans of blogging all the step-by-step details of the arts and crafts I create over on my Instagram. As I generally only publish the finished results on Instagram, I thought a blog would be an amazing opportunity to outline all the tips and tricks I have up my sleeve for making and creating easy, fun and colourful craft activities for kids. I also had plans of adding links to printables to help you create fun learning opportunities in your own home and even the classroom. In my mind, this blog was such a fun and colourful little corner of the web!

But…and there’s always a but!…ha ha, I always got stuck writing my first post. I would sit down and start typing, but never had anything very interesting to say. I tried introducing myself, I tried talking about my background as a Scientist and our lives here in Melbourne. It all sounded so blah! So, I have finally decided to just skip it all and get started. After all, if you decide to follow along, you will learn all about me along the way!

So here goes! Welcome to my blog! It is a work in progress and totally built by me. Enjoy!