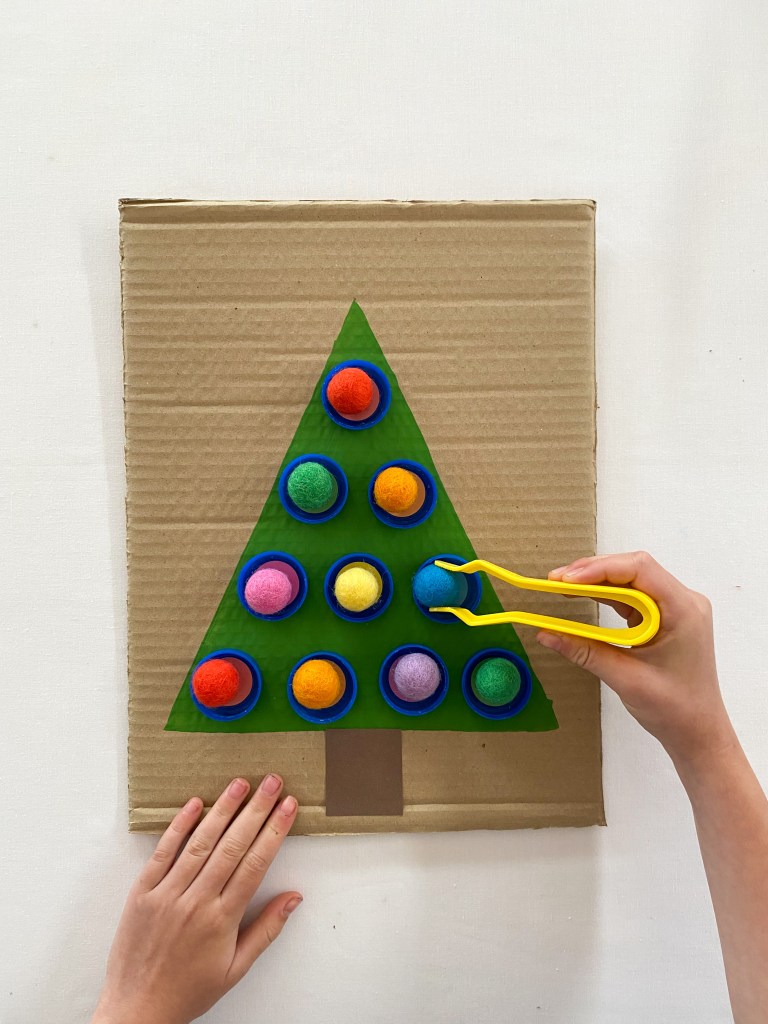
This fun activity is perfect to make in the lead up to these holidays. It’s great for developing color recognition, counting and fine motor skills. And the fact that it is made from recycled and easily accessible materials also means that it is inexpensive to set up!
Advertisements
This is what you will need:
A piece of recycled cardboard
Pencil
Ruler
Green paint
Glue – I used white school (PVA) glue
Recycled bottle tops – I used milk bottle tops
Circle stickers
Pom poms
Tweezer or tongs
Advertisements
This is what you will need to do:
1. Cut a piece of recycled cardboard to size. You can use any size piece of cardboard that you like. Use a pencil and ruler to draw a triangle shape and then paint it green. You might also like to paint a star on the top of your tree. I wish that I had! If you do not have green paint, you can always use crayons, marker pens or even pencils.
Advertisements
2. Once your green paint is dry, glue down the bottle tops onto the tree. I lined our bottle tops up in rows, but feel free to spread them across your tree in any pattern that you like.
Advertisements
3. Label the bottle tops with some colored circle stickers. If you do not have circle stickers, you could always cut some small circles from colored paper and glue them down instead.
Advertisements
4. Match the pom poms to the bottle tops. Repeat and play over and over again. We used tweezers to transfer the pom poms to the bottle tops – this is great for developing fine motor skills – but feel free to use fingers, a peg or any other tongs that you might have at home!
Advertisements
I hope that you enjoy this activity! Let me know how you find it! Jacinta Xx
If you are unable to make one of these Christmas trees yourself or if you would like a quick alternative, try this fun, FREE printable version of the game.
And here are a couple more FREE holiday printable worksheets for you! There is a match the upper and lower case letter game, a count and color game and, a find and color the shapes game!
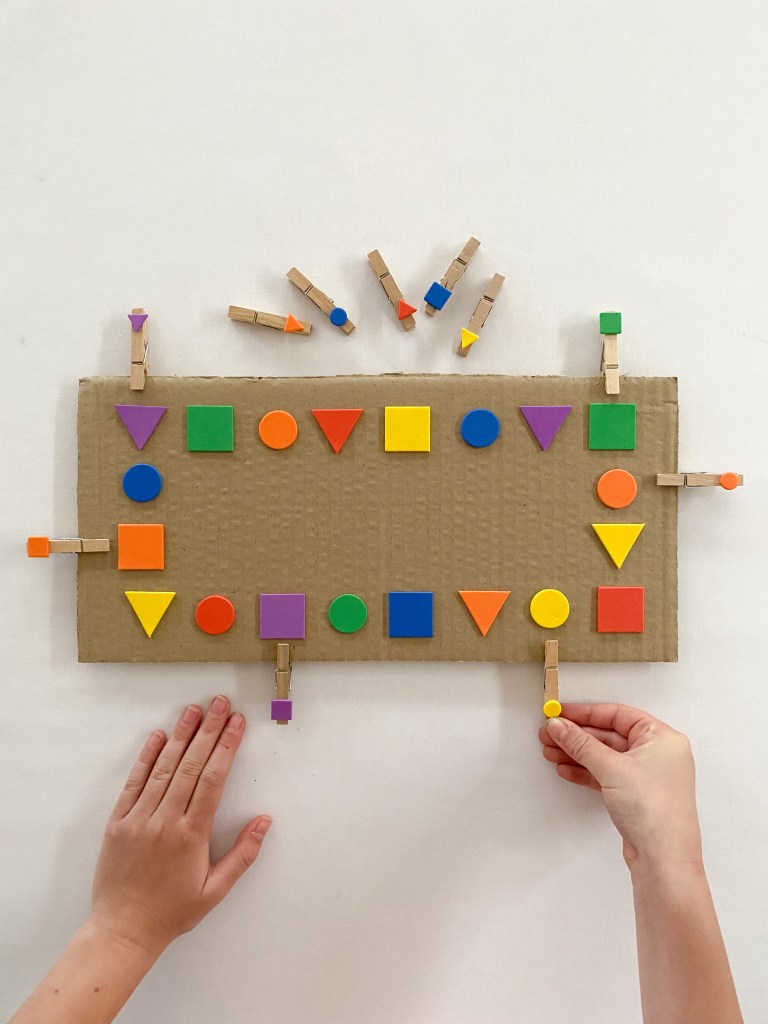
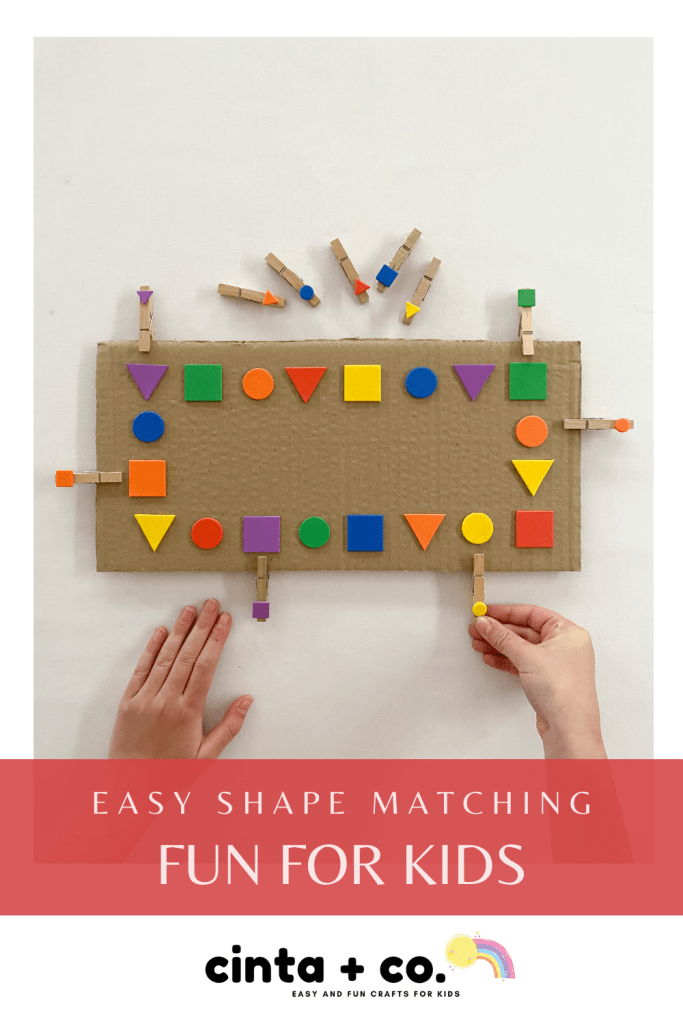
Learning how to recognize shapes and their properties is an essential early numeracy skill. My kids love learning all about shapes, and I love putting activities together that teach about shapes. As you can see in this post, shape activities can be so easy to set up, require few materials and can be played with over and over again.
Advertisements
This is what you will need – you will only need three things!
A piece of recycled cardboard
Shape stickers – if you do not have stickers, simply use some marker pens to draw them!
Small pegs
Advertisements
This is what you will need to do:
1. Trim your piece of cardboard to size. For reference, our piece of cardboard is about 30 cm long and 20 cm high. This is just a rough guide though, you can use any size piece of card that you like. Once you are happy with your cardboard, simply paste stickers around the edge of the card. Make sure you leave enough space to place a peg between the sticker and the actual edge of the card.
If you do not have shape stickers, simply draw some shapes with marker pens or colored pencils directly onto the card. You can draw any shape and use any colors that you like!
Advertisements
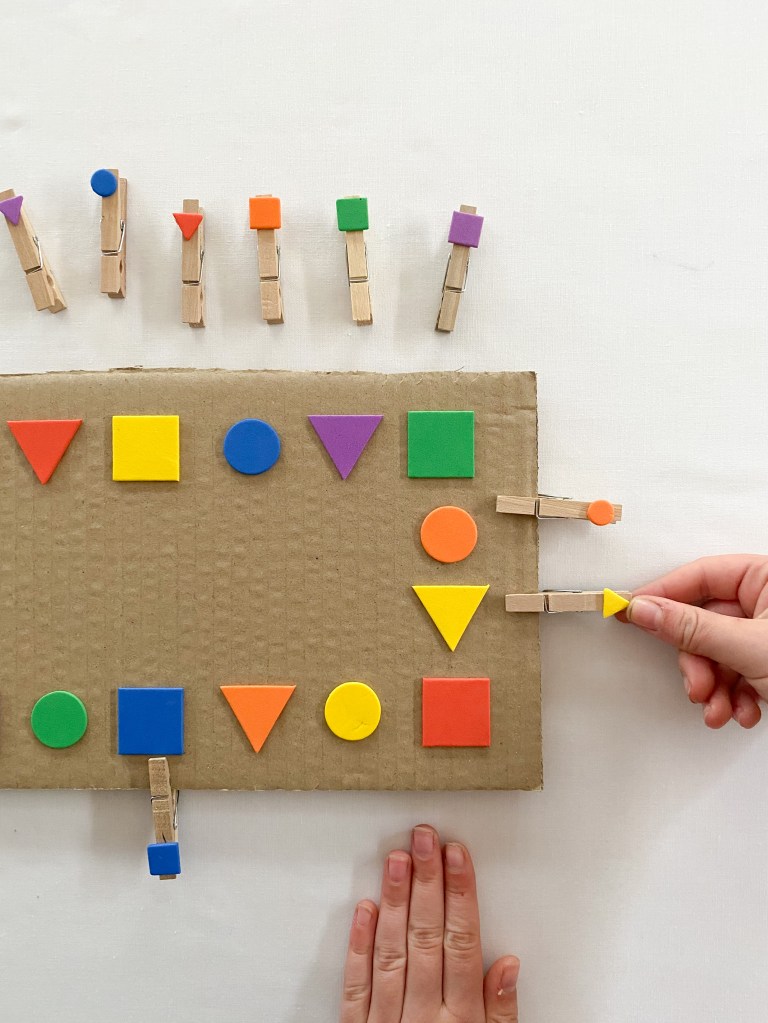
2. Next, prepare your matching pegs. I used small shape stickers to label our pegs. As our game is a shape and color matching game, I made sure that the pegs were labelled with the same colored shape as the shapes on the cardboard.
Advertisements
3. Now play! Simply match the pegs to the board. Attaching the pegs is great for fine motor skill development and for encouraging pincer grip – the finger grip required to hold a pencil.
Advertisements
And the neat thing about this game is that there are so many ways to play. You could use a timer and see how quickly you can match the pegs or you could call out a shape or color and find the corresponding peg to match! And if you have colored pegs, you could even match colors to shapes. See the pictures below for that to make more sense 😉
Advertisements
Thank you so much for reading! Jacinta Xx. I hope that you enjoy these fun shape printables!
It feels a little strange writing this blog post about fall activities as it’s actually spring here in Melbourne. In fact, it’s a lovely sunny day! I do love Fall crafts though, especially ones I see coming out of the northern hemisphere where the falling leaves are beautiful reds and orange in color. Where we live, the leaves obviously fall, but we don’t really get the vibrant color changes. Mostly just green to brown!
We have tried a few fall crafts over the years, but this one was really fun! I do want to point out that it does require single use plastic bags – which from an environmental view – we hate using. To make the activity worthwhile, we added quite a bit of paint to each bag, so that it didn’t dry out and we could play longer, and we ensured that once we had finished with the bags, we disposed of them carefully. And you could always wash the bags out and reuse them again too if you like!
And please read through right to the end of post to find some fun FREE fall printables!
Advertisements
This is what you will need:
Leaves
Zip-lock bags
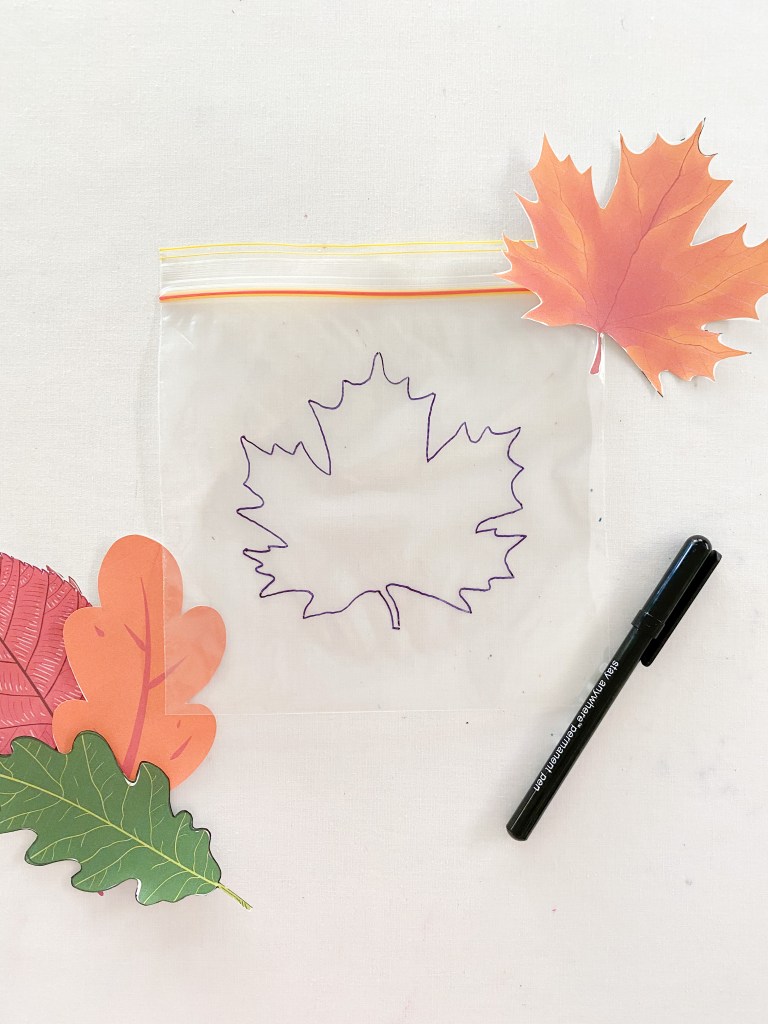
Black marker pen
Paint
Advertisements
This is what you will need to do:
1. Head outside to collect some leaves. Remember to always watch for car and bicycle traffic when you are walking your neighborhood, and make sure that adults accompany children at all times.
2. Trace the leaves onto the zip-lock bags with marker pen. You will have to make sure that you collect leaves that are slightly smaller than your bags. And if you can’t find any leaves that you LOVE, you could print some paper ones like we did!
Advertisements
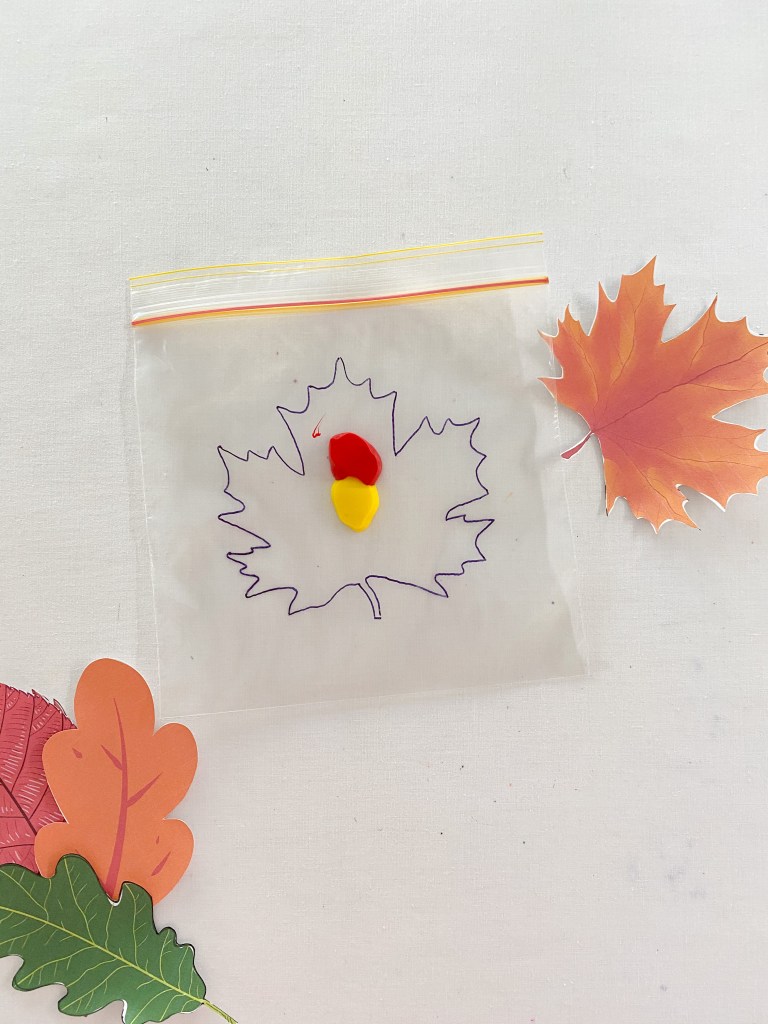
3. Then add some paint to your bags. I wanted to make our activity a color mixing activity as well as a fine motor activity, so we added two colors to each bag.
4. Once the paint is in the bag, you might like to tape the bag closed to secure. The last thing you want is little people opening the bags and spilling paint everywhere. My girls are older now and know not to open the bags, so I haven’t taped these ones!
I definitely recommend taping the bags though and supervising carefully throughout the activity to avoid any paint spills and damage to clothing and furniture.
Advertisements
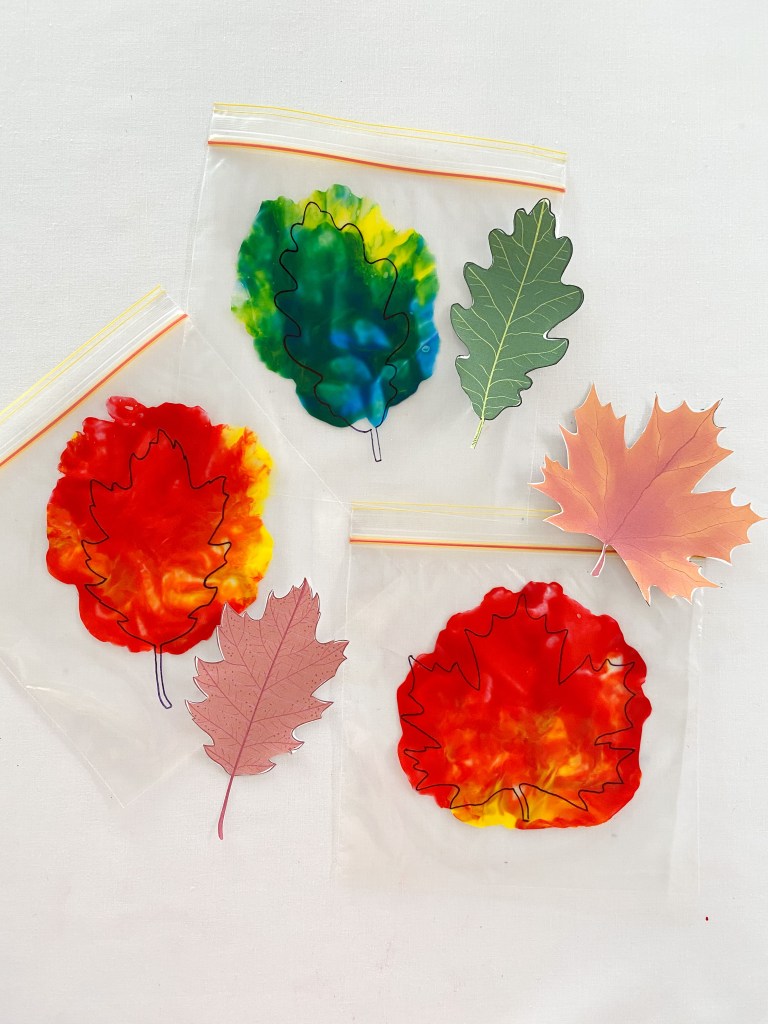
5. Once the paint is safely in the bag, squish it with your fingers. The idea is to both mix the colors together and keep the paint within the outlines of the leaves. This can be a little tricky for small children, especially when you are trying to mix the color evenly at the same time! See how you go!
Advertisements
My girls really love this type of activity, and I love it because it’s relatively mess free! They get to use paint, which they really enjoy, and the paint stays in the bag for a quick and easy clean up!
Advertisements
Have you seen this craft on my Instagram? These are leaves that we collected from our neighbors oak tree and colored with oil pastels. It looks much better over on Insta, but this is fun too if you are looking for a quick prep activity!
Advertisements
Advertisements
And I nearly forgot to include these FREE printables! Enjoy! Jacinta Xx.
Halloween is fast approaching and my kids are getting super excited! Even though the holiday will look a bit different this year and trick or treating probably wont be happening where we live – I am still determined to make it as fun as possible.
These three activities are super easy to set up and lots of fun to play. They each use clear sticky contact – the type that you would cover school books with. Clear contact is such a fun craft material! I always have some on hand at home.
Please note that the materials list in this post contain referral links!
Advertisements
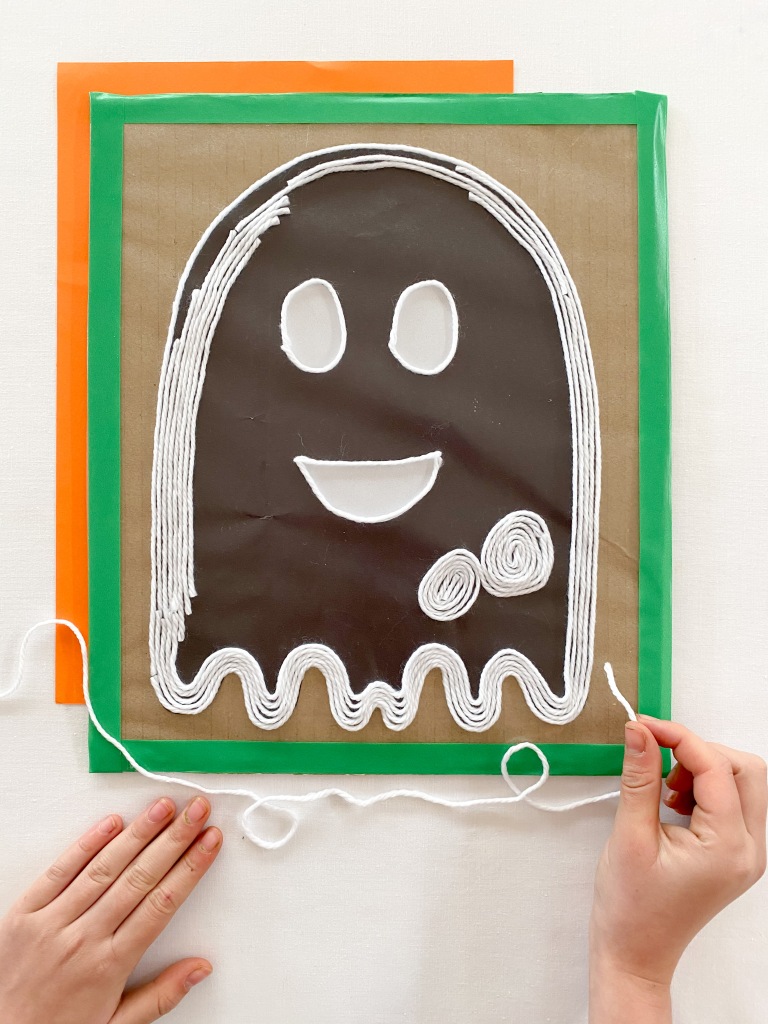
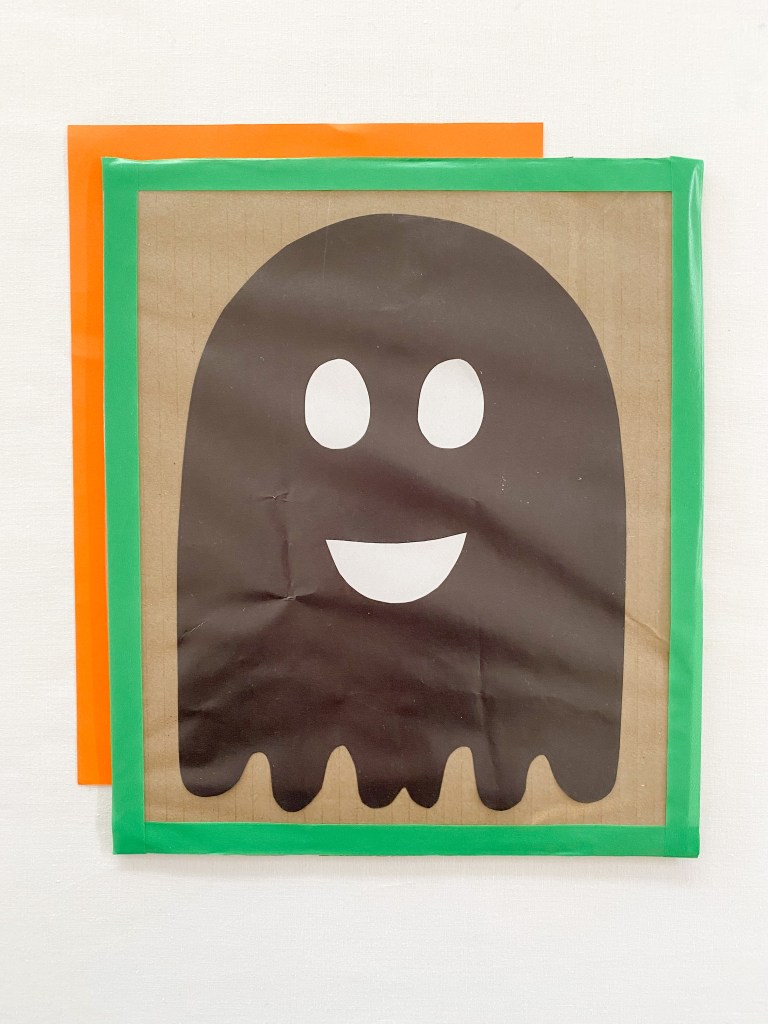
The first sticky contact activity that I want to share with you is this ghostly yarn art activity.
1. Place your cardboard on a flat surface. Draw a ghost on some black construction paper and glue it to the cardboard. Cut some eyes and a mouth from the white construction paper and paste down these pieces too! Cover the cardboard with clear contact – sticky side up. You may like to decorate your cardboard with a strip of colored washi tape to finish.
2. Cut a piece of white yarn and stick it down to the contact. You can start covering your ghost anywhere that you like. We started tracing around the edge of our ghost picture.
3. Keep sticking down the yarn until you have covered your entire ghost. The neat thing about this activity is that you can be as creative as you like with how you stick down the yarn. You might like to add long, straight lengths of yarn or you may like to swirl your yarn pieces.
4. And if you have younger children, you might like to use cotton balls to stick to your ghost. They work really well too and look great!
Advertisements
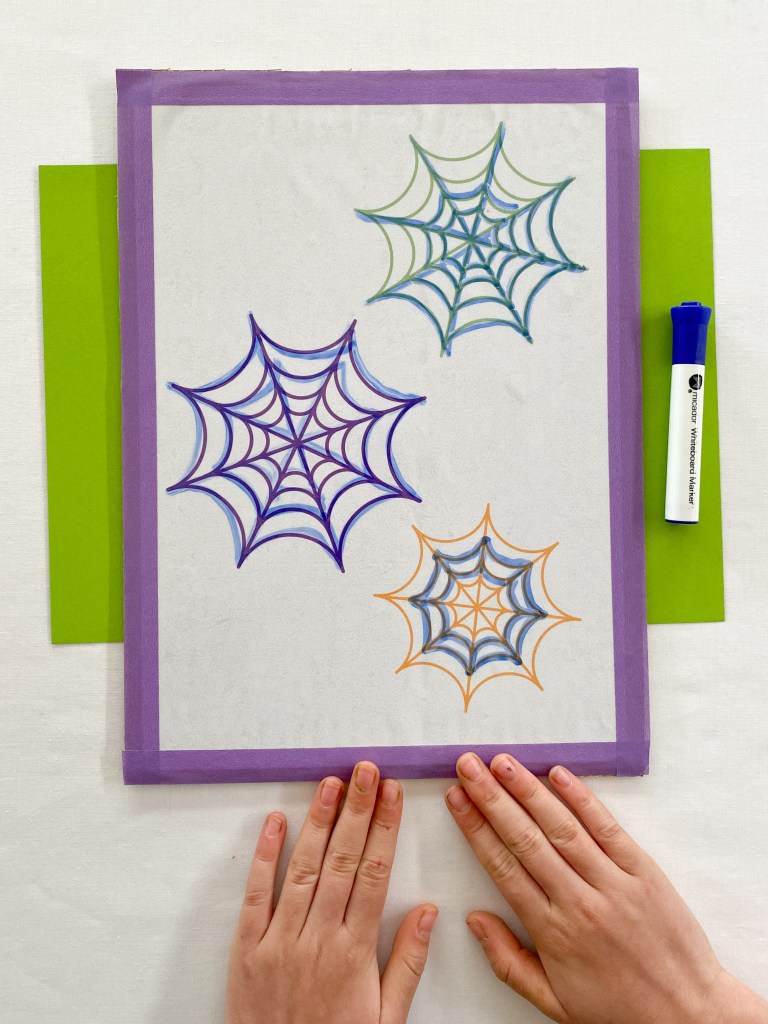
The next activity I want to share with you is this fun erasable tracing board. This activity is great for developing fine motor skills and once you’ve made it, can be used over and over again! It’s a great way to save paper!
Here is what you will need:
Recycled Cardboard
Spider Web Printable (See step 1)
Clear Contact
Erasable Marker pens
Paper Towel
Here is what you will need to do:
1. Start by printing the PDF attached below and paste it to a piece of cardboard. Once the glue is dry, cover the printed sheet with clear contact. For this activity, you will stick the contact down as you would normally cover a book. You may like to finish the board with a washi tape boarder.
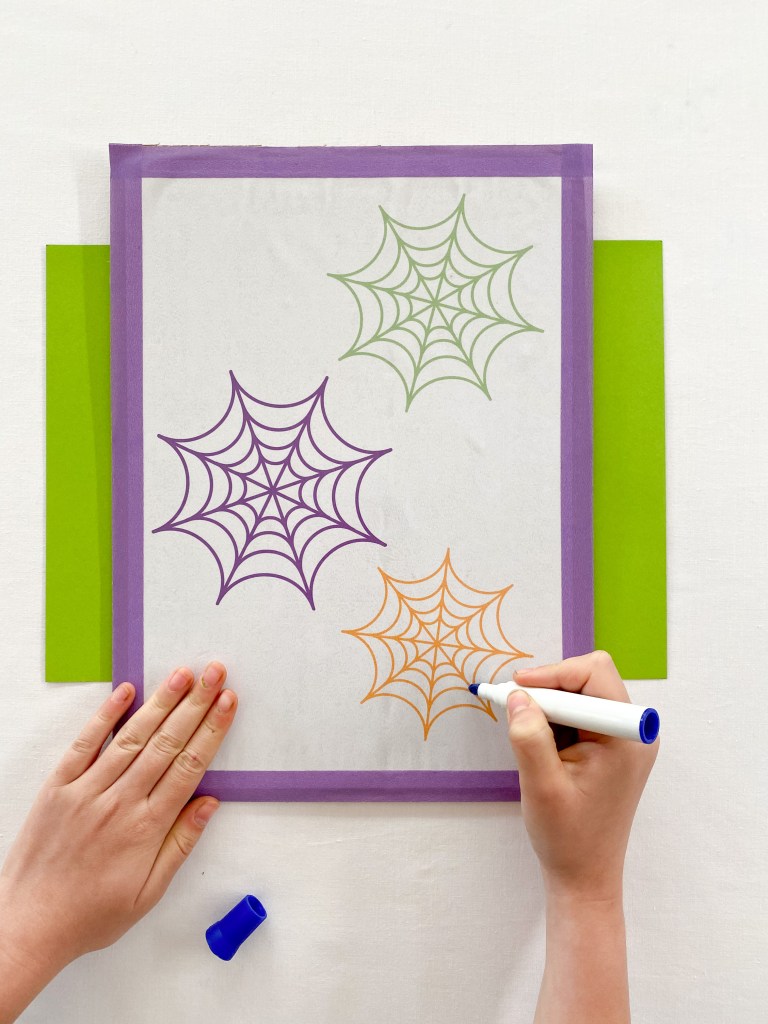
2. Now trace away! Grab a dry erase or white board marker and start tracing!
3. Once you have finished tracing, simply grab some paper towel and wipe the marker away. Then you can start tracing again!
Advertisements
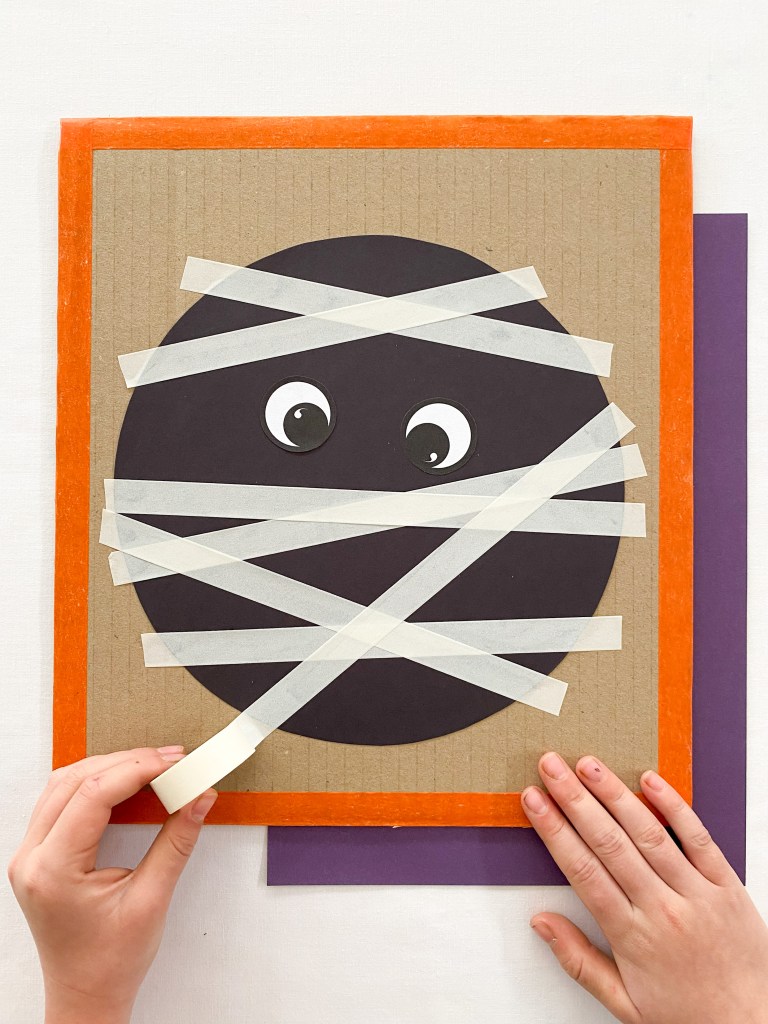
The final activity that I want to share with you is this fun sticky mummy activity! This is such fun, and best of all, you only need a few simple materials to make one.
This is what you will need:
A piece of recycled cardboard
Black construction paper
Glue stick
Clear Contact
Scissors
White washi tape
This is what you will need to do:
1. Trace a circle shape onto black construction paper and paste the circle onto the piece of cardboard. Add some big eyes to the center of your circle. Cover the entire board with clear contact, smoothing any bubbles out with your fingers as you go. You may like to decorate the boarder of your cardboard with a strip of washi tape.
If you like, you can use this Mummy picture instead of drawing your own:
2. Next, grab your roll of washi tape and start adding strips to your mummy. Each of these strips that you add will represent the mummies bandages. You can either tear lengths of tape straight from the roll and attach to the board, or use your scissors to neatly snip. It’s up to you. Both ways will look great!
3. Once you have finished your Mummy, you can remove the tape from the clear contact. You probably won’t be able to use the tape again, but you will be able to reuse the board.
Advertisements
I hope that you have enjoyed reading this article and find it useful this Halloween holiday! Jacinta Xx
I really love activities that develop math skills! Especially activities that encourage number recognition, counting skills, subitising and 1:1 correspondence. The activities that I describe here are perfect for developing all of these early numeracy skills. And best of all, you probably have everything you need to play at home already!
These activities are actually an extension of a recent blog article I posted entitled “Build A City.” You may have read it already? As well as working on the early math skills I listed above, these activities also introduce some simple addition and subtraction principles.
Advertisements
This is what you will need:
Printed copy of the downloadable files
Lego, duplo bricks or building blocks
Advertisements
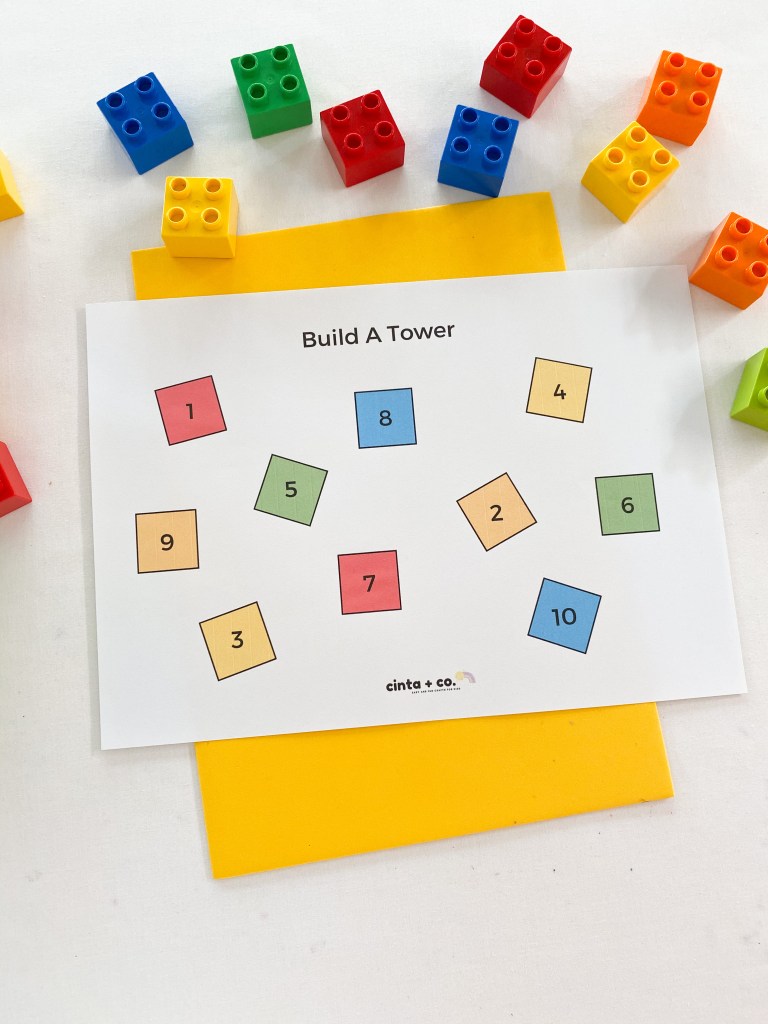
Build a Tower
For this first activity, simply print out the “Build a Tower” file – you will find a link at the end of this paragraph. Then build a tower, stacking the number of bricks or blocks in each square. You will notice that the squares on the page are at different angles. This encourages your child to manipulate the angle of their tower on the page. This manipulation of angle is great for developing fine motor skills.
Here are the files that you will need. There is a black and white one, where you can match any color bricks to the squares, and a colored file. For this one, you can match colored bricks to each square.
You will get to practice some easy addition in this activity. Begin by printing out the downloadable file – again, you will find this file at the end of the paragraph. Then simply add the blocks together to build the towers.
You guessed it! This next activity is subtract a tower. Start by printing the downloadable file and then substract the blocks. Place the resulting stack onto the corresponding square.
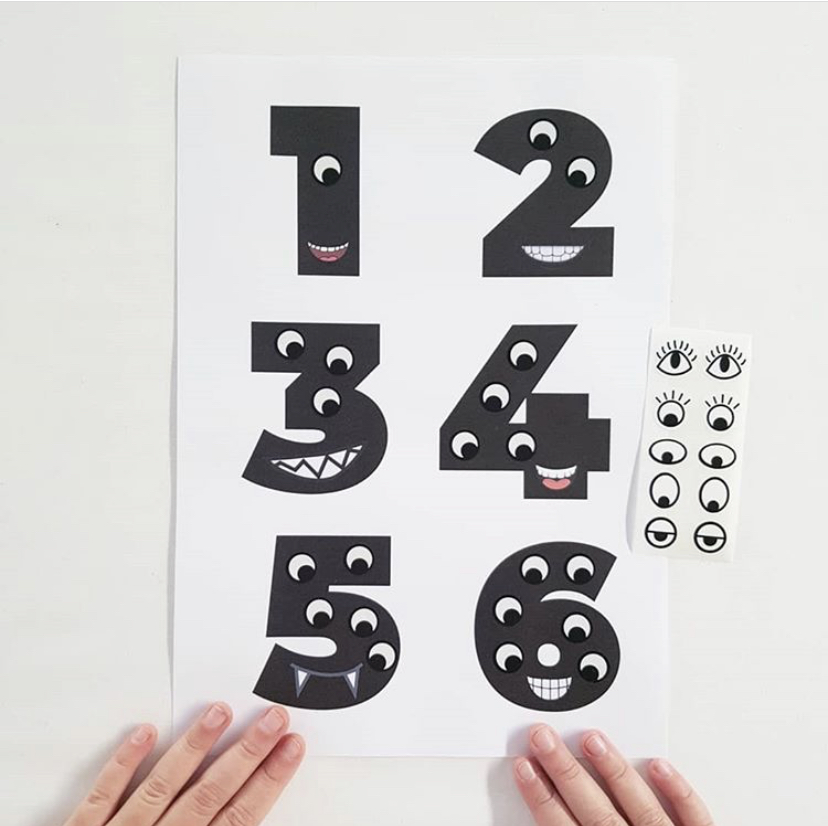
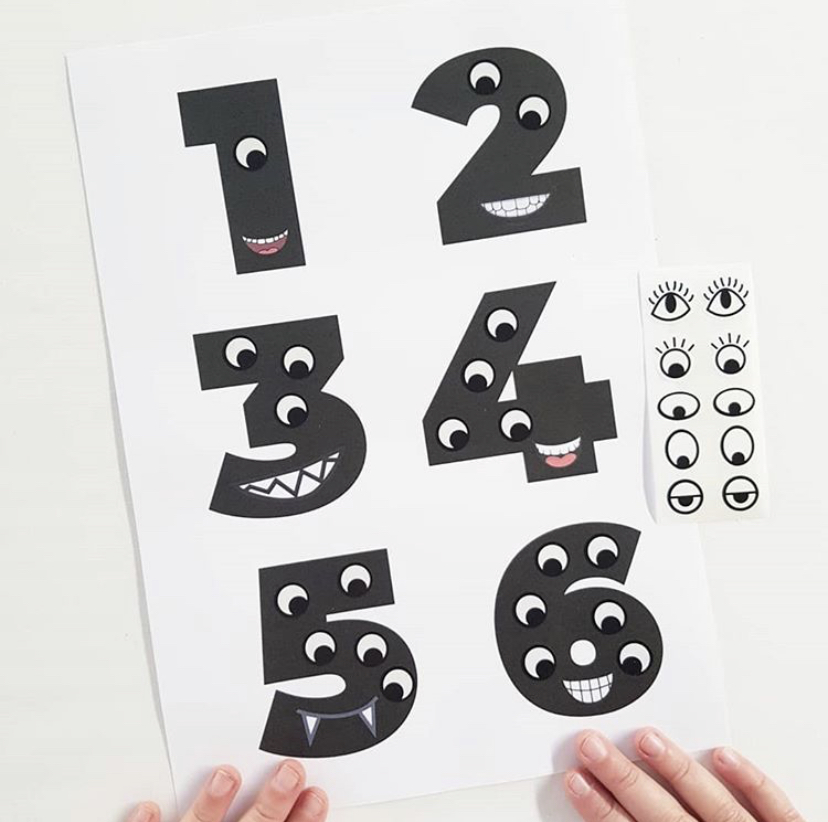
I first posted this super easy activity a couple of months back as a fun way for kids to practice their early number skills. The idea is to simply match the corresponding number of sticker or googly eyes to each number. This activity is perfect for practicing number recognition, number order, 1:1 correspondence and subitising skills.
Once you match the stickers to the numbers, it kind of makes the numbers look like monsters! So come October, this activity will be a super fun Halloween game too.
I have used stickers in the above pictures to label each number, but you can also use googly eyes! You can even use the googly eyes like counters, rather than gluing them down, so that you can play over and over again.
Advertisements
This is what you will need:
Copy of the FREE printable file
Stickers or googly eyes
White school glue (optional)
Advertisements
This is what you will need to do:
1. Print the free downloadable file.
2. You can now play any way that you like! You can use googly eyes to decorate your numbers, either gluing them down, or if you would like to use your print out over and over, simply use the googly eyes like counters. That way you can move them into place, and then clear them away.
!WARNING: Remember that googly eyes are a choking hazard. Always closely supervise your children and never give googly eyes to mouthing babies to play with!
3. I used some fun sticker eyes that we had at home to label the pictures that I posted over on Instagram. If you don’t have these stickers, you could try drawing some eyes with chalk or a white gel pen.
And that’s it! A really fun and super easy activity to play with your children or students this Halloween.
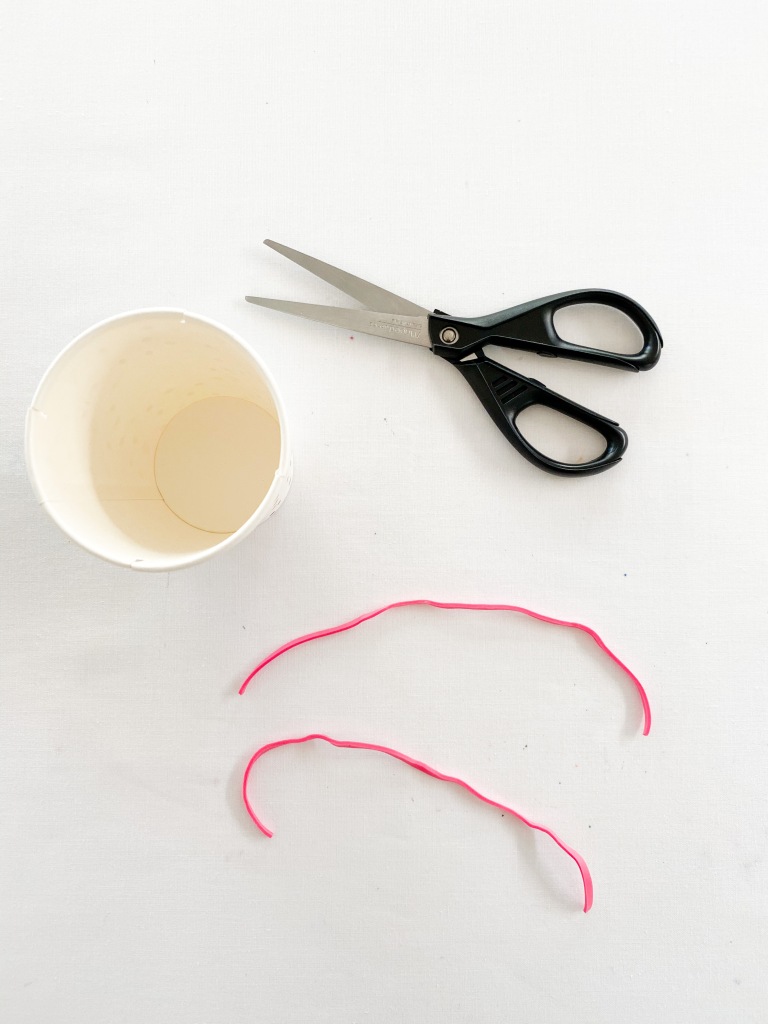
Here is a super easy science craft for kids. These rocket launches are actually amazing! And, all you will need to make one is two paper cups, two elastic bands and a pair of scissors. Then if you like, you can add some extra construction paper decorations to turn one of the cups into a rocket, but this is not essential. The launch will work with plain, undecorated cups too.
This craft is perfect for kids of all ages. Preschoolers will be amazed playing around with these, while older children can use them to help explain important physics principles such as force, mass and acceleration.
This is what you will need:
2 paper cups
2 elastic bands
Scissors
If you would like to make a rocket, you will also need:
Colored construction paper
Tissue paper
Tape
(You can see that I also put some aluminum foil in the picture. We didn’t use this in the end – it was really hard to wrap around the cup securely. By all means use it if you would like though!)
This is what you will need to do:
Make 4 snips in the cup. Then, snip each elastic band once to form a long piece of elastic.
2. Attach the two elastic bands to the cup. The trick here is to not pull the elastics too tight. You want to retain the original shape of the cup, or as close to it as possible.
Advertisements
3. Tie each end of the elastic band to secure. Trim any excess elastic.
4. You can now launch your paper cup! To do this, place your unaltered cup upside down on a flat surface. Then gently press the elastic bands on your second cup down on top. Let go and watch the cup fly.
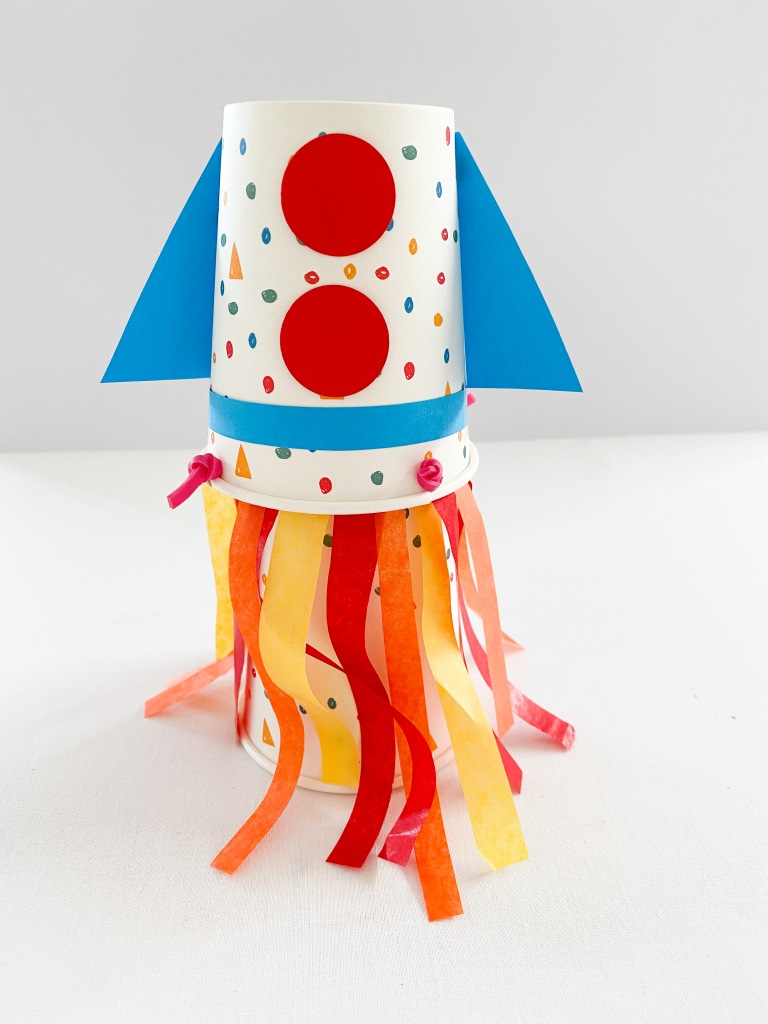
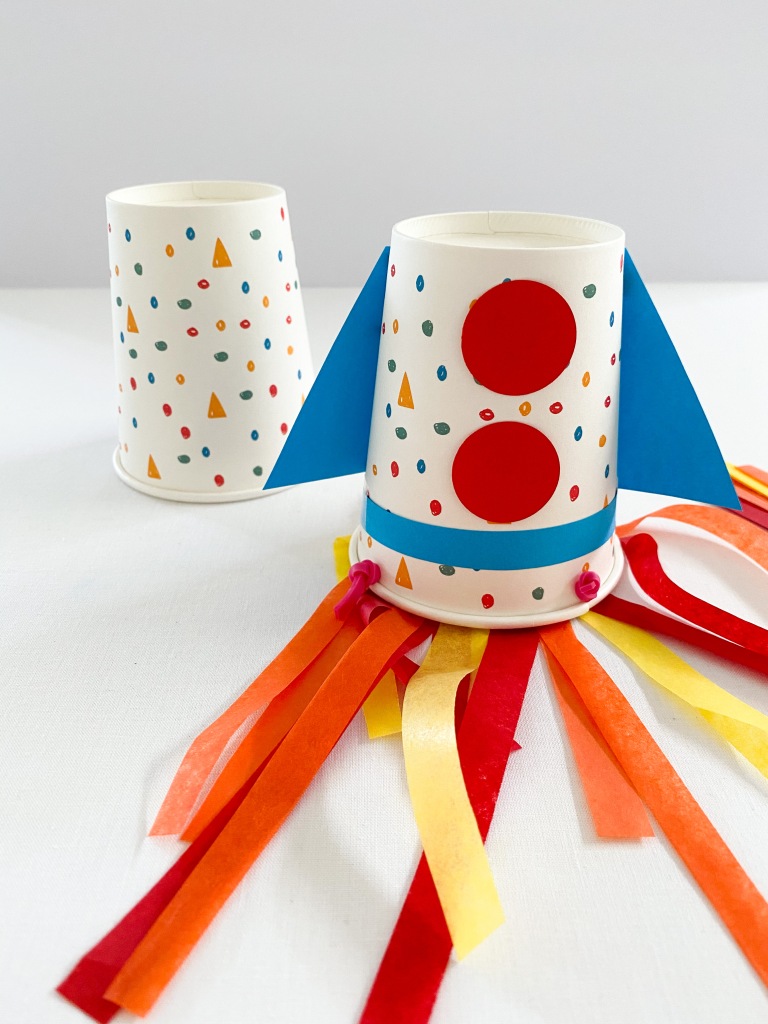
5. If you would like to turn you cup into a rocket, tape some strips of colored tissue paper to the inside of the cup.
6. Then cut some pieces of colored construction paper to decorate the body of the rocket. I added two windows and some fins. But you can decorate your rocket any way that you like. You might like to add your name or even a nose cone! Just be careful not to make it too heavy. Heavy cups won’t launch very high!
7. Once you have decorated your rocket. Press it onto the launch cup, let it go and watch it fly!
I hope you have making your own rocket launcher. Jacinta Xx
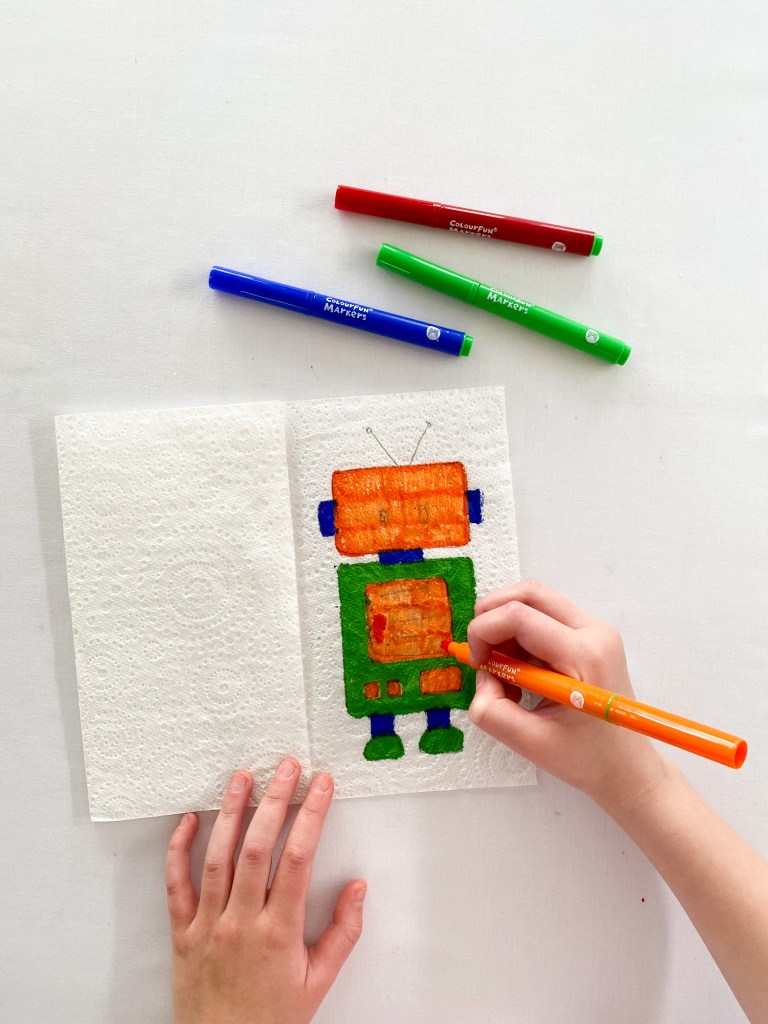
I love this super easy chromatography experiment for kids! It kind of reminds me of the actual chromatography techniques I used in the lab as a student. Most importantly though, this experiment is fun! It is so magical watching the colors appear.
Paper chromatography is a scientific technique that is used to separate and identify individual components within mixtures. It can be used to identify proteins and even genes in a mixture of liquids. In this activity, we simply use chromatography to make the colors magically appear on our robots.
Advertisements
This is what you will need:
Paper towel
Washable marker pens (the pens must be washable for this experiment to work).
Black permanent marker
Shallow plate or dish
Water
Advertisements
This is what you will need to do:
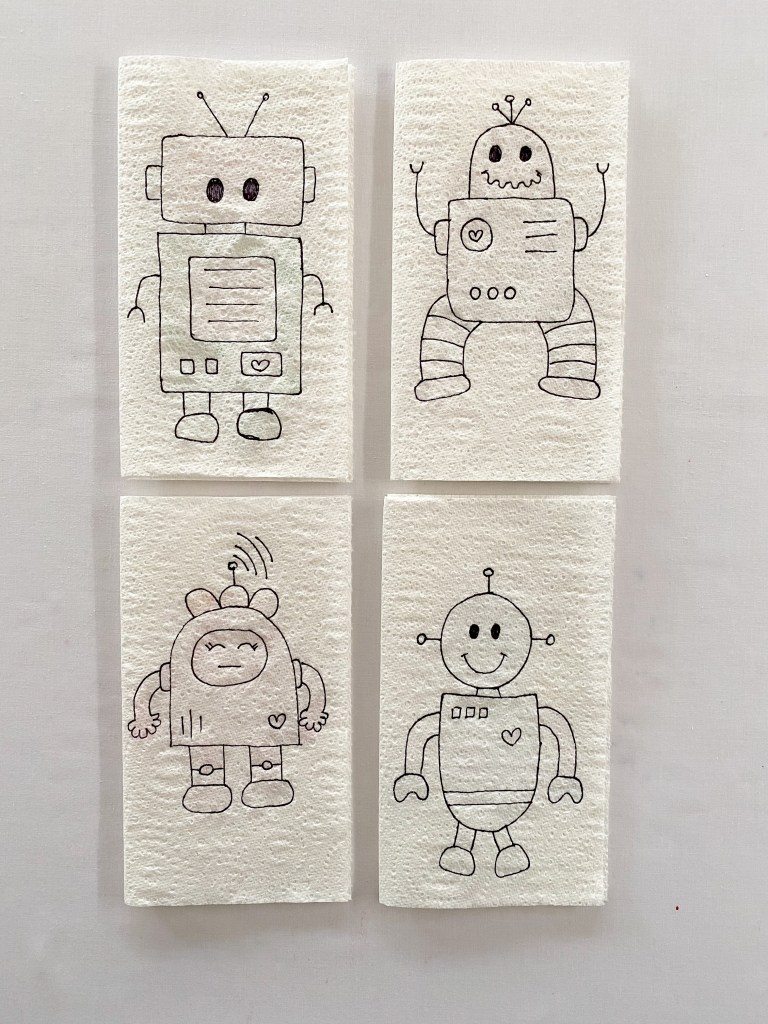
1. Tear the paper towel into individual sheets and fold each piece in half. Open the paper towel and draw on the right hand side of the fold with the washable markers. You can draw anything that you like. We drew robots for this experiment. And if you prefer, you can lightly draw your pictures with pencil first and then color with markers.
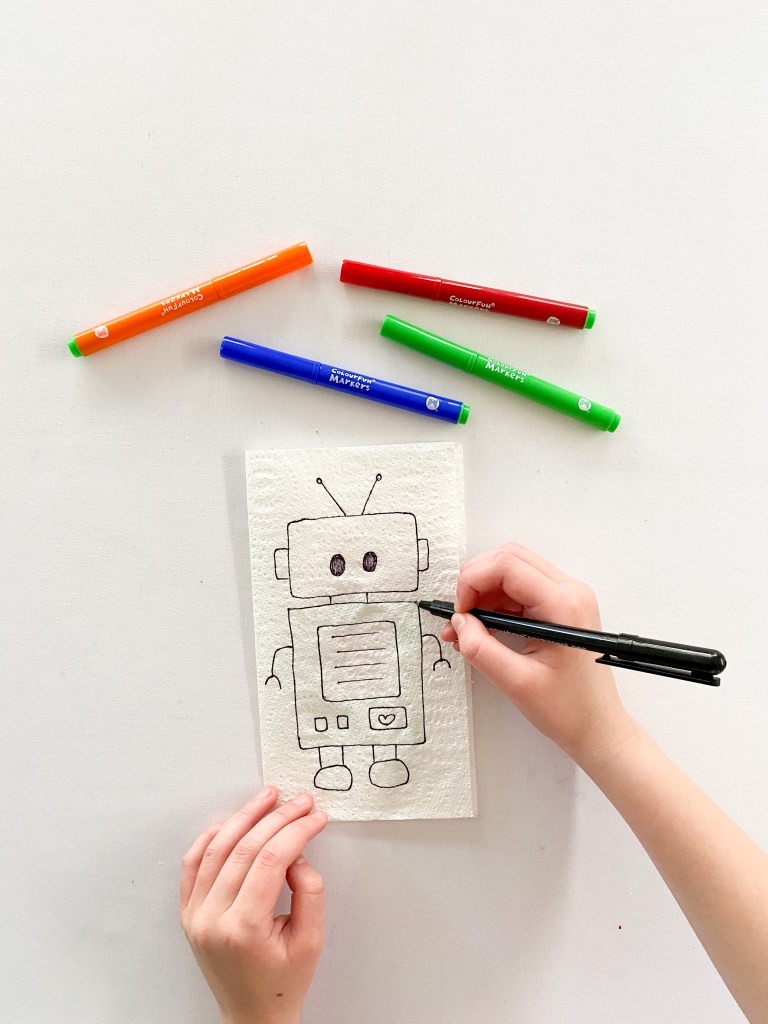
2. Fold the paper towel back over and trace around your drawings with black permanent marker. Add as much detail as you like.
Here is a picture of the four robots that we drew.
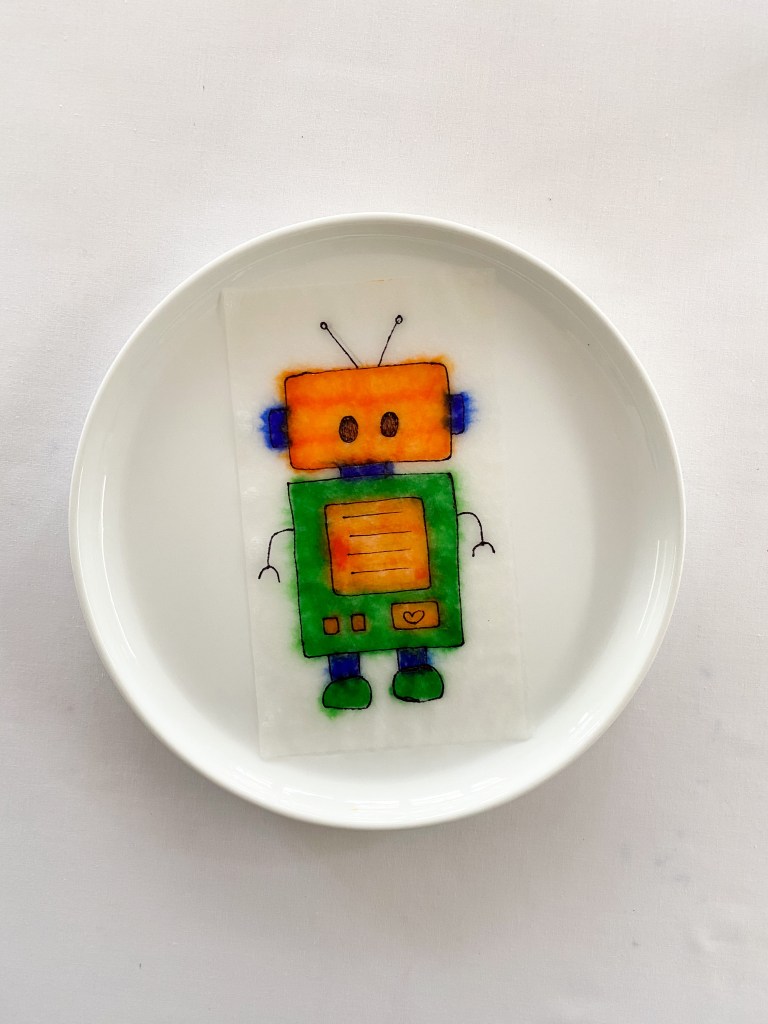
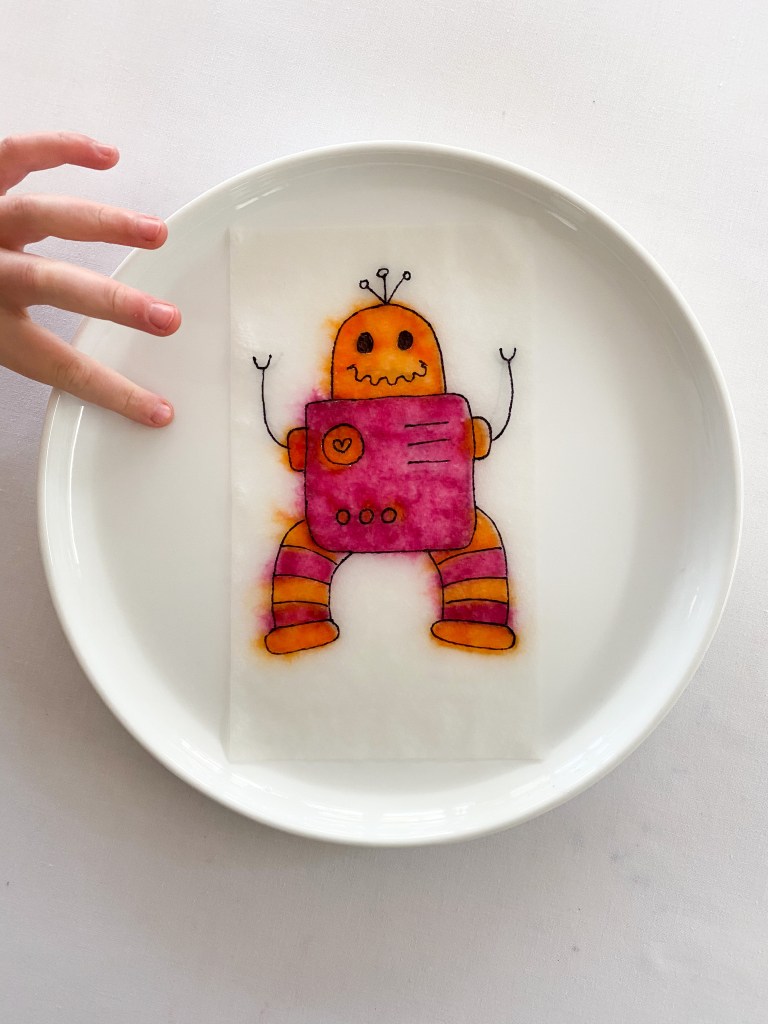
3. Pour a small amount of water into the bottom of a dish or container.
4. Gently drop your paper towel directly into the water. The colors that you have drawn will magically appear.
The most important part of this experiment is that you use washable markers. The experiment doesn’t work as well, if at all, if you use permanent, non washable markers for your coloring.
Here is a super fun robot memory match game for you! Thanks so much for reading! Jacinta Xx Enjoy
I posted this activity over on my Instagram a couple of weeks back and wow was it popular! The girls and I had been home and were bored, so we searched through Pinterest for a fun art activity to try together. We stumbled across a similar activity and instantly knew that it would be fun!
Here is how we put our own little spin on this fun art activity.
Advertisements
This is what you will need:
White A4 paper
Cardstock
Black marker pen
Coloured markers, pencils or crayons
Scissors
Balloon
Advertisements
This is what you will need to do:
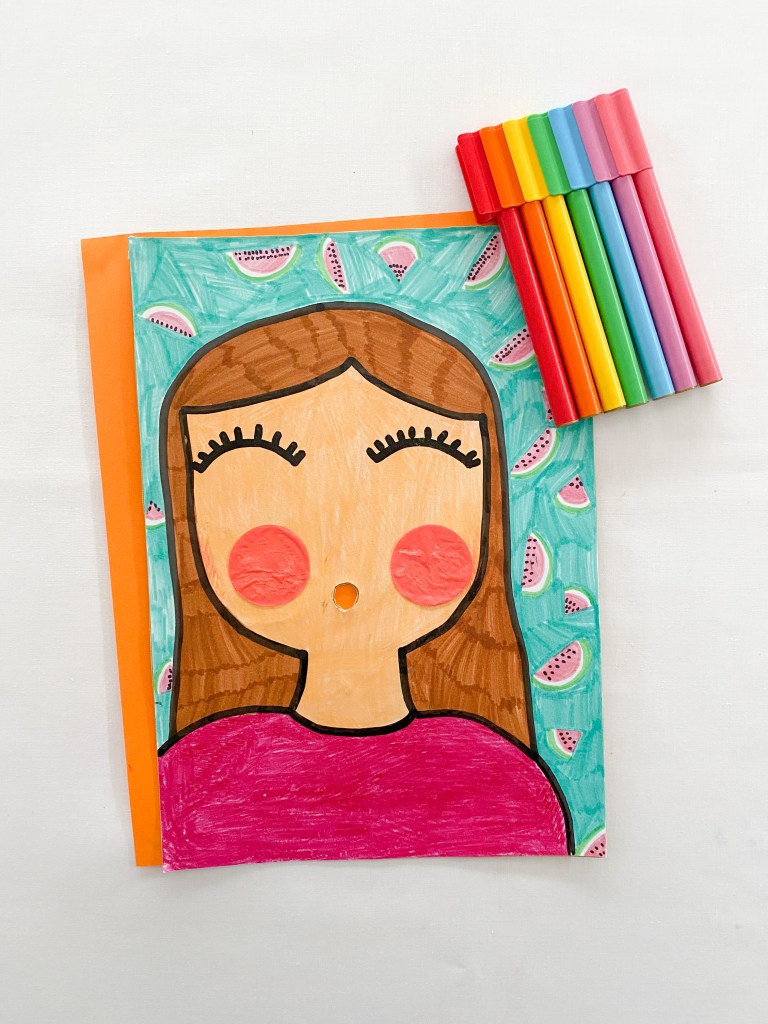
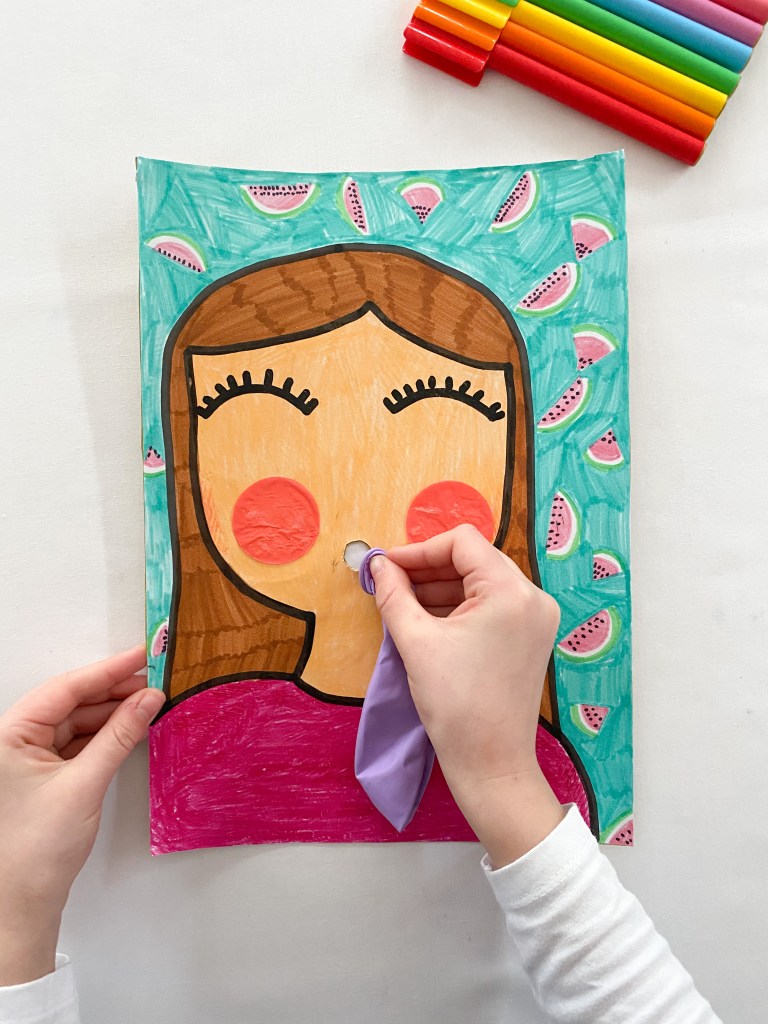
1. Draw a face with black marker pen onto a piece of white paper.
2. Color the picture.
3. Add a pattern to the background and lots more color. We pasted some confetti onto the cheeks!
4. At this point, paste your picture down onto some card. You don’t have to do this, but the paper on its own might be a little flimsy to hold when you are blowing your balloon.
5. Use your scissors to make a small hole where the mouth would be. Remember that scissors are sharp. Always be careful when using scissors and closely supervise children using scissors.
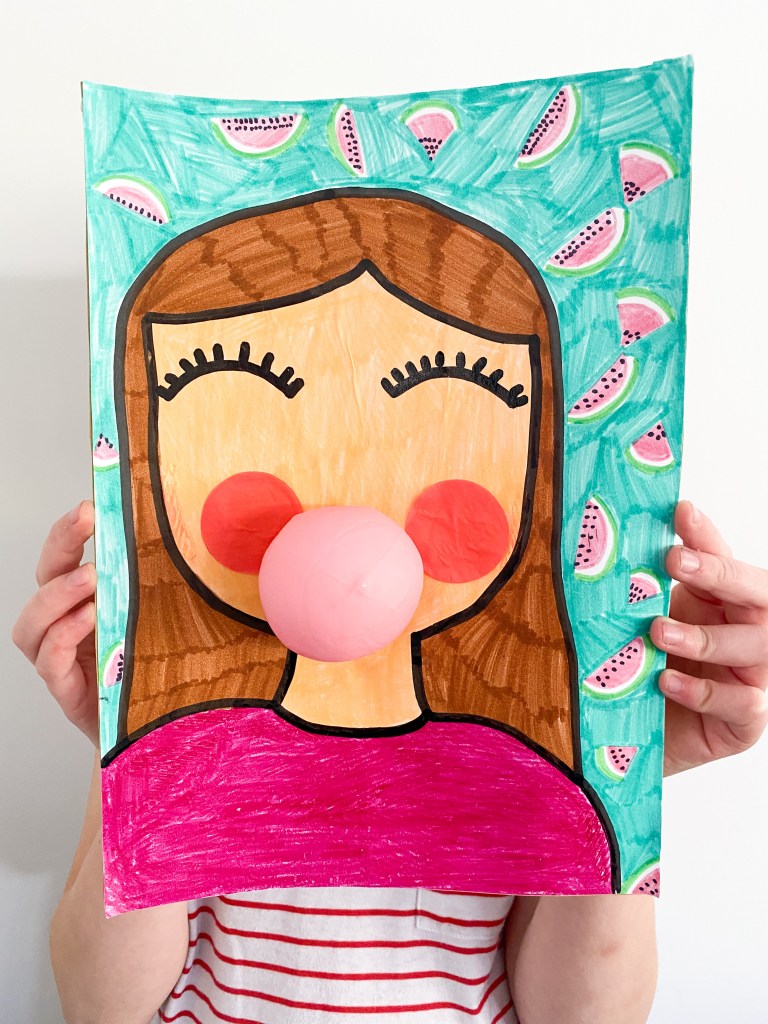
5. Gently press the balloon through the hole.
6. Blow the balloon up!
Thanks so much for reading! If you have any comment or questions, pop them below and I will get back to you. Jacinta Xx
Advertisements
If you would like to make a girl balloon art, here’s a template: